Moist Mocha Layer Cake With Coffee Glaze Recipe
Experience the perfect marriage of rich dark chocolate and bold espresso in this decadent Moist Mocha Layer Cake. Topped with a glossy, sweet coffee glaze, this dessert is a dream come true for coffee lovers and chocoholics alike.
25 minutes
35 minutes
1 hour 15 minutes (plus cooling)
12 servings
Dessert
Baking
American
Vegetarian
There is something undeniably magical about the combination of chocolate and coffee. It is a pairing that has stood the test of time, a culinary duet where each element elevates the other to new heights. When you take a bite of this Moist Mocha Layer Cake, you aren’t just tasting chocolate cake with a hint of coffee; you are experiencing a symphony of flavors designed to tantalize the palate. The deep, earthy notes of the cocoa are awakened by the sharp, roasted intensity of the coffee, creating a flavor profile that is complex, sophisticated, and utterly addictive. This isn’t just a cake; it’s an event. It’s the kind of dessert that demands to be eaten slowly, savoring every crumb.
Imagine a crumb that is incredibly tender, almost melting in your mouth, yet sturdy enough to hold up to layers of luscious filling or a heavy pour of glaze. The texture is paramount here. Too often, chocolate cakes can lean towards being dry or crumbly, but this recipe utilizes specific ingredients like buttermilk and oil to ensure a moistness that lasts for days. The coffee glaze is the crowning jewel, a simple yet elegant finish that adds a sugary crunch and an extra kick of caffeine. Whether you are celebrating a birthday, hosting a dinner party, or simply treating yourself after a long week, this cake promises to be the highlight of the table. It is a testament to the fact that homemade baking, with all its love and effort, will always triumph over store-bought alternatives. Prepare your kitchen, brew your strongest coffee, and get ready to bake a masterpiece.
History & Origins
The term ‘Mocha’ itself is steeped in history, deriving its name from the port city of Mocha (al-Mukha) in Yemen. For centuries, this port was the primary marketplace for coffee, particularly the Coffea arabica variety grown in the mountain regions of Yemen. The beans exported from Mocha were known for their distinct, chocolatey undertones, a natural flavor profile that eventually led to the culinary practice of combining coffee and chocolate. While the drink we know today as a ‘caffe mocha’—espresso, hot milk, and chocolate—became popular in American coffee culture in the 20th century, the flavor pairing has roots that go back much further in European baking traditions.
Chocolate cakes themselves have evolved significantly over the last two centuries. In the early 19th century, chocolate was primarily consumed as a beverage. It wasn’t until the extraction of cocoa butter and the production of cocoa powder that chocolate cake as we know it became possible. By the mid-20th century, the ‘Devil’s Food’ style of cake became popular, characterized by its dark color and moist texture. Bakers began adding hot coffee to the batter not necessarily to make it taste like coffee, but to bloom the cocoa powder and intensify the chocolate flavor. This recipe pays homage to that tradition but takes it a step further by bringing the coffee flavor to the forefront, celebrating the historic link between the Yemeni port and the world’s love affair with chocolate.
Why This Recipe Works
This recipe succeeds where others fail primarily due to the science of ‘blooming’ the cocoa and the balance of fats. Many chocolate cake recipes call for creaming butter and sugar, which is great for structure but can sometimes lead to a drier crumb if overbaked. In this recipe, we use a combination of oil and buttermilk. Oil remains liquid at room temperature, which translates to a sensation of moistness on the palate that butter simply cannot replicate. Buttermilk brings acidity, which tenderizes the gluten in the flour and reacts with the baking soda to create a superb lift, ensuring the cake is fluffy rather than dense.
Furthermore, the addition of boiling hot coffee is crucial. When hot liquid is poured over cocoa powder, it dissolves the cocoa butter and releases flavor compounds that remain dormant in cold liquid. This process, known as blooming, ensures a profound depth of chocolate flavor. The coffee doesn’t just add a mocha taste; it acts as a flavor enhancer for the chocolate, making it taste ‘more’ like chocolate. The glaze provides a textural contrast—a slightly crisp, sugary shell that yields to the soft cake underneath—while reinforcing the coffee profile without the bitterness that can sometimes accompany espresso desserts.
Why You’ll Love This Recipe
- ✓Incredibly moist texture that stays fresh for days.
- ✓Deep, intense chocolate flavor amplified by hot coffee.
- ✓Simple, no-mixer-required batter preparation.
- ✓Versatile coffee glaze that can be adjusted for thickness.
- ✓Perfect balance of sweetness and roasted coffee bitterness.
Equipment You’ll Need
- ✓Two 8-inch or 9-inch round cake pans
- ✓Large mixing bowl
- ✓Medium mixing bowl
- ✓Whisk
- ✓Rubber spatula
- ✓Measuring cups and spoons
- ✓Wire cooling rack
- ✓Parchment paper
Ingredients
- ✓2 cups all-purpose flour
- ✓2 cups granulated sugar
- ✓3/4 cup unsweetened cocoa powder (Dutch-processed preferred)
- ✓2 teaspoons baking powder
- ✓1 1/2 teaspoons baking soda
- ✓1 teaspoon salt
- ✓1 cup buttermilk, room temperature
- ✓1/2 cup vegetable oil or canola oil
- ✓2 large eggs, room temperature
- ✓2 teaspoons pure vanilla extract
- ✓1 cup freshly brewed strong hot coffee
- ✓2 cups powdered sugar (for glaze)
- ✓3-4 tablespoons strong brewed coffee or espresso, cooled (for glaze)
- ✓1 teaspoon vanilla extract (for glaze)
Instructions
- Preheat your oven to 350°F (175°C). Grease two 9-inch round cake pans with butter or cooking spray and line the bottoms with parchment paper. Dust the sides with a little cocoa powder or flour.
- In a large mixing bowl, whisk together the flour, sugar, cocoa powder, baking powder, baking soda, and salt until well combined and no lumps remain.
- In a separate medium bowl, whisk together the buttermilk, vegetable oil, eggs, and vanilla extract until the mixture is smooth and uniform.
- Pour the wet ingredients into the dry ingredients. Using a whisk or electric mixer on low speed, mix until just combined. Do not overmix.
- Slowly pour in the hot coffee while whisking gently. The batter will be very thin and liquid; this is completely normal and essential for a moist cake.
- Divide the batter evenly between the prepared cake pans. Tap the pans gently on the counter to release any large air bubbles.
- Bake in the preheated oven for 30 to 35 minutes, or until a wooden toothpick inserted into the center comes out clean or with just a few moist crumbs attached.
- Remove the cakes from the oven and let them cool in the pans for about 10-15 minutes. Then, run a knife around the edges and invert them onto a wire rack to cool completely before glazing.
- To make the glaze: In a medium bowl, whisk the powdered sugar, 3 tablespoons of cooled coffee, and vanilla extract. If the glaze is too thick, add more coffee one teaspoon at a time until it reaches a pourable consistency.
- Once the cakes are completely cool, place one layer on a serving plate. Drizzle with a little glaze (or use a frosting of choice). Place the second layer on top.
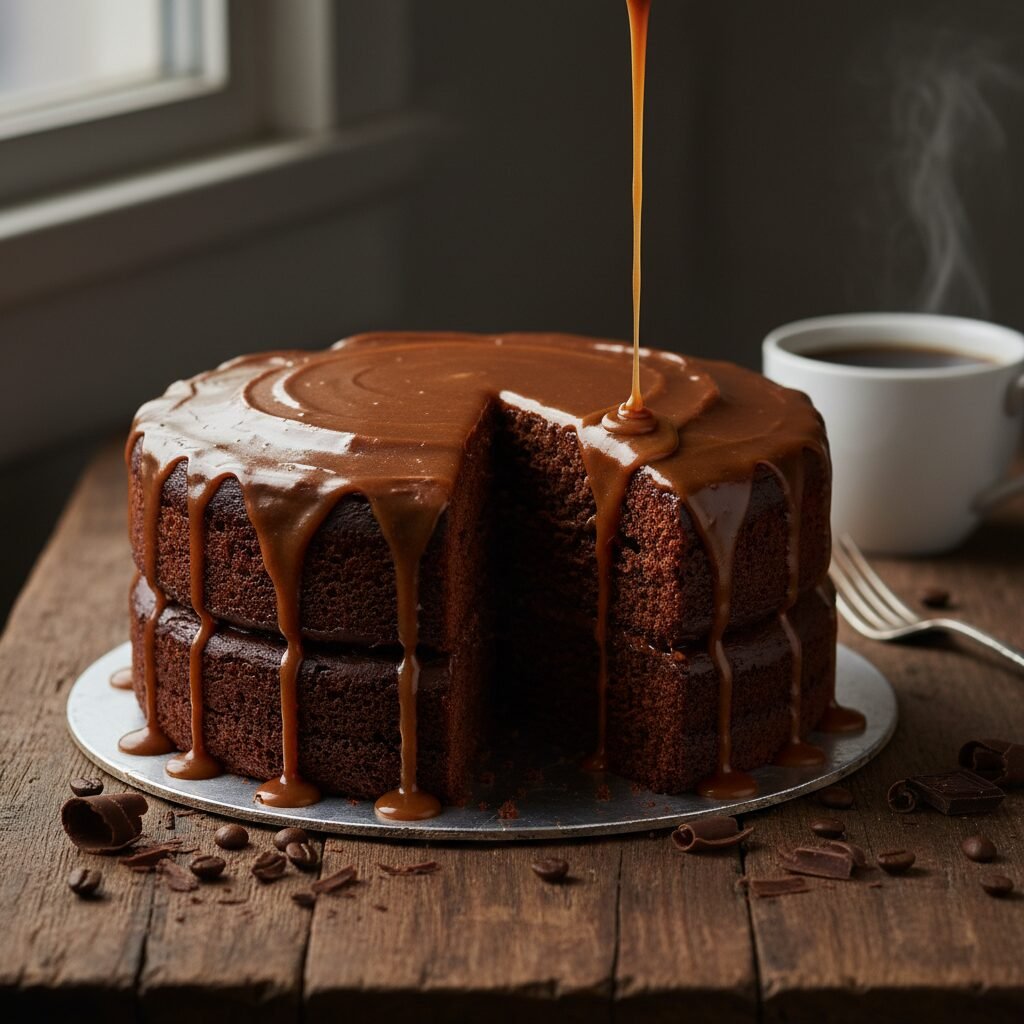
- Pour the remaining coffee glaze over the top of the cake, allowing it to drip dramatically down the sides. Let the glaze set for 15 minutes before slicing.
Expert Cooking Tips
- ✓Use room temperature ingredients (eggs, buttermilk) to ensure the batter emulsifies properly.
- ✓Do not skip the boiling water/coffee step; it blooms the cocoa powder for maximum flavor.
- ✓If you don’t have buttermilk, make a substitute by adding 1 tablespoon of vinegar or lemon juice to 1 cup of milk and letting it sit for 5 minutes.
- ✓Weigh your flour using a kitchen scale for the most accurate results; too much flour causes dry cake.
- ✓Use high-quality cocoa powder; Dutch-processed offers a smoother, darker flavor.
- ✓Don’t open the oven door too early, as the rush of cold air can cause the cakes to sink in the middle.
Substitutions and Variations
This recipe is quite resilient, but substitutions should be made with care to maintain the texture. For the flour, you can use a 1:1 gluten-free baking flour blend if you are catering to gluten sensitivities, though the texture may be slightly denser. If you are out of buttermilk, a mixture of plain yogurt and milk (50/50 ratio) or sour cream thinned with milk works wonderfully to provide the necessary acidity. Vegetable oil can be replaced with melted coconut oil or melted butter, though butter will result in a slightly drier texture once the cake cools. For the coffee, if you want to avoid caffeine entirely, decaf coffee works perfectly without altering the flavor profile. Alternatively, if you dislike the taste of coffee, you can use hot water, transforming this into a classic chocolate cake, though you lose the ‘mocha’ element. For the sweetener, granulated white sugar is best for structure, but you could substitute half of it with light brown sugar for a deeper, molasses-like flavor.
Common Mistakes to Avoid
The most common mistake with this cake is overbaking. Because the batter is dark, it is hard to see visual cues of browning. Rely on the toothpick test and start checking 5 minutes before the timer goes off. Another frequent error is overmixing the batter after adding the flour. Once the wet and dry ingredients interact, gluten begins to form. Excessive mixing leads to a tough, rubbery cake rather than a tender one. Also, attempting to glaze or frost the cake while it is still warm is a recipe for disaster; the glaze will simply melt and slide off, soaking into the cake and making it soggy rather than creating a nice shell. Finally, using cold coffee for the batter instead of hot coffee will result in a less intense chocolate flavor and potentially a gritty texture from undissolved cocoa.
Serving Suggestions
This Moist Mocha Layer Cake is a showstopper on its own, but it pairs beautifully with various accompaniments. Serve a slice with a dollop of lightly sweetened whipped cream to cut through the richness of the chocolate. A scoop of vanilla bean or coffee ice cream provides a delightful temperature contrast. For a more elegant presentation, garnish the top of the glazed cake with chocolate-covered espresso beans, chocolate shavings, or a dusting of cocoa powder. Fresh berries, particularly raspberries or strawberries, add a pop of color and a tart freshness that balances the deep mocha flavors. It is best served at room temperature to ensure the crumb remains soft and the flavors are fully pronounced.
Storage and Reheating Tips
Because this cake is oil-based, it stays moist for a surprisingly long time. Store the cake in an airtight container or under a cake dome at room temperature for up to 3 days. If you live in a particularly hot or humid climate, you may want to store it in the refrigerator to prevent the glaze from becoming too sticky, but be sure to bring it back to room temperature before serving for the best texture. For longer storage, you can freeze the cake layers (un-glazed) wrapped tightly in plastic wrap and then foil for up to 3 months. Thaw overnight in the refrigerator and glaze before serving. Even fully assembled slices can be frozen if wrapped individually, making for a quick treat later on.
Nutrition Facts (Estimated)
| Serving Size | 1 Slice |
| Calories | 480 |
| Fat | 24g |
| Saturated Fat | 6g |
| Unsaturated Fat | 16g |
| Trans Fat | 0g |
| Cholesterol | 45mg |
| Sodium | 310mg |
| Carbohydrates | 62g |
| Fiber | 3g |
| Sugar | 35g |
| Protein | 6g |
Frequently Asked Questions
Can I make this cake ahead of time?
Absolutely. In fact, the flavors often meld and deepen the day after baking. You can bake the layers one day, wrap them tightly once cool, and glaze them the next day before serving.
Why is the batter so runny?
The batter is intentionally thin due to the high ratio of liquid (coffee, buttermilk, oil). This hydration is what evaporates and steams during baking to create an ultra-moist and tender crumb. Do not add more flour to thicken it.
Can I use instant coffee?
Yes, you can. Dissolve 2-3 teaspoons of high-quality instant coffee granules in 1 cup of boiling water to replace the brewed coffee in the batter. Adjust the strength according to your preference.
Do I have to use a Bundt pan or layer pans?
This recipe is versatile. While written for two 9-inch round pans, it can be baked in a 9×13 sheet pan (adjust baking time to approx 35-40 mins) or a Bundt pan (bake for 45-55 mins). Always check for doneness with a toothpick.
Is the coffee flavor very strong?
The coffee flavor is distinct but not overpowering. It primarily serves to enhance the chocolate. If you want a very strong coffee kick, increase the espresso in the glaze or add a teaspoon of espresso powder to the dry ingredients.
Why do I need vinegar if I don’t have buttermilk?
The acid in buttermilk (or the vinegar substitute) reacts with the baking soda. This chemical reaction creates carbon dioxide bubbles, which leaven the cake and make it rise. Without acid, the baking soda won’t activate properly, leading to a dense cake.
Can I use butter instead of oil?
You can, but the texture will change. Butter provides flavor but creates a crumb that is firmer when cool. Oil ensures the cake remains soft and moist even straight from the fridge. A 50/50 mix is a good compromise.
My cake sank in the middle, why?
This usually happens if the oven door was opened too early, if the oven wasn’t hot enough, or if there was too much leavening (baking powder/soda). Ensure your oven is fully preheated and try not to peek until the end of the baking time.
Conclusion
In the world of baking, few things are as satisfying as pulling a perfect chocolate cake out of the oven. This Moist Mocha Layer Cake with Coffee Glaze delivers on every promise—it is rich, tender, aromatic, and deeply satisfying. Whether you are a novice baker or a seasoned pro, the simplicity of the method combined with the complexity of the results makes this a recipe you will return to time and again. So, pour yourself a cup of coffee, slice a generous piece of cake, and enjoy the simple pleasure of a homemade dessert done right. Happy baking!