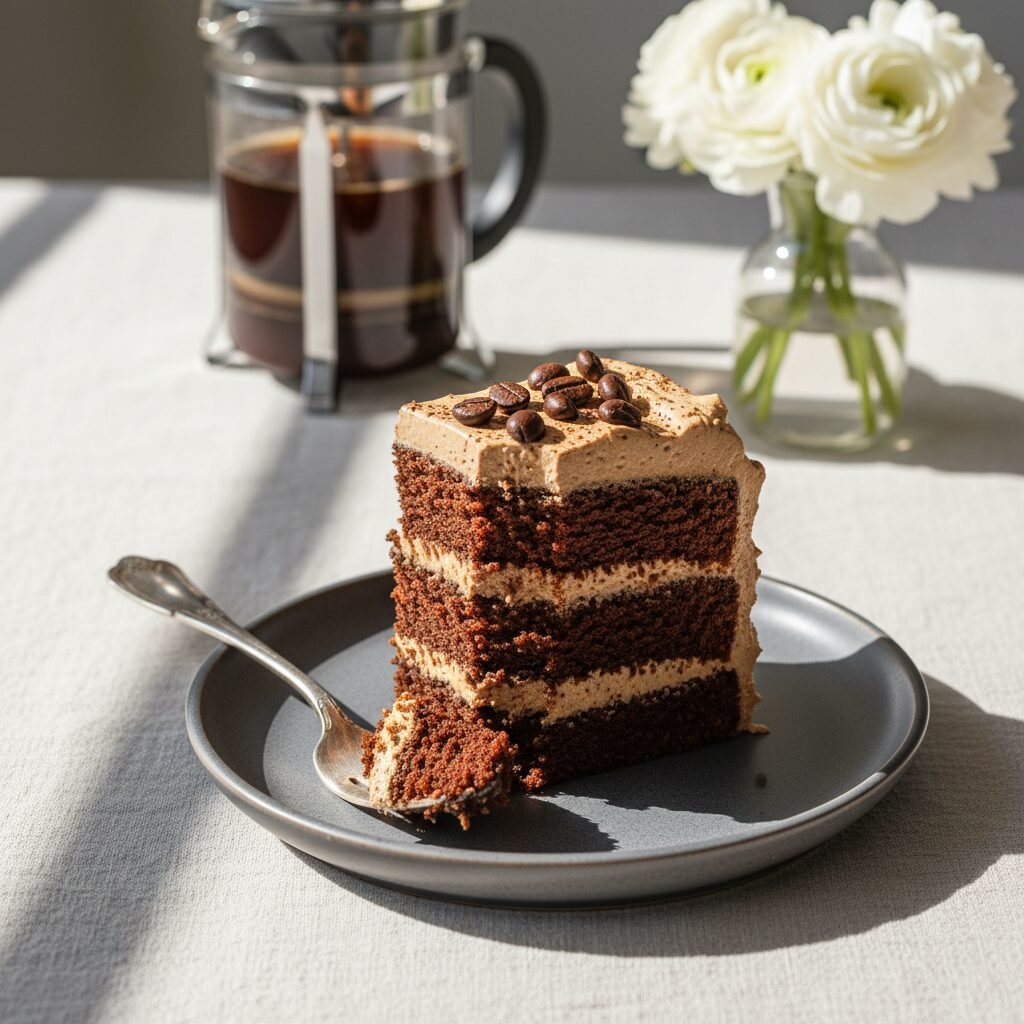
Moist Mocha Layer Cake For Brunch Recipe
Wake up to the irresistible aroma of espresso and chocolate with this incredibly moist Mocha Layer Cake. Perfectly balanced between bold coffee notes and rich cocoa, it is the ultimate showstopping centerpiece for your next weekend brunch.
30 minutes
35 minutes
1 hour 30 minutes
12-14 servings
Dessert
Baking
American
Vegetarian
There is something undeniably magical about the marriage of coffee and chocolate. It is a flavor combination that feels sophisticated yet comforting, making it the absolute perfect candidate for a high-end weekend brunch. While pancakes and waffles have their place, this Moist Mocha Layer Cake elevates the mid-morning meal into a celebration. Imagine slicing into three towering layers of dark, velvety cake, each crumb infused with the robust warmth of freshly brewed strong coffee and the deep, earthy tones of premium cocoa. This isn’t just a dessert; it’s a sensory experience designed to complement that second cup of coffee on a lazy Sunday.
The secret to this cake’s allure lies in its texture. Unlike dry, crumbly sponges that require a gallon of milk to wash down, this recipe yields a crumb that is exceptionally tender, dense enough to hold its shape, yet light enough to melt on the tongue. The mocha buttercream frosting is whipped to an ethereal consistency, offering a creamy counterpoint to the rich sponge. We’ve designed this recipe specifically for brunch because it bridges the gap between a morning pastry and a decadent dessert. It possesses the caffeine kick we crave in the AM hours, softened by the sweetness of chocolate. Whether you are hosting a bridal shower, a birthday brunch, or simply treating your family, this cake promises to be the topic of conversation long after the last crumb has been devoured.
History & Origins
The term ‘Mocha’ is ubiquitous in coffee shops and bakeries today, often serving as shorthand for anything combining chocolate and coffee. However, its origins are deeply rooted in the history of the coffee trade itself. The name derives from the port city of Al Mokha (Mocha) in Yemen, which was the primary marketplace for the world’s coffee trade from the 15th to the early 18th century. The Arabica beans exported from this specific region were renowned for their distinctively earthy, chocolate-like undertones. Even before chocolate was added as an ingredient, ‘Mocha coffee’ implied a flavor profile that hinted at cocoa.
As coffee culture spread to Europe, particularly Italy, the concept of mixing actual chocolate with coffee began to take shape. In 18th-century Turin, a drink called ‘Bicerin’—layered espresso, drinking chocolate, and milk—became fashionable. This paved the way for the modern ‘Caffè Mocha’ found in American coffee houses. In the realm of baking, the Devil’s Food Cake of the early 20th century often utilized boiling water to bloom cocoa powder. Clever bakers soon realized that swapping boiling water for boiling coffee intensified the chocolate flavor without making the cake taste overwhelmingly like a latte. This evolution birthed the modern Mocha Cake. Over the decades, it has transitioned from a humble tea-time snack to a decadent, multi-layered spectacle, becoming a staple in American brunch culture where indulgence is the order of the day.
Why This Recipe Works
This recipe succeeds where others fail due to three specific scientific principles: the blooming of cocoa, the fat selection, and the acidity balance. First and foremost, the instruction to use hot, strong coffee is not arbitrary. When hot liquid is poured over cocoa powder, it ‘blooms’ the cocoa, dissolving the hard exterior of the cocoa particles and releasing the full depth of flavor that cold mixing simply cannot achieve. The coffee intensifies the chocolate notes, making them taste more like chocolate than the chocolate itself, while adding a subtle roasted background note.
Secondly, we utilize oil instead of butter for the cake batter. While butter offers flavor, it is about 80% fat and 20% water, and it solidifies at room temperature. Vegetable oil is 100% fat and remains liquid at room temperature. This ensures that the cake remains incredibly moist and tender for days, rather than drying out as it cools. We save the butter for the frosting, where its flavor and structure are essential.
Finally, the inclusion of buttermilk provides necessary acidity. This acid reacts with the baking soda to create carbon dioxide bubbles, giving the cake a magnificent rise and a light, airy structure despite its richness. The buttermilk also works to tenderize the gluten strands in the flour, preventing the cake from becoming tough or chewy. The result is a foolproof balance of moisture, fluffiness, and deep, resonant flavor.
Why You’ll Love This Recipe
- ✓Intense chocolate flavor amplified by hot brewed coffee.
- ✓Stays moist for days thanks to the oil-based batter.
- ✓Silky, whipped espresso buttercream frosting.
- ✓Perfect balance of sweetness and bitterness for brunch.
- ✓Impressive three-layer presentation.
- ✓Can be made ahead of time for stress-free hosting.
Equipment You’ll Need
- ✓Three 8-inch round cake pans
- ✓Stand mixer with paddle attachment or electric hand mixer
- ✓Large mixing bowls
- ✓Wire cooling rack
- ✓Parchment paper
- ✓Offset spatula
- ✓Cake turntable (optional but recommended)
- ✓Measuring cups and spoons
- ✓Kitchen scale
Ingredients
- ✓2 1/2 cups All-purpose flour
- ✓2 1/2 cups Granulated sugar
- ✓1 cup Unsweetened cocoa powder (high quality)
- ✓2 1/2 tsp Baking soda
- ✓1 tsp Baking powder
- ✓1 tsp Fine sea salt
- ✓3 large Eggs, room temperature
- ✓1 1/2 cups Buttermilk, room temperature
- ✓3/4 cup Vegetable oil or Canola oil
- ✓1 tbsp Pure vanilla extract
- ✓1 1/2 cups Strong hot brewed coffee
- ✓1 1/2 cups Unsalted butter, softened (for frosting)
- ✓4-5 cups Powdered sugar (for frosting)
- ✓1/2 cup Unsweetened cocoa powder (for frosting)
- ✓2 tsp Instant espresso powder (dissolved in 1 tbsp hot water)
- ✓1/4 cup Heavy cream
- ✓Chocolate covered espresso beans (for garnish)
Instructions
- Preheat your oven to 350°F (175°C). Grease three 8-inch round cake pans with butter or cooking spray and line the bottoms with parchment paper rounds. Dust the sides with a little cocoa powder or flour.
- In the bowl of a stand mixer or a large mixing bowl, sift together the flour, sugar, 1 cup cocoa powder, baking soda, baking powder, and salt. Whisk by hand briefly to ensure the dry ingredients are evenly combined.
- In a separate medium bowl, whisk together the eggs, buttermilk, vegetable oil, and vanilla extract until fully combined and smooth.
- With the mixer on low speed, slowly pour the wet ingredient mixture into the dry ingredients. Mix until just combined, scraping down the sides of the bowl as needed. Do not overmix at this stage.
- With the mixer running on the lowest speed, carefully pour in the hot coffee in a slow, steady stream. The batter will become very thin and liquidy—this is completely normal and essential for the moisture of the cake. Mix only until combined.
- Divide the batter evenly among the three prepared cake pans. Using a kitchen scale is recommended to ensure even layers (approx 500g – 550g per pan).
- Bake for 30-35 minutes, or until a toothpick inserted into the center comes out clean or with just a few moist crumbs attached. Avoid opening the oven door before the 25-minute mark to prevent sinking.
- Remove cakes from the oven and let them cool in the pans for about 15-20 minutes. Then, run a knife around the edges and invert them onto a wire rack to cool completely before frosting.
- To make the frosting: In a stand mixer fitted with a paddle attachment, beat the softened butter on medium-high speed for about 5 minutes until it is pale and fluffy.
- Sift the powdered sugar and 1/2 cup cocoa powder. Gradually add this to the butter on low speed, one cup at a time. Once incorporated, increase speed to high and beat for 2 minutes.
- Add the dissolved espresso mixture and the heavy cream. Whip on medium-high speed for another 2-3 minutes until the frosting is silky, airy, and spreadable. If it’s too stiff, add a teaspoon more cream; if too loose, add more sugar.
- Assemble the cake: Place one layer on your serving plate or cake stand. Spread a generous layer of frosting over the top. Repeat with the second and third layers.
- Frost the outside of the cake with the remaining buttercream. Use an offset spatula to create swirls or smooth it out for a clean look. Top with chocolate-covered espresso beans or chocolate shavings.
- Slice and serve immediately, or store in the refrigerator until ready to serve.
Expert Cooking Tips
- ✓Use fresh, high-quality cocoa powder; Dutch-processed offers a darker color and mellower flavor, while natural cocoa offers more acidity.
- ✓Ensure your coffee is very hot when adding it to the batter; this heat activates the cocoa bloom.
- ✓Do not overmix the batter once the flour is added, as this creates gluten and results in a tough cake.
- ✓Room temperature ingredients (eggs, buttermilk) are crucial for a smooth, emulsified batter.
- ✓If you don’t have three pans, you can bake in batches, but keep the remaining batter at room temperature.
- ✓Chill the cake layers for 20 minutes before frosting to reduce crumbs getting into the icing (crumb coat).
- ✓Weigh your flour using a scale (approx 120g per cup) rather than scooping, which can pack the flour and dry out the cake.
Substitutions and Variations
This recipe is quite versatile if you need to make swaps. If you do not have buttermilk, you can make a quick substitute by adding 1 tablespoon of white vinegar or lemon juice to 1.5 cups of whole milk and letting it sit for 5 minutes. For the coffee, if you are sensitive to caffeine, high-quality decaf coffee works perfectly without compromising the flavor profile. If you prefer not to use coffee at all, you can use hot water, though the chocolate flavor will be less intense. For a gluten-free version, substitute the all-purpose flour with a high-quality 1:1 gluten-free baking flour blend that contains xanthan gum. The vegetable oil can be swapped for melted coconut oil or grapeseed oil, though coconut oil may impart a slight coconut flavor. In the frosting, you can use heavy coconut cream instead of dairy cream for a lactose-free option, provided you also swap the butter for a vegan block butter alternative.
Common Mistakes to Avoid
The most common mistake with this cake is over-baking. Because the batter is dark, it is hard to see visual cues of doneness. Rely on the toothpick test and start checking at 30 minutes. Another frequent error is frosting the cake while it is still slightly warm. This will cause the butter in the frosting to melt, resulting in sliding layers and a greasy mess. Always ensure layers are completely cool. Additionally, using cold ingredients for the batter often leads to curdling; take your eggs and buttermilk out of the fridge at least an hour before baking. Finally, skipping the parchment paper often leads to cakes sticking to the bottom of the pan, ruining the structural integrity of your layers.
Serving Suggestions
This Moist Mocha Layer Cake is a showstopper on its own, but for a brunch setting, presentation is key. Serve slices on crisp white plates to contrast the dark cake. A dollop of lightly sweetened vanilla bean whipped cream on the side cuts through the richness. Fresh berries, particularly raspberries or strawberries, add a pop of color and a tart freshness that complements the dark chocolate and coffee flavors beautifully. For the ultimate brunch pairing, serve this cake alongside a hot cappuccino, a cold brew, or even a glass of sparkling prosecco, which helps cleanse the palate between bites of the rich dessert.
Storage and Reheating Tips
This cake stores exceptionally well thanks to the oil in the batter. It can be kept at room temperature in an airtight cake carrier for up to 2 days. For longer storage, keep it in the refrigerator for up to 5 days; however, allow the slices to come to room temperature before eating for the best texture and flavor release. Cold chocolate cake can taste muted and waxy. You can also freeze the cake layers (unfrosted) wrapped tightly in plastic wrap for up to 3 months. Thaw them in the fridge overnight before assembling. Slices of the fully frosted cake can also be frozen individually; place them on a baking sheet to freeze solid, then wrap tightly in cling film and foil.
Nutrition Facts (Estimated)
| Serving Size | 1 slice |
| Calories | 650 |
| Fat | 34g |
| Saturated Fat | 12g |
| Unsaturated Fat | 20g |
| Trans Fat | 0g |
| Cholesterol | 85mg |
| Sodium | 320mg |
| Carbohydrates | 82g |
| Fiber | 4g |
| Sugar | 55g |
| Protein | 6g |
Frequently Asked Questions
Can I make this cake ahead of time?
Absolutely. In fact, the flavor often improves the next day as the moisture redistributes. You can bake the layers a day in advance, wrap them in plastic, and store them at room temperature, then frost on the day of serving.
Does the cake taste strongly of coffee?
The cake has a definite mocha profile, but it is primarily a chocolate cake. The coffee enhances the chocolate intensity. The frosting has a more distinct espresso flavor. If you want less coffee flavor, omit the espresso powder in the frosting.
Can I use instant coffee for the cake batter?
Yes. Dissolve about 1.5 to 2 tablespoons of instant coffee granules into 1.5 cups of boiling water to create the strong coffee needed for the batter.
Why did my cake sink in the middle?
Sinking usually happens if the oven door was opened too early, causing a temperature drop, or if the cake was under-baked. It can also occur if there was too much leavening (baking soda/powder) measured.
Can I make this as cupcakes?
Yes, this batter makes excellent cupcakes. Fill liners 2/3 full and bake for approximately 18-22 minutes at 350°F. The yield will be roughly 24-30 cupcakes.
My batter is very runny, did I do something wrong?
No, you did it perfectly! This recipe produces a very thin, liquid batter compared to standard butter cakes. This high liquid content is what guarantees the moisture after baking.
Can I use 9-inch pans instead of 8-inch?
Yes, you can use two 9-inch pans instead of three 8-inch pans. The layers will be thicker and may need about 5-10 minutes longer in the oven. Keep an eye on them.
What kind of cocoa powder is best?
For this recipe, a blend of natural and Dutch-processed works well, but regular unsweetened cocoa powder found in most grocery stores is perfectly fine. Dutch-processed will give a darker, fudgier result.
How do I get flat layers?
You can use ‘cake strips’ wrapped around the outside of the pan to insulate the edges, promoting even rising. Alternatively, use a serrated knife to level the dome off the cooled cakes before stacking.
Conclusion
In the world of brunch desserts, this Moist Mocha Layer Cake stands unrivaled. It offers the sophistication of a European café with the comforting, homemade appeal of a classic American layer cake. The deep, complex flavors of roasted coffee and dark cocoa, combined with a texture that stays impossibly moist, make it a recipe you will return to time and time again. Whether you are an experienced baker or a novice looking to impress, this cake delivers on every front. So, brew a fresh pot of coffee, gather your ingredients, and prepare to bake a masterpiece that will make your next brunch truly unforgettable. Don’t forget to pin this recipe to your favorite dessert board!