Moist Chocolate Fudge Cake With Peanut Butter Frosting Recipe
This isn’t just another cake; it is a decadent masterpiece featuring incredibly moist, dark chocolate layers wrapped in a silky, salty-sweet peanut butter buttercream. Perfect for birthdays or indulgent weekends, this recipe marries the classic combination of chocolate and peanut butter into a dessert that tastes better than any bakery offering.
30 minutes
35 minutes
1 hour 30 minutes
12-16 servings
Dessert
Baking
American
Vegetarian
There are few flavor combinations in the culinary world as iconic and universally adored as chocolate and peanut butter. It is a marriage of textures and tastes that hits every pleasure point on the palate: the deep, slightly bitter complexity of dark cocoa perfectly offset by the rich, salty-sweet creaminess of roasted peanuts. This Moist Chocolate Fudge Cake with Peanut Butter Frosting is my love letter to that timeless duo. Unlike many chocolate cakes that promise moisture but deliver a dry, crumbly sponge, this recipe relies on a specific scientific balance of fats and liquids to ensure a texture that is dense, fudgy, and tender.
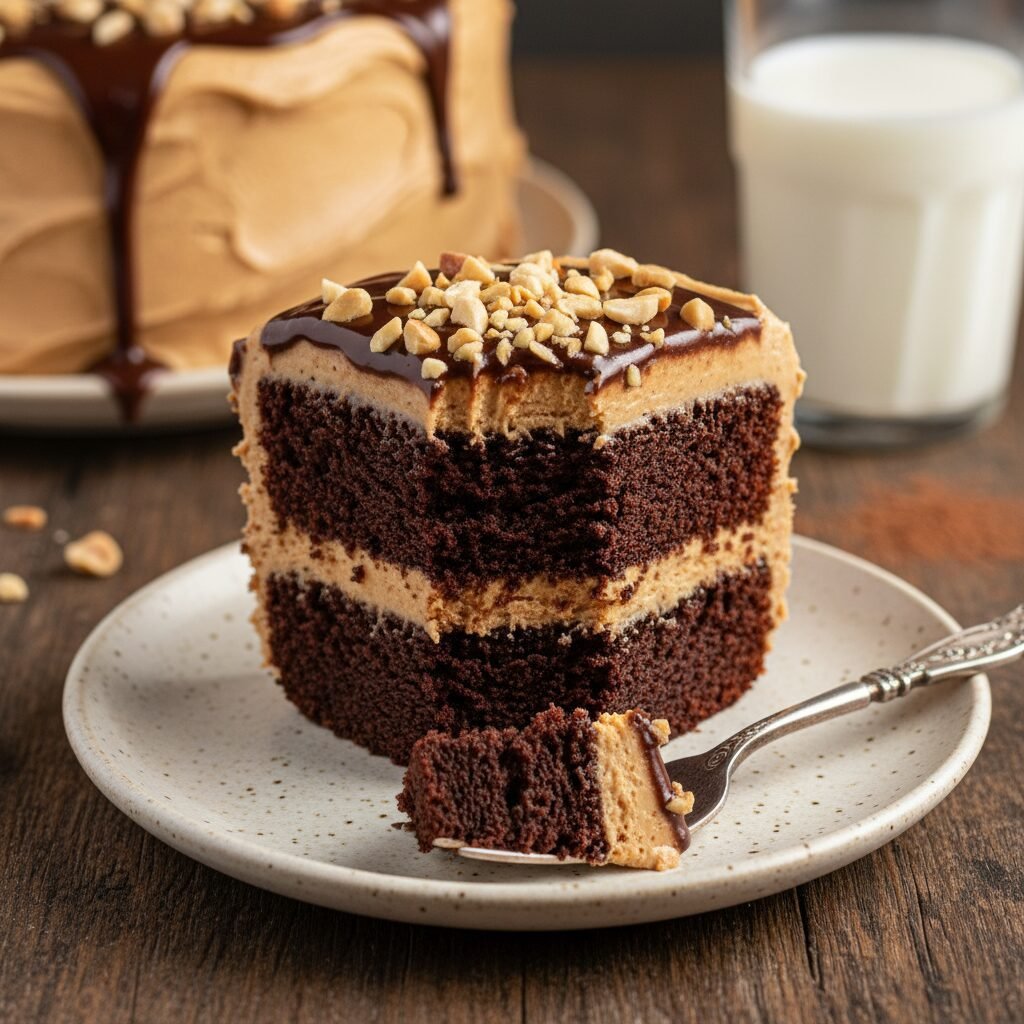
The cake layers themselves are dark and intense, utilizing the ‘blooming’ technique with hot coffee to wake up the cocoa powder, resulting in a flavor profile that is robust rather than sugary sweet. But the real showstopper here is the frosting. We aren’t making a stiff, sugary glaze; we are whipping up a cloud-like peanut butter buttercream that feels like mousse but holds its shape perfectly for piping. As you slice into this cake, the knife glides through effortlessly, revealing the stark, beautiful contrast between the midnight-black sponge and the golden-tan frosting. Whether you are a lifelong fan of Reese’s cups or just looking for a dessert that commands attention at the dinner table, this cake is guaranteed to become your new go-to standard for celebration baking. It is comfort food elevated to gourmet status, yet surprisingly simple to pull together in a home kitchen.
History & Origins
The history of chocolate cake is a fascinating journey through American culinary evolution. Before the mid-19th century, chocolate was primarily consumed as a beverage. It wasn’t until the 1830s and 40s, with the extraction of cocoa butter and the cheapening of cocoa powder, that chocolate began to appear in solid forms. However, early ‘chocolate cakes’ were actually yellow or white cakes served with chocolate frosting. The transition to the dark, chocolate-infused crumb we know today began in the late 1800s with the advent of Devil’s Food Cake. The name ‘Devil’s Food’ was likely a playful contrast to the light and airy ‘Angel Food Cake,’ signifying its rich, dense, and dark nature.
Parallel to this, peanut butter was establishing its own stronghold in American culture. While the Aztecs mashed peanuts centuries ago, the modern spreadable version gained traction at the 1904 St. Louis World’s Fair. By the Great Depression, peanut butter became a staple protein source. The marriage of chocolate and peanut butter is a distinctly American phenomenon, popularized heavily in the mid-20th century by H.B. Reese, a former dairy farmer who created the Peanut Butter Cup. This combination moved from candy aisles to bakery cases rapidly. Today, the Chocolate Peanut Butter Cake is a staple of American comfort baking, representing a perfect synthesis of the intense chocolate obsession of the Victorian era and the practical, nutty ingenuity of the early 20th-century American pantry.
Why This Recipe Works
This recipe succeeds where many others fail due to three critical chemical interactions: the fat source, the liquid acidity, and the cocoa blooming process. First, we use vegetable oil instead of butter for the cake batter. While butter adds flavor, it consists of 80% fat and 20% water/solids, and it solidifies at room temperature. Oil is 100% fat and remains liquid at room temperature, which guarantees that the cake stays moist and tender for days, rather than drying out as it cools.
Second, the inclusion of buttermilk provides necessary acidity. This acid reacts with the baking soda to create carbon dioxide bubbles, giving the cake a lift that counteracts the heavy cocoa and sugar, ensuring the crumb is fudgy but not brick-heavy. Finally, and perhaps most importantly, the recipe calls for boiling hot coffee. Pouring hot liquid over cocoa powder ‘blooms’ it, dissolving the fruitier, complex flavor compounds that cold liquids cannot access. This doesn’t make the cake taste like coffee; rather, it amplifies the chocolate intensity significantly. On the frosting side, beating the butter and peanut butter together before adding sugar ensures the fats emulsify completely, preventing a greasy mouthfeel and creating a stable structure that is light yet rich.
Why You’ll Love This Recipe
- ✓Incredibly moist crumb that stays fresh for days
- ✓Deep, intense chocolate flavor enhanced by hot coffee
- ✓Perfect balance of salty and sweet in the frosting
- ✓Simple one-bowl method for the cake batter
- ✓Visual stunner with high contrast layers
Equipment You’ll Need
- ✓Two 8-inch or 9-inch round cake pans
- ✓Stand mixer or electric hand mixer
- ✓Large mixing bowl
- ✓Whisk
- ✓Sifter or fine-mesh sieve
- ✓Wire cooling rack
- ✓Offset spatula
- ✓Parchment paper
Ingredients
- ✓2 cups granulated sugar
- ✓1 3/4 cups all-purpose flour
- ✓3/4 cup unsweetened cocoa powder (Dutch-processed preferred)
- ✓1 1/2 teaspoons baking powder
- ✓1 1/2 teaspoons baking soda
- ✓1 teaspoon salt
- ✓2 large eggs, room temperature
- ✓1 cup whole milk or buttermilk, room temperature
- ✓1/2 cup vegetable oil or canola oil
- ✓2 teaspoons pure vanilla extract
- ✓1 cup boiling hot coffee (or boiling water)
- ✓1 cup unsalted butter, softened (for frosting)
- ✓1 cup creamy peanut butter (commercial brands like Jif or Skippy work best)
- ✓3-4 cups powdered sugar
- ✓1/4 cup heavy cream
- ✓1 teaspoon vanilla extract (for frosting)
- ✓Pinch of salt (for frosting)
Instructions
- Preheat oven to 350°F (175°C). Grease two 9-inch round cake pans with butter or cooking spray and dust with cocoa powder. Line the bottoms with parchment paper for easy removal.
- In a large bowl, sift together the sugar, flour, cocoa, baking powder, baking soda, and salt. Whisk to combine thoroughly.
- Add the eggs, milk (or buttermilk), oil, and vanilla extract to the dry ingredients. Beat on medium speed with a mixer for about 2 minutes. The batter should look smooth and well-combined.
- Reduce the mixer speed to low and carefully pour in the boiling hot coffee. The batter will become very thin and liquidy; this is normal and essential for the moisture content. Mix until just combined.
- Divide the batter evenly between the prepared cake pans. Tap the pans gently on the counter to release any large air bubbles.
- Bake for 30-35 minutes, or until a wooden toothpick inserted into the center comes out clean or with just a few moist crumbs attached.
- Remove from the oven and let the cakes cool in the pans for 10 minutes. Then, run a knife around the edges and invert them onto a wire rack to cool completely before frosting.
- While the cakes cool, make the frosting. In a large bowl or stand mixer, beat the softened butter and peanut butter together on medium-high speed until smooth and creamy (about 2-3 minutes).
- Gradually add the powdered sugar, one cup at a time, mixing on low speed. Scrape down the sides of the bowl as needed.
- Add the heavy cream, vanilla extract, and a pinch of salt. Increase the speed to high and whip for 3-4 minutes until the frosting is light, fluffy, and spreadable. If it’s too stiff, add a tablespoon more cream; if too soft, add more sugar.
- Once the cakes are completely cool, place one layer on a serving plate. Spread a thick layer of peanut butter frosting over the top. Place the second cake layer on top.
- Cover the top and sides of the cake with the remaining frosting. Use an offset spatula to create swirls or smooth it out depending on your preference. Garnish with chocolate shavings or chopped peanuts if desired.
Expert Cooking Tips
- ✓Use room temperature eggs and milk to ensure the batter emulsifies properly without curdling.
- ✓Do not skip the parchment paper lining; this cake is very moist and can stick to the bottom of the pan easily.
- ✓If you don’t drink coffee, use boiling water, but the coffee truly enhances the chocolate flavor without adding a coffee taste.
- ✓Use commercial creamy peanut butter (like Skippy or Jif) rather than natural peanut butter, as the oil separation in natural varieties can break the frosting.
- ✓Chill the cake layers for 20 minutes before frosting to reduce crumbs getting caught in the icing (crumb coating).
Substitutions and Variations
For a gluten-free version, swap the all-purpose flour for a high-quality 1:1 gluten-free baking flour blend that includes xanthan gum. If you are dairy-free, you can substitute the buttermilk with a mixture of almond milk and a teaspoon of vinegar (let it sit for 5 minutes to curdle), and use a plant-based butter and cream alternative for the frosting. While Dutch-processed cocoa powder yields a darker, fudgier cake, regular unsweetened cocoa powder works fine, though the cake will be lighter in color and slightly more acidic. For the oil, melted coconut oil or melted butter can be used, though vegetable oil provides the moistest texture. In the frosting, almond butter or cashew butter can be swapped for peanut butter if you have a specific nut preference, but the flavor profile will change significantly.
Common Mistakes to Avoid
The most common mistake is over-baking the cake. Because the batter is dark, it is hard to see visual cues of browning. Rely strictly on the toothpick test and start checking 5 minutes before the timer goes off. Another error is frosting the cake before it is 100% cool. Even a slightly warm cake will melt the butter in the frosting, causing the layers to slide apart and the icing to become a greasy glaze. Additionally, using natural peanut butter (the kind you have to stir) often leads to a separated, oily frosting. Stick to the stabilized, emulsified commercial brands for baking. Finally, do not overmix the batter once the flour is added (before the coffee step), as this develops gluten and can make the cake tough instead of tender.
Serving Suggestions
This cake is incredibly rich, so thin slices are often sufficient. It pairs beautifully with a tall glass of cold milk to cut through the sweetness and density. For a dinner party, serve it with a scoop of vanilla bean ice cream or a dollop of unsweetened whipped cream to balance the sugar. If you want to get fancy, drizzle warm chocolate ganache over the slice right before serving, or garnish the plate with fresh raspberries, as the tartness of the fruit cuts through the heavy peanut butter and chocolate flavors perfectly.
Storage and Reheating Tips
This cake stores exceptionally well due to its oil content. It can be kept at room temperature in an airtight cake carrier for up to 3 days. For longer storage, keep it in the refrigerator for up to a week, but be sure to let slices come to room temperature before eating, as the cold solidifies the butter in the frosting and makes the texture firm. You can also freeze individual slices wrapped tightly in plastic wrap and then foil for up to 3 months. Thaw frozen slices in the refrigerator overnight or on the counter for an hour.
Nutrition Facts (Estimated)
| Serving Size | 1 slice |
| Calories | 680 |
| Fat | 38g |
| Saturated Fat | 14g |
| Unsaturated Fat | 22g |
| Trans Fat | 0g |
| Cholesterol | 85mg |
| Sodium | 420mg |
| Carbohydrates | 82g |
| Fiber | 4g |
| Sugar | 55g |
| Protein | 10g |
Frequently Asked Questions
Can I make this cake ahead of time?
Yes, absolutely. In fact, the flavor and moisture often improve the day after baking. You can bake the layers, wrap them in plastic, and store them in the fridge for up to 2 days before frosting.
Why is my batter so runny?
The batter is supposed to be very thin and liquid, almost like chocolate milk, after adding the hot coffee. Do not add more flour; this high liquid content cooks off to create a super moist steam-baked texture.
Can I make this into cupcakes instead?
Yes! This recipe will yield about 24-30 cupcakes. Bake them at the same temperature (350°F) for roughly 18-22 minutes.
What does the hot coffee do?
Hot coffee ‘blooms’ the cocoa powder, releasing flavor compounds and ensuring the chocolate taste is deep and rich. It also helps dissolve the sugar and cocoa clumps.
Can I use chunky peanut butter?
You can, but it will make piping the frosting difficult if you plan to decorate. For a smooth finish, use creamy peanut butter and sprinkle chopped peanuts on top instead.
Why did my cake sink in the middle?
This usually happens if the oven door was opened too early during baking, causing a temperature drop, or if the leavening agents (baking soda/powder) were expired.
Is this cake very sweet?
It is a rich American-style dessert, so it is sweet, but the dark cocoa and the salt in the peanut butter help balance the sugar intensity.
Can I use a 9×13 pan instead of rounds?
Yes, you can bake this in a standard 9×13 inch rectangular pan. The baking time will likely need to be increased to 35-45 minutes.
Conclusion
There you have it—the blueprint for the most indulgent, crowd-pleasing chocolate peanut butter cake you will ever bake. It is a recipe that demands to be shared, whether for a special birthday, a holiday gathering, or just a Tuesday when you need a little chocolate therapy. The magic lies in the contrast between the deeply dark, moist sponge and the light, nutty sweetness of the frosting. Don’t be intimidated by the steps; the method is forgiving and the results are bakery-quality. Once you try this combination, you’ll likely find yourself retiring your other chocolate cake recipes. Happy baking, and enjoy every single fudgy bite!

