Moist Dark Chocolate Cake With Peanut Butter Frosting Recipe
This is the definitive recipe for chocolate and peanut butter lovers everywhere. Featuring incredibly moist, fudgy dark chocolate cake layers enveloped in a silky, sweet-and-salty peanut butter frosting, it’s a showstopping dessert perfect for birthdays or indulgent weekends.
30 minutes
35 minutes
1 hour 15 minutes
12-16 servings
Dessert
Baking
American
Vegetarian
If there is a flavor combination more iconic and universally adored in the American culinary canon than chocolate and peanut butter, I have yet to find it. There is something profoundly satisfying about the interplay between the deep, slightly bitter notes of high-quality dark chocolate and the savory, salty sweetness of creamy peanut butter. This recipe for Moist Dark Chocolate Cake with Peanut Butter Frosting is not just another cake recipe; it is a love letter to that timeless duo. As a food blogger who has tested dozens of chocolate cake variations, I can confidently say this one reigns supreme. The crumb is impossibly tender—almost damp in the best way possible—thanks to a specific combination of buttermilk and hot coffee that blooms the cocoa powder to its fullest potential.
Unlike dry, lackluster sponge cakes that rely heavily on syrups for moisture, this cake stands on its own. It is rich, dark, and decadent without being overly heavy. The frosting serves as the perfect counterpoint: fluffy, whipped peanut butter buttercream that melts in your mouth. It creates a balance that prevents the dessert from becoming cloyingly sweet. Whether you are baking for a special occasion, a family gathering, or simply because you crave a slice of comfort, this cake delivers on every level. It invokes nostalgia while offering a sophisticated depth of flavor that appeals to adult palates just as much as it delights children. Get your mixer ready, because this is about to become your new go-to chocolate cake recipe.
History & Origins
The history of chocolate cake is a fascinating journey that mirrors the evolution of baking technology and ingredient availability in the Western world. Before the mid-19th century, chocolate was primarily consumed as a beverage. It wasn’t until the 1830s and 40s, with the extraction of cocoa butter and the grinding of cocoa beans, that solid chocolate and cocoa powder became accessible for baking. The earliest ‘chocolate cakes’ were actually yellow cakes served with a chocolate drink on the side, or white cakes with chocolate frosting.
The turning point came with the invention of chemical leavening agents like baking soda and baking powder. This allowed for the creation of the ‘Devil’s Food Cake’ in the early 1900s, a term used to describe a cake so rich, dark, and sinful that it was the antithesis of the light and airy Angel Food Cake. The reddish hue of early Devil’s Food cakes was a result of the chemical reaction between alkaline baking soda and natural cocoa powder, which wasn’t as processed as the Dutch cocoa we often see today.
The marriage of chocolate and peanut butter, however, is a distinctly American innovation. Peanut butter became a staple in US households in the early 20th century, largely popularized by the World Wars as a source of protein. The combination skyrocketed in popularity with the invention of the Reese’s Peanut Butter Cup in 1928 by H.B. Reese, a former dairy farmer. Since then, the duo has become inseparable in American dessert culture. This recipe pays homage to that history, combining the classic, chemically-leavened Devil’s Food technique with the beloved mid-century obsession with peanut butter frostings.
Why This Recipe Works
This recipe succeeds where many others fail due to the precise science behind the ingredients. First and foremost, the moisture content is maximized through the use of oil rather than butter in the cake batter. While butter provides flavor, it contains water and solids that can lead to a drier crumb once the cake cools. Oil is 100% fat and remains liquid at room temperature, ensuring the cake stays soft and moist for days.
Secondly, the inclusion of hot coffee is crucial. Adding boiling liquid to the batter does two things: it helps dissolve the sugar completely, ensuring a uniform texture, and, more importantly, it ‘blooms’ the cocoa powder. Cocoa powder is essentially dried plant matter; adding hot liquid releases the flavor compounds trapped within the starch particles, resulting in a much more intense chocolate flavor without requiring expensive chocolate bars.
Finally, the acidity of the buttermilk reacts with the baking soda. This reaction creates carbon dioxide bubbles which leaven the cake, making it fluffy despite its richness. It also tenderizes the gluten in the flour. The peanut butter frosting works because of the fat ratio; using a mix of butter and peanut butter creates a stable structure that is pipeable but still creamy, with the salt in the peanut butter cutting through the powdered sugar to prevent the ‘tooth-aching’ sweetness often associated with American buttercreams.
Why You’ll Love This Recipe
- ✓Incredibly moist texture that stays fresh for days
- ✓Deep, intense chocolate flavor enhanced by hot coffee
- ✓Perfect balance of salty and sweet in the frosting
- ✓No stand mixer required for the cake batter
- ✓Ideal for birthdays, holidays, and special occasions
Equipment You’ll Need
- ✓Two 8-inch or 9-inch round cake pans
- ✓Large mixing bowl
- ✓Medium mixing bowl
- ✓Whisk
- ✓Electric hand mixer or stand mixer (for frosting)
- ✓Rubber spatula
- ✓Measuring cups and spoons
- ✓Wire cooling rack
- ✓Parchment paper
- ✓Offset spatula
Ingredients
- ✓2 cups granulated sugar
- ✓1 3/4 cups all-purpose flour
- ✓3/4 cup unsweetened dark cocoa powder
- ✓1 1/2 tsp baking powder
- ✓1 1/2 tsp baking soda
- ✓1 tsp salt
- ✓2 large eggs, room temperature
- ✓1 cup whole milk or buttermilk
- ✓1/2 cup vegetable oil or canola oil
- ✓2 tsp vanilla extract
- ✓1 cup boiling hot coffee (or boiling water)
- ✓1 cup unsalted butter, softened (for frosting)
- ✓1 cup creamy peanut butter (commercial style, not natural)
- ✓3-4 cups powdered sugar
- ✓1/4 cup heavy cream
- ✓1 tsp vanilla extract (for frosting)
- ✓Pinch of salt (to taste)
Instructions
- Preheat oven to 350°F (175°C). Grease and flour two 9-inch round baking pans or line the bottoms with parchment paper.
- In a large bowl, whisk together the sugar, flour, cocoa, baking powder, baking soda, and salt until well combined and no lumps remain.
- Add the eggs, buttermilk, oil, and vanilla extract to the dry ingredients. Beat on medium speed with a hand mixer or whisk vigorously by hand for about 2 minutes.
- Stir in the boiling hot coffee by hand. The batter will be very thin and liquid; this is normal and essential for the moisture.
- Pour the batter evenly into the prepared pans.
- Bake for 30 to 35 minutes, or until a wooden toothpick inserted in the center comes out clean or with just a few moist crumbs.
- Cool in the pans for 10 minutes, then remove from pans to wire racks to cool completely before frosting.
- To make the frosting: In a large bowl, beat the softened butter and peanut butter together until smooth and creamy.
- Gradually add the powdered sugar, one cup at a time, beating on low speed until incorporated.
- Add the heavy cream, vanilla, and a pinch of salt. Increase speed to high and beat for 3 minutes until fluffy.
- Assemble the cake: Place one layer on a serving plate. Spread a thick layer of frosting over the top. Place the second layer on top and frost the top and sides of the cake.
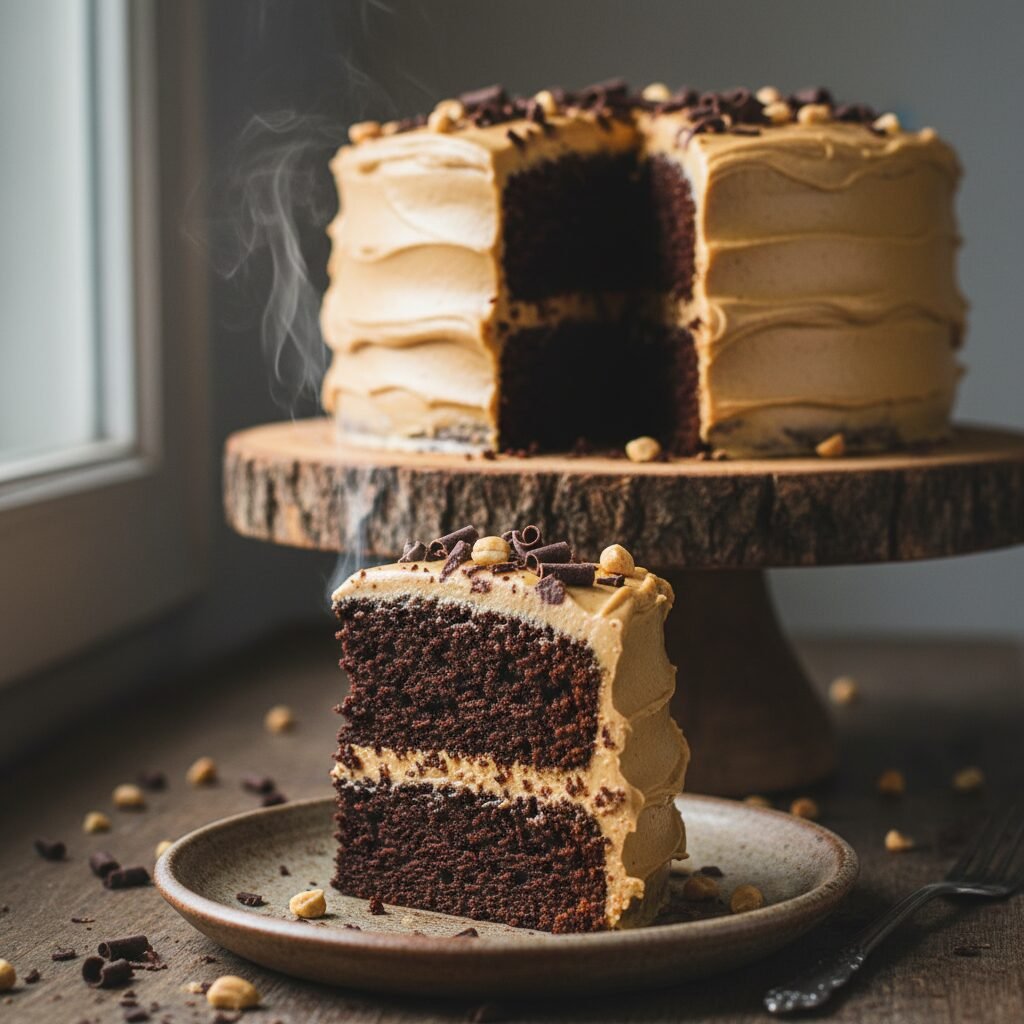
- Garnish with chocolate shavings, chopped peanuts, or a drizzle of melted chocolate if desired.
Expert Cooking Tips
- ✓Use high-quality cocoa powder for the best depth of flavor.
- ✓Do not over-bake; check the cake at the 30-minute mark to ensure it stays moist.
- ✓Ensure your coffee is boiling hot when added to bloom the cocoa properly.
- ✓Use commercial creamy peanut butter (like Jif or Skippy) rather than natural styles for a smoother frosting texture.
- ✓Let the cakes cool completely before frosting, otherwise, the butter in the frosting will melt and slide off.
Substitutions and Variations
This recipe is quite versatile if you need to make swaps. If you don’t have buttermilk, you can make a DIY version by adding a tablespoon of white vinegar or lemon juice to a cup of regular milk and letting it sit for 5 minutes. For the oil, melted coconut oil or melted butter can be used, though vegetable oil yields the moistest crumb. If you want to avoid caffeine, decaf coffee works perfectly, or you can simply use boiling water—though the chocolate flavor may be slightly less intense. For a gluten-free version, substitute the all-purpose flour with a high-quality 1:1 gluten-free baking flour blend that contains xanthan gum. In the frosting, almond butter or cashew butter can replace peanut butter for a different nut profile, though peanut butter is the classic choice.
Common Mistakes to Avoid
The most common mistake with this recipe is over-measuring the flour. If you scoop the flour directly with the measuring cup, you pack it down, leading to a dense and dry cake. Always use the ‘spoon and level’ method or a kitchen scale. Another error is using natural peanut butter (the kind that separates) for the frosting. The oil separation can cause the buttercream to break or become greasy. Stick to stabilized peanut butter. Also, do not skip the boiling liquid step; some bakers fear it will cook the eggs, but if you mix the eggs in with the other wet ingredients first and pour the hot liquid slowly while stirring, it tempers the mixture perfectly without scrambling the eggs.
Serving Suggestions
This rich cake is best served in thin slices, as it is quite decadent. It pairs beautifully with a tall glass of cold milk to cut through the richness. For an elevated dessert course, serve a slice slightly warmed (10 seconds in the microwave) with a scoop of vanilla bean ice cream or a dollop of freshly whipped cream. A drizzle of salted caramel sauce over the plated slice adds another layer of complexity. If serving at a party, you can garnish the top with mini peanut butter cups or chopped roasted peanuts to give guests a visual cue of the flavors inside.
Storage and Reheating Tips
Because of the dairy in the frosting, this cake is best stored in the refrigerator if you plan to keep it for more than 24 hours, specifically in warm climates. However, cold cake can taste dry and the frosting will harden like a stick of butter. Therefore, always remove the cake (or the slice you intend to eat) from the fridge 30 to 60 minutes before serving to bring it back to room temperature. This restores the soft texture of the crumb and the creaminess of the frosting. Stored in an airtight container or cake dome, it will last for up to 5 days in the fridge. You can also freeze individual slices wrapped tightly in plastic wrap for up to 3 months.
Nutrition Facts (Estimated)
| Serving Size | 1 slice |
| Calories | 580 |
| Fat | 32g |
| Saturated Fat | 12g |
| Unsaturated Fat | 18g |
| Trans Fat | 0g |
| Cholesterol | 65mg |
| Sodium | 320mg |
| Carbohydrates | 68g |
| Fiber | 4g |
| Sugar | 45g |
| Protein | 9g |
Frequently Asked Questions
Can I make this cake ahead of time?
Yes! The cake layers can be baked, cooled, wrapped tightly in plastic wrap, and stored at room temperature for 1 day or frozen for up to a month before frosting. The flavor actually develops even better the next day.
Why is the batter so runny?
The batter is supposed to be very thin due to the cup of boiling liquid. Do not be alarmed and do not add more flour; this high liquid content is what creates the ultra-moist texture after baking.
Can I make this into cupcakes?
Absolutely. This recipe yields about 24-30 standard cupcakes. Bake them at 350°F for 18-22 minutes.
Do I have to use coffee?
No, you don’t have to, but it is highly recommended. The coffee enhances the chocolate flavor without making the cake taste like coffee. If you prefer, use boiling water.
Can I use natural peanut butter?
It is not recommended for the frosting. Natural peanut butter tends to separate and can make the buttercream oily or gritty. Use a standard commercial brand for the smoothest results.
Why did my cake sink in the middle?
This usually happens if the oven door was opened too early during baking, causing a temperature drop, or if the cake was underbaked. It can also happen if there was too much leavening agent used.
Can I use Dutch-process cocoa?
Yes, Dutch-process cocoa will give the cake a darker color and a smoother, less acidic flavor. Natural cocoa powder works too, but Dutch is preferred for a ‘Devil’s Food’ style darkness.
How do I get flat cake layers?
You can use ‘cake strips’ soaked in water wrapped around the pans to insulate the edges, promoting even rising. Alternatively, simply trim the domed tops with a serrated knife before assembling.
Conclusion
There are few pleasures in life as simple and profound as a slice of homemade cake, and this Moist Dark Chocolate Cake with Peanut Butter Frosting is truly in a league of its own. It balances the sophistication of dark chocolate with the comforting, nostalgic hug of creamy peanut butter. Whether you are an experienced baker or a novice in the kitchen, this recipe is forgiving, reliable, and guaranteed to impress. It’s the kind of dessert that silences a room as everyone takes their first bite, followed by a chorus of requests for the recipe. So, preheat your oven, brew that coffee, and get ready to bake the best chocolate cake of your life. Happy baking!

