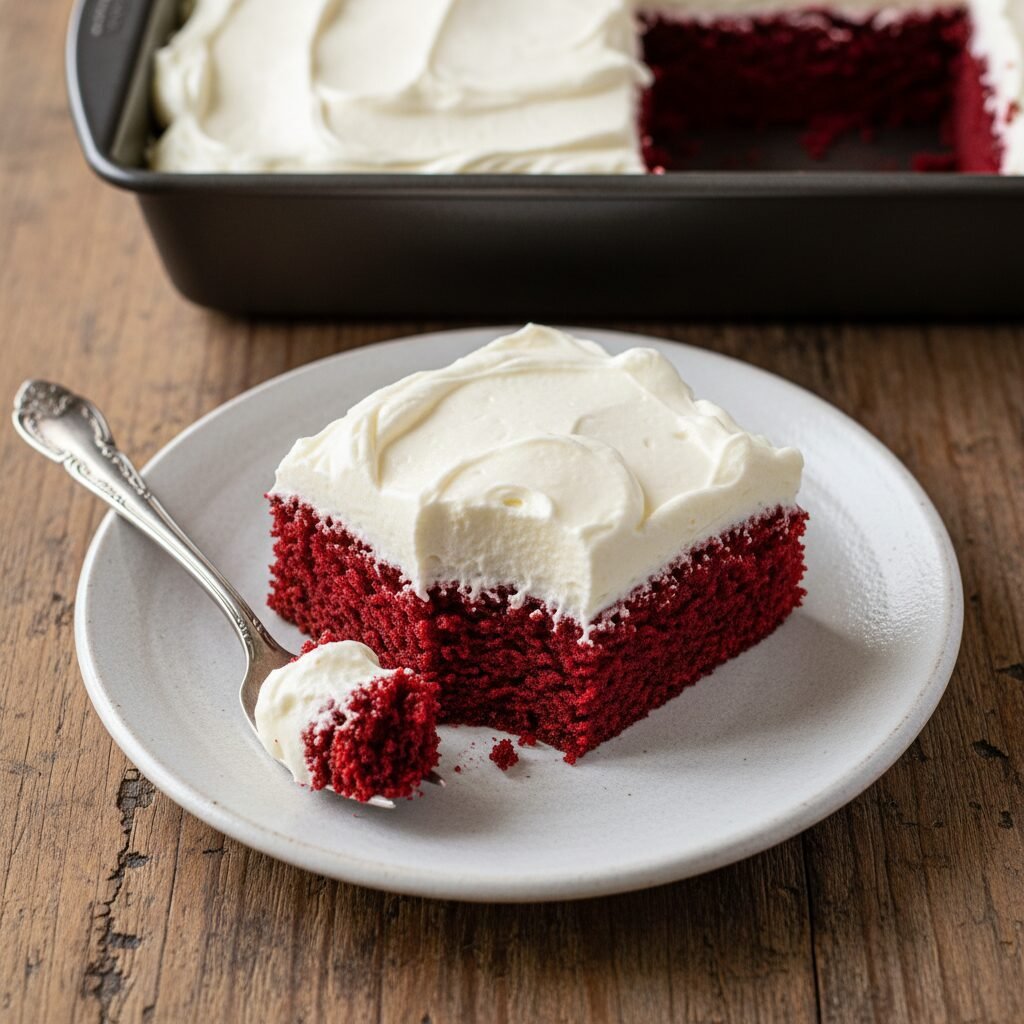
Moist Red Velvet Sheet Cake With Whipped Cream Frosting Recipe
Say goodbye to dry cake and complicated layering! This Red Velvet Sheet Cake is the busy mom’s secret weapon—it comes together in one bowl, stays moist for days, and the fluffy whipped cream frosting is like eating a cloud.
20 minutes
30 minutes
50 minutes (plus cooling)
24 servings
Dessert
Baking
American
Vegetarian
Hey there, beautiful mamas! Let’s be real for a second. We all love the idea of a towering, three-layer cake that looks like it came straight out of a bakery window. But between school drop-offs, laundry mountains, and trying to keep the tiny humans alive, who actually has time to level cakes, crumb coat, and stress over sliding layers? Not me!
That is exactly why I am completely obsessed with this Moist Red Velvet Sheet Cake. It gives you all that luxurious, velvety texture and iconic flavor we crave, but with zero fuss. It is a ‘pour, bake, and frost’ kind of situation, which is my love language in the kitchen.
This isn’t just any red velvet cake, though. I have tweaked this recipe over the years to ensure it is impossibly moist (sorry if you hate that word, but it is the only way to describe it!). We are topping it with a homemade Whipped Cream Frosting that is so much lighter than the traditional heavy cream cheese blocks. It balances the rich cocoa notes perfectly without making you feel like you need a nap immediately after eating it. Grab your aprons, ladies—this one is a keeper!
History & Origins
Red Velvet cake has such a fascinating, slightly mysterious history that makes it even more fun to bake! Originally, during the Victorian era, ‘velvet’ cakes were simply fancy cakes with a soft, fine crumb. The reddish hue actually wasn’t from food coloring back then; it was a chemical reaction! When raw cocoa powder (which contains anthocyanins) mixed with acidic ingredients like buttermilk and vinegar, it turned a dark, rusty red color.
Fast forward to the Great Depression and World War II, when food rationing made baking difficult. The Adams Extract company in Texas is largely credited with popularizing the modern, bright red version we know today to sell more food coloring and vanilla. It became a Southern staple, and eventually, the Waldorf-Astoria Hotel in New York claimed it as their signature dessert. Now, it is a beloved classic for holidays, representing love and celebration!
Why This Recipe Works
There is some serious kitchen science happening in this bowl, and that is why this recipe is foolproof! First, the combination of baking soda and vinegar creates a fizzy reaction that leavens the cake, giving it that signature fluffy, ‘velvety’ crumb. Without this, red velvet is just chocolate cake in a costume.
Secondly, we use oil instead of butter. While I love butter, oil is liquid at room temperature, which means your cake stays soft and moist on the counter much longer than a butter-based cake would. Finally, the frosting choice is key. Traditional cream cheese frosting can be heavy and sugary. By switching to a stabilized whipped cream frosting, we introduce airiness that cuts through the density of the cake, creating a perfectly balanced bite that isn’t cloyingly sweet.
Why You’ll Love This Recipe
- ✓One-bowl mixing method for easy cleanup
- ✓Stays soft and moist for days thanks to vegetable oil
- ✓Light whipped frosting is less heavy than traditional icing
- ✓Perfect for feeding a crowd (yields 24 generous slices)
- ✓Vibrant red color makes it festive for holidays
- ✓No fancy decorating skills required
Equipment You’ll Need
- ✓9×13 inch baking pan (metal or glass)
- ✓Large mixing bowl
- ✓Whisk
- ✓Electric hand mixer or Stand Mixer (for frosting)
- ✓Rubber spatula
- ✓Measuring cups and spoons
- ✓Offset spatula (for spreading frosting)
Ingredients
- ✓For the Cake:
- ✓2 1/2 cups all-purpose flour (sifted)
- ✓1 1/2 cups granulated white sugar
- ✓1 teaspoon baking soda
- ✓1 teaspoon salt
- ✓1/4 cup unsweetened cocoa powder
- ✓1 1/2 cups vegetable oil (or canola oil)
- ✓1 cup buttermilk, room temperature
- ✓2 large eggs, room temperature
- ✓2 tablespoons red food coloring (liquid)
- ✓1 teaspoon white distilled vinegar
- ✓1 teaspoon pure vanilla extract
- ✓For the Whipped Cream Frosting:
- ✓2 cups heavy whipping cream, cold
- ✓1/2 cup powdered sugar (confectioners’ sugar)
- ✓1 teaspoon pure vanilla extract
- ✓1 tablespoon instant vanilla pudding mix (optional, for stability)
Instructions
- Preheat and Prep: Preheat your oven to 350°F (175°C). Grease a 9×13 inch baking pan with non-stick spray or butter, and lightly dust with flour (or cocoa powder if you want to avoid white streaks).
- Mix Dry Ingredients: In a large bowl, sift together the flour, sugar, baking soda, salt, and cocoa powder. Whisk them gently to ensure everything is evenly distributed and there are no lumps.
- Combine Wet Ingredients: In a separate medium bowl (or a large measuring cup), whisk together the oil, buttermilk, eggs, food coloring, vinegar, and vanilla extract until the mixture is bright red and fully emulsified.
- Make the Batter: Pour the wet red mixture into the bowl with the dry ingredients. Using a whisk or electric mixer on low speed, mix just until the flour disappears. Do not overmix! Stop as soon as the streaks of flour are gone to keep the cake tender.
- Bake: Pour the batter into your prepared pan and smooth it out with a spatula. Bake for 28-32 minutes. Test by inserting a toothpick into the center; if it comes out clean or with just a few moist crumbs, it is done.
- Cool Completely: This is the hardest part! Let the cake cool completely in the pan on a wire rack. If you try to frost it while it is even slightly warm, your whipped cream will melt into a puddle.
- Whip the Frosting: While the cake cools, chill your mixing bowl and beaters in the freezer for 10 minutes. Then, add the cold heavy cream, powdered sugar, vanilla, and instant pudding mix (if using) to the bowl. Beat on high speed until stiff peaks form (about 3-5 minutes).
- Frost and Serve: Dollop the whipped cream over the cooled cake and spread gently with an offset spatula. You can garnish with sprinkles, chocolate shavings, or crumbled cake trimmings. Slice and enjoy!
Expert Cooking Tips
- ✓Room Temperature Ingredients: Make sure your eggs and buttermilk are at room temperature. This helps them emulsify with the oil properly, creating a uniform texture.
- ✓Don’t Skimp on the Dye: If you want that classic, deep red color, you really need the full 2 tablespoons of liquid dye. Gel paste is more concentrated, so if using gel, start with 1 teaspoon.
- ✓Cocoa Quality: Use regular unsweetened cocoa powder, not Dutch-processed. The regular cocoa is acidic and reacts better with the baking soda.
- ✓Stabilizing the Frosting: If you are making this for a warm day or a potluck where it will sit out, add a tablespoon of dry instant vanilla pudding mix or a teaspoon of gelatin to the cream while whipping. It keeps the whipped cream firm for hours!
- ✓Make Your Own Buttermilk: No buttermilk? No problem! Add 1 tablespoon of lemon juice or vinegar to a cup of regular milk and let it sit for 5 minutes until it curdles.
Substitutions and Variations
If you are out of vegetable oil, you can substitute melted coconut oil or even melted butter, though the texture will be slightly denser. For a gluten-free version, swap the all-purpose flour for a high-quality 1:1 Gluten-Free Baking Flour blend. If you want to avoid red dye entirely, you can use beet powder or simply leave it out for a delicious ‘Velvet Chocolate’ cake—it will taste exactly the same!
Common Mistakes to Avoid
The biggest mistake mamas make is overmixing the batter. Once that flour hits the wet ingredients, gluten starts to form. If you mix too aggressively, you’ll end up with a tough, rubbery cake instead of a tender one. Another common pitfall is frosting too soon. Whipped cream is very sensitive to heat. Even a lukewarm cake will cause the fats in the cream to break down and slide right off.
Serving Suggestions
This cake is stunning on its own, but I love serving it with fresh berries—strawberries or raspberries look beautiful against the white frosting and red cake. For a holiday twist, sprinkle crushed candy canes on top during Christmas, or heart-shaped sprinkles for Valentine’s Day. A hot cup of coffee is non-negotiable for me when enjoying a slice!
Storage and Reheating Tips
Because of the dairy in the whipped cream frosting, this cake must be stored in the refrigerator. Cover the pan tightly with plastic wrap or a lid. It will stay fresh for up to 4 days. If you want to freeze it, I recommend freezing the unfrosted cake wrapped in plastic wrap and foil for up to 3 months. Thaw it in the fridge overnight and whip up fresh frosting before serving.
Nutrition Facts (Estimated)
| Serving Size | 1 square |
| Calories | 320 |
| Fat | 18g |
| Saturated Fat | 8g |
| Unsaturated Fat | 9g |
| Trans Fat | 0g |
| Cholesterol | 45mg |
| Sodium | 180mg |
| Carbohydrates | 36g |
| Fiber | 1g |
| Sugar | 24g |
| Protein | 4g |
Frequently Asked Questions
Why does my red velvet cake taste dry?
Dry cake is usually caused by over-baking or measuring flour incorrectly. Be sure to ‘spoon and level’ your flour rather than scooping the cup directly into the bag, which packs it down.
Can I use butter instead of oil?
You can, but I highly recommend oil for this specific recipe. Oil coats the flour proteins better than butter, preventing gluten formation and keeping the cake moist for much longer.
Does this taste like chocolate cake?
It has a mild chocolate flavor, but it’s not as rich as a Devil’s Food cake. The flavor is a unique blend of vanilla, slight tang from the buttermilk/vinegar, and mild cocoa.
Can I make this into cupcakes?
Absolutely! This recipe will make about 24-28 standard cupcakes. Bake them for 18-22 minutes at the same temperature.
My frosting is runny, what happened?
You likely didn’t whip it long enough, or your cream wasn’t cold enough. Ensure you whip until ‘stiff peaks’ form—meaning when you lift the beater, the cream stands up straight without curling over.
Is the vinegar necessary?
Yes! Don’t skip it. You won’t taste the vinegar, but the acid is crucial for activating the baking soda (for rise) and preserving the red color.
Can I use Cream Cheese Frosting instead?
Of course. If you prefer the traditional tang, swap the whipped cream for a standard cream cheese buttercream. However, the whipped cream offers a lighter, less sugary alternative.
How do I get the cake out of the pan?
Since this is a sheet cake, it is designed to be served straight from the pan! If you really want to remove it, line the pan with parchment paper with an overhang before baking so you can lift it out.
Conclusion
There you have it, friends! The easiest, most reliable Red Velvet Sheet Cake you will ever make. Whether you are a baking novice or a seasoned pro, this recipe delivers that ‘wow’ factor with minimal effort. The contrast between the deep red, moist sponge and the snowy white whipped cream is just magic on a plate.
If you try this recipe, please snap a photo and tag me on Pinterest or Instagram! I love seeing your creations. Now, go hide a slice in the back of the fridge for yourself—you deserve it, mama!

