Moist Chocolate Birthday Cake With Vanilla Frosting Recipe
Stop searching for the perfect birthday treat because this is the moistest chocolate cake recipe you will ever find. Paired with a fluffy, cloud-like vanilla buttercream, this classic combination creates a nostalgic, melt-in-your-mouth dessert that stays soft for days and is surprisingly easy to make.
30 minutes
35 minutes
1 hour 30 minutes
12-14 servings
Dessert
Baking
American
Vegetarian
There is something undeniably magical about a classic chocolate birthday cake. It is the centerpiece of our fondest childhood memories, the grand finale of celebrations, and the comfort food we crave when we need a slice of happiness. However, finding the absolute perfect recipe—one that promises a deep, rich cocoa flavor without ending up dry or crumbly—can be a lifelong quest for many home bakers. We have all been there: cutting into a stunningly decorated cake only to find the sponge inside is parched and lackluster. That ends today. This recipe is the result of years of testing, tweaking, and tasting to achieve the ‘holy grail’ of baking: a chocolate cake that is impossibly moist, tender, and rich, yet light enough to eat a second slice.
What sets this cake apart is its reliance on specific scientific interactions between ingredients that guarantee a velvety crumb. Unlike dense mud cakes or airy sponges that lack substance, this recipe strikes the perfect balance. It possesses a dark, fudgy depth that chocolate lovers dream of, but the texture is soft and plush. To top it off, we pair it with a quintessential vanilla bean buttercream. The contrast between the dark, not-too-sweet chocolate sponge and the sweet, creamy, aromatic vanilla frosting is the definition of balance. Whether you are baking for a child’s birthday party, a sophisticated dinner gathering, or just a Tuesday night craving, this cake delivers professional bakery-quality results right from your home kitchen. Get your apron on, because you are about to bake the best cake of your life.
History & Origins
The history of chocolate cake is a fascinating journey that mirrors the evolution of baking technology and ingredient availability. In the early days of American baking, specifically around the mid-18th century, chocolate was primarily consumed as a beverage. It wasn’t until 1764, when Dr. James Baker discovered how to grind cocoa beans between massive circular millstones, that chocolate became more accessible for culinary use. However, the concept of a ‘chocolate cake’ as we know it today didn’t exist. Early recipes were actually yellow or white cakes with chocolate frosting, or they were spiced molasses cakes with a hint of cocoa. It wasn’t until 1828, when Conrad Van Houten of the Netherlands invented a mechanical press to remove the fat (cocoa butter) from roasted cacao beans, that we got cocoa powder. This invention was pivotal, as it made chocolate affordable and easy to mix into batters.
The real turning point came in the late 19th and early 20th centuries with the rise of ‘Devil’s Food Cake.’ The name was likely a playful contrast to the popular ‘Angel Food Cake,’ distinguishing its dark, rich color and heavy texture. The reddish hue of early Devil’s Food cakes was a result of a chemical reaction between alkaline baking soda and non-alkalized cocoa powder. As the 20th century progressed, the American birthday cake tradition solidified, moving away from fruitcakes and yeast breads toward the chemically leavened, frosted layer cakes we adore today. By the 1930s and 40s, with the advent of boxed mixes, the chocolate cake with vanilla frosting became an icon of American domesticity and celebration. This recipe honors that long lineage, taking the best elements of historical techniques—like using hot liquid to bloom cocoa—and refining them for the modern palate.
Why This Recipe Works
This recipe succeeds where many others fail due to three critical food science principles: the fat source, the liquid temperature, and the acidity. First, we use vegetable oil instead of butter for the cake batter. While butter provides flavor, it is about 20% water and solidifies at room temperature. Oil, being 100% fat and liquid at room temperature, coats the flour proteins more effectively, inhibiting gluten formation. This results in a tender crumb that stays moist on the counter for days, whereas butter-based cakes can dry out quickly.
Second, the addition of boiling water is a non-negotiable step. Adding boiling water to the batter does two things: it ‘blooms’ the cocoa powder, releasing its full flavor potential by dissolving the cocoa solids instantly, and it creates a very thin batter. This high hydration turns into steam during baking, which helps lift the cake and keeps the crumb incredibly soft. Finally, the use of buttermilk provides essential acidity. This acid reacts vigorously with the baking soda, creating carbon dioxide bubbles that give the cake its loft and airy texture. The acidity also tenderizes the gluten strands, ensuring the cake melts in your mouth rather than requiring heavy chewing. This trifecta of oil, hot water, and buttermilk is the secret engineering behind the perfect slice.
Why You’ll Love This Recipe
- ✓Incredibly moist texture that lasts for 3-4 days
- ✓Deep, intense chocolate flavor without being bitter
- ✓Silky, whipped vanilla buttercream provides perfect contrast
- ✓Simple one-bowl mixing method for the batter
- ✓Sturdy enough for stacking but soft enough to melt in your mouth
- ✓Perfect for birthdays, holidays, and special occasions
Equipment You’ll Need
- ✓Two 8-inch or 9-inch round cake pans
- ✓Electric stand mixer or hand mixer
- ✓Large mixing bowl
- ✓Sifter or fine-mesh sieve
- ✓Wire cooling rack
- ✓Offset spatula
- ✓Parchment paper
- ✓Measuring cups and spoons
Ingredients
- ✓2 cups granulated sugar
- ✓1 3/4 cups all-purpose flour
- ✓3/4 cup unsweetened cocoa powder (dark or regular)
- ✓1 1/2 teaspoons baking powder
- ✓1 1/2 teaspoons baking soda
- ✓1 teaspoon salt
- ✓2 large eggs, room temperature
- ✓1 cup whole milk or buttermilk, room temperature
- ✓1/2 cup vegetable oil or canola oil
- ✓2 teaspoons pure vanilla extract
- ✓1 cup boiling water
- ✓1 cup unsalted butter, softened (for frosting)
- ✓4 cups powdered sugar (confectioners’ sugar)
- ✓2-3 tablespoons heavy cream or milk (for frosting)
- ✓1 tablespoon vanilla bean paste or extract (for frosting)
- ✓Pinch of salt (for frosting)
Instructions
- Preheat your oven to 350°F (175°C). Grease two 8-inch or 9-inch round cake pans with butter or cooking spray and line the bottoms with parchment paper. Dust the sides with a little cocoa powder or flour.
- In a large mixing bowl or the bowl of a stand mixer, sift together the sugar, flour, cocoa, baking powder, baking soda, and salt. Whisk by hand briefly to ensure the dry ingredients are evenly combined.
- Add the eggs, buttermilk, oil, and vanilla extract to the dry ingredients. Beat on medium speed for about 2 minutes. The batter will look thick at this stage.
- Reduce the mixer speed to the lowest setting and carefully pour in the boiling water. Mix until just combined. The batter will be very thin and watery; this is completely normal and essential for the moist texture.
- Divide the batter evenly between the prepared cake pans. Tap the pans gently on the counter once to release any large air bubbles.
- Bake for 30-35 minutes, or until a wooden toothpick inserted into the center comes out clean or with just a few moist crumbs attached. Do not overbake.
- Remove the cakes from the oven and let them cool in the pans for about 10 minutes. Then, run a knife around the edges and invert them onto a wire rack to cool completely before frosting.
- While the cakes cool, make the frosting. In a stand mixer fitted with the paddle attachment, beat the softened butter on medium-high speed for about 5 minutes until it is very pale and creamy.
- Gradually add the powdered sugar, one cup at a time, mixing on low speed until incorporated. Scrape down the sides of the bowl as needed.
- Add the vanilla bean paste, heavy cream, and a pinch of salt. Increase the speed to high and whip for another 3-4 minutes until the frosting is light, airy, and fluffy.
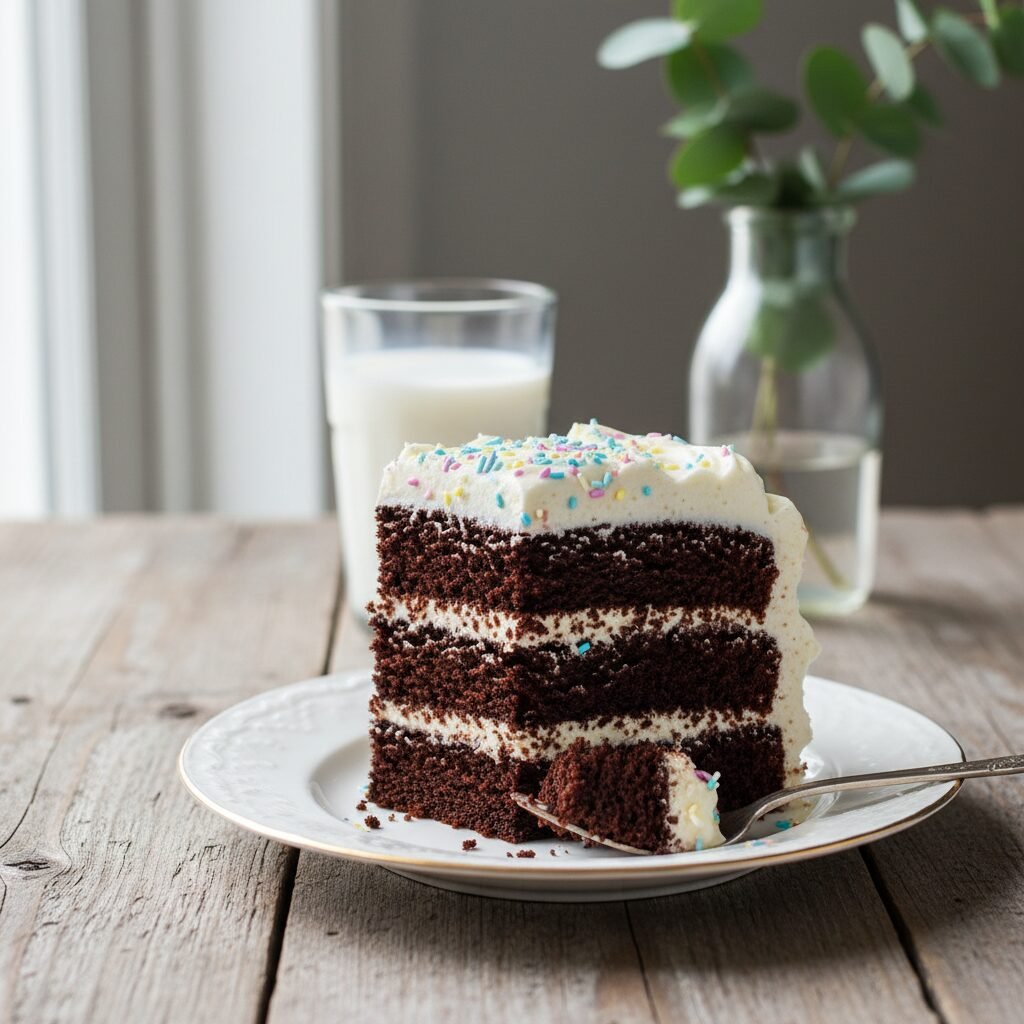
- Once the cakes are completely cool, place one layer on your serving plate. Spread a generous layer of frosting over the top. Place the second cake layer on top.
- Cover the top and sides of the cake with the remaining frosting. Use an offset spatula to create swirls or smooth the sides. Decorate with sprinkles if desired.
Expert Cooking Tips
- ✓Use room temperature ingredients (eggs and buttermilk) to ensure the batter emulsifies properly.
- ✓Do not skip the parchment paper lining; this guarantees your cakes won’t stick to the bottom of the pan.
- ✓For an extra depth of flavor, add a teaspoon of instant espresso powder to the boiling water. It enhances the chocolate without making the cake taste like coffee.
- ✓Weigh your flour if possible. Scooping with a cup can pack the flour down, leading to a dry cake.
- ✓Let the cakes cool completely before frosting. Even a slightly warm cake will melt the butter in the frosting and cause the layers to slide.
- ✓If your frosting is too stiff, add more cream one teaspoon at a time. If it’s too runny, add more powdered sugar.
- ✓Bloom the cocoa! Ensure the water is actually boiling when you add it, not just hot tap water.
Substitutions and Variations
This recipe is quite forgiving, and there are several substitutions you can make if needed. If you don’t have buttermilk, you can make a DIY sour milk by adding one tablespoon of white vinegar or lemon juice to a cup of regular whole milk and letting it sit for 5 minutes. For a gluten-free version, substitute the all-purpose flour with a high-quality 1:1 gluten-free baking flour blend that includes xanthan gum. If you prefer a dairy-free cake, you can use almond milk or soy milk mixed with vinegar in place of the buttermilk, and use a plant-based butter stick for the frosting (though the texture of the frosting may vary slightly). You can substitute the vegetable oil with melted coconut oil or melted butter, though melted butter will result in a slightly denser crumb that isn’t quite as moist. For the frosting, if you don’t have vanilla bean paste, regular high-quality vanilla extract works perfectly fine.
Common Mistakes to Avoid
The most common mistake with this cake is overbaking. Because the batter is dark, it is hard to see visual cues of browning. Rely on the toothpick test and start checking 5 minutes before the timer goes off. Another mistake is over-mixing the batter after adding the flour, which can develop gluten and lead to a tough cake; however, the liquid nature of this batter makes that harder to do than with thicker batters. A frequent issue with the frosting is using butter that is too soft or melted. If your butter is oily, the frosting will be greasy and won’t hold its shape. The butter should be cool room temperature—soft enough to dent with a thumb, but not losing its structure. Lastly, do not try to frost the cake while it is warm. Patience is key; freezing the cake layers for 20 minutes before frosting can make the process much easier and reduce crumbs in the icing.
Serving Suggestions
This cake is a showstopper on its own, but presentation can take it to the next level. Serve it on a classic white cake stand to let the dark chocolate contrast with the white frosting. A side of fresh berries, particularly raspberries or strawberries, cuts through the richness of the chocolate and adds a pop of color. For an adult twist, serve slices with a glass of cold milk, a hot espresso, or even a glass of red wine like a Cabernet Sauvignon or Merlot. If you are celebrating a birthday, rainbow sprinkles are a must, but for a more elegant look, you can use chocolate shavings, edible gold leaf, or fresh flowers. A scoop of vanilla bean ice cream on the side is never a bad idea, creating a delightful hot-cold contrast if you gently warm the slice in the microwave for 10 seconds.
Storage and Reheating Tips
Because this cake is oil-based, it stays moist longer than butter cakes. You can store the frosted cake at room temperature in an airtight cake carrier for up to 3 days. If your kitchen is particularly hot or humid, it is safer to store it in the refrigerator for up to 5 days. However, always bring the cake back to room temperature before serving, as the frosting and cake texture are best when not cold. For freezing, you can freeze the unfrosted cake layers by wrapping them tightly in plastic wrap and then aluminum foil for up to 3 months. You can also freeze individual slices of the frosted cake; just place them on a baking sheet to freeze the frosting solid first, then wrap them tightly. Thaw on the counter for a few hours before eating.
Nutrition Facts (Estimated)
| Serving Size | 1 slice |
| Calories | 580 |
| Fat | 28g |
| Saturated Fat | 12g |
| Unsaturated Fat | 14g |
| Trans Fat | 0g |
| Cholesterol | 85mg |
| Sodium | 320mg |
| Carbohydrates | 76g |
| Fiber | 3g |
| Sugar | 48g |
| Protein | 6g |
Frequently Asked Questions
Can I use this recipe to make cupcakes?
Yes, absolutely! This batter makes excellent cupcakes. Fill cupcake liners about 2/3 full and bake at 350°F for 18-22 minutes. This recipe yields approximately 24 standard cupcakes.
Why is the batter so runny?
The batter is supposed to be very thin, almost like chocolate milk. The high liquid content from the boiling water and milk creates steam during baking, which yields that incredibly moist, soft texture. Do not add more flour to thicken it.
Can I use Dutch-processed cocoa powder?
You can, but because this recipe uses both baking soda and baking powder, regular natural cocoa powder works best to react with the soda. However, many bakers use Dutch-processed successfully in this recipe for a darker color and mellower flavor without issues.
Can I make the cake layers ahead of time?
Yes. In fact, the cake is often easier to frost if made a day ahead. Bake the layers, let them cool completely, wrap them tightly in plastic wrap, and store them at room temperature overnight or in the fridge.
My cake sank in the middle. What happened?
This usually happens if the oven door was opened too early during baking, causing the structure to collapse before it set. It can also happen if the leavening agents (baking soda/powder) are expired or if too much leavening was used.
Can I reduce the sugar in this recipe?
We do not recommend significantly reducing the sugar. Sugar is not just for sweetness; it provides moisture and tenderness. Reducing it too much will result in a rubbery, dry cake.
Can I use hot coffee instead of water?
Yes! Using hot coffee instead of boiling water is a pro tip. It intensifies the chocolate flavor significantly without imparting a distinct coffee taste.
How do I get my frosting white like the pictures?
Butter naturally has a yellow tint. To get white frosting, whip the butter for a full 5 minutes until it is very pale before adding sugar. You can also add a tiny drop of violet food coloring to counteract the yellow tones.
Conclusion
There you have it—the only chocolate cake recipe you will ever need in your repertoire. This Moist Chocolate Birthday Cake with Vanilla Frosting is more than just a dessert; it is a reliable friend for every celebration. The combination of the deep, dark, tender sponge with the sweet, creamy, nostalgic vanilla frosting is pure culinary bliss. It is a recipe that invites you to slow down, enjoy the process of baking, and share something truly special with the people you love. Whether you are an experienced baker or a novice, this cake is designed to make you look like a star. So go ahead, preheat that oven, and get ready to make some delicious memories. Happy baking!

