Moist Dark Chocolate Cake With Buttermilk Recipe
Discover the secret to the darkest, most tender crumb with this foolproof buttermilk chocolate cake recipe. Infused with hot coffee and rich cocoa, it delivers an intense chocolate flavor that stays incredibly moist for days.
20 minutes
35 minutes
55 minutes
12-14 servings
Dessert
Baking
American
Vegetarian
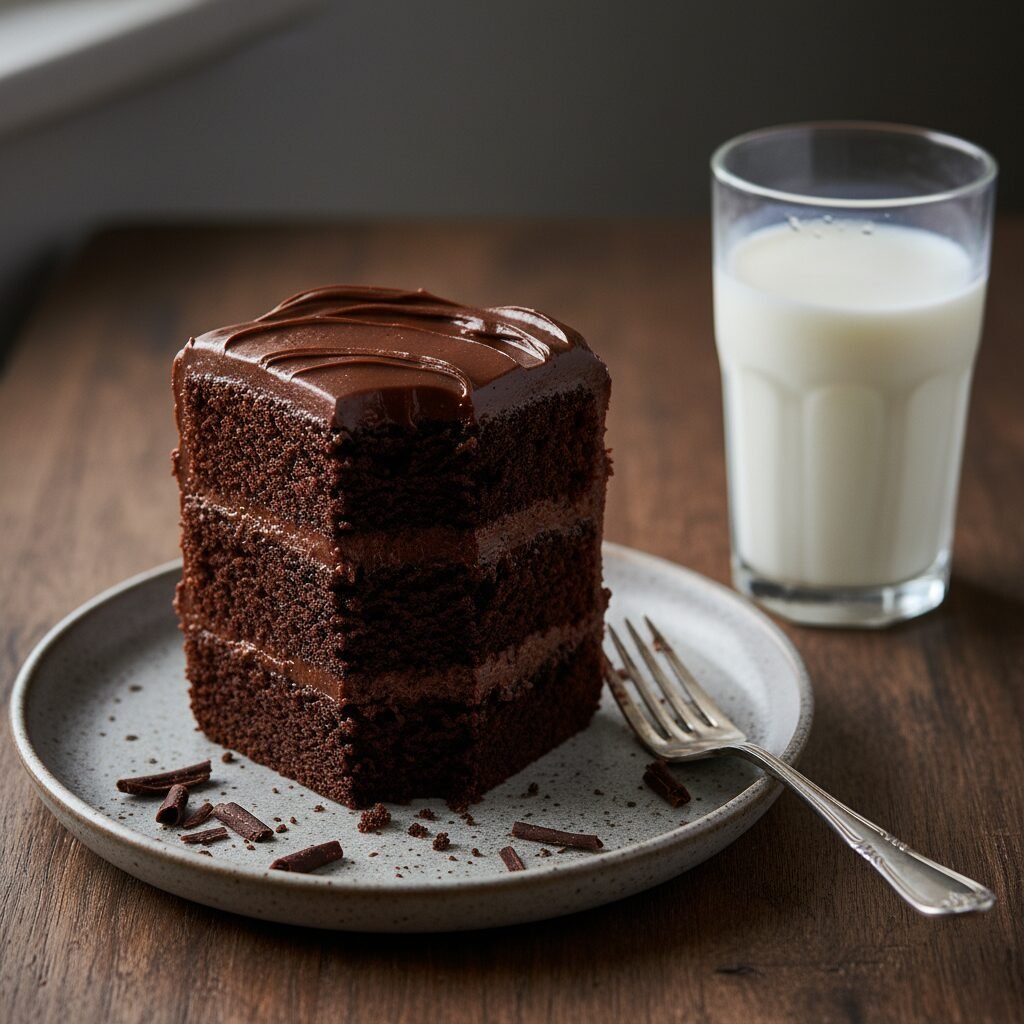
There are chocolate cakes, and then there is *this* chocolate cake. If you have been endlessly searching for that elusive recipe that balances a profound, bittersweet cocoa intensity with a crumb so tender it practically melts on your tongue, your search ends here. This Moist Dark Chocolate Cake with Buttermilk is not just a dessert; it is an experience. Designed for the true chocoholic, this cake eschews the dryness often found in butter-based sponges in favor of a scientifically perfected oil and buttermilk blend. The result is a texture that is dense yet fluffy, rich yet not cloying.
Imagine slicing into a dark, almost black sponge that glistens with moisture. The aroma fills the kitchen—a heady mix of vanilla, roasted coffee, and deep chocolate notes. We use hot coffee to bloom the cocoa powder, a technique that unlocks the full potential of the chocolate, ensuring every bite is packed with flavor. Whether you are celebrating a birthday, an anniversary, or simply the fact that it is Friday, this cake is the ultimate showstopper. It pairs perfectly with a simple ganache or a fluffy buttercream, but honestly, it is delicious enough to eat plain, straight from the pan.
History & Origins
The history of chocolate cake is a journey from a beverage to the decadent dessert we know today. Until the mid-19th century, chocolate was primarily consumed as a drink. It wasn’t until Dr. James Baker discovered how to grind cocoa beans in 1764, and later, when Conrad Van Houten developed the process for extracting cocoa butter in 1828, that baking with chocolate became accessible. The earliest ‘chocolate cakes’ were actually yellow cakes served with chocolate frosting.
The specific lineage of this dark, moist cake traces back to the early 20th century with the emergence of ‘Devil’s Food Cake.’ The name was likely a playful contrast to ‘Angel Food Cake,’ referencing the cake’s dark, reddish-brown hue and rich density. Originally, this color was achieved through a chemical reaction between cocoa powder and baking soda, which reddened the cocoa. Over time, as processing methods changed, the red hue diminished, but the name stuck for any intensely chocolatey cake. The introduction of buttermilk into these recipes was a game-changer in American Southern baking. Dairy was a precious commodity, and buttermilk—the liquid left after churning butter—was prized for its acidity and ability to tenderize gluten. This recipe honors that tradition, combining modern baking science with the nostalgic, comforting roots of classic American home baking.
Why This Recipe Works
This recipe succeeds where others fail due to a few key chemical interactions. First and foremost is the use of **oil instead of butter**. While butter adds flavor, it contains water and solid fats that solidify at room temperature, often leading to a drier texture. Oil remains liquid, coating the flour proteins and preventing excessive gluten formation, which ensures the cake stays soft and moist even after days in the fridge.
Secondly, the **buttermilk** is crucial. Its acidity reacts vigorously with the baking soda (sodium bicarbonate). This reaction produces carbon dioxide gas, which provides the lift needed to keep this dense batter airy and light. Without this acidity, the cake would be heavy and sodden. Finally, the **blooming technique**—pouring hot coffee over the cocoa powder—dissolves the cocoa solids effectively and releases flavor compounds that are otherwise trapped. The hot liquid also begins to gelatinize the starches in the flour immediately upon mixing, contributing to that sturdy yet velvety structure that defines a high-quality bakery cake.
Why You’ll Love This Recipe
- ✓Stays moist for up to 5 days due to the oil-based batter.
- ✓Deep, intense chocolate flavor enhanced by hot coffee.
- ✓Incredibly easy one-bowl mixing method.
- ✓Versatile enough for layer cakes, sheet cakes, or cupcakes.
- ✓Perfect balance of sweetness and dark cocoa bitterness.
Equipment You’ll Need
- ✓Two 9-inch round cake pans
- ✓Large mixing bowl
- ✓Whisk
- ✓Measuring cups and spoons
- ✓Parchment paper
- ✓Wire cooling rack
- ✓Sifter
Ingredients
- ✓2 cups granulated sugar
- ✓1 3/4 cups all-purpose flour
- ✓3/4 cup dark unsweetened cocoa powder
- ✓1 1/2 teaspoons baking powder
- ✓1 1/2 teaspoons baking soda
- ✓1 teaspoon salt
- ✓2 large eggs, room temperature
- ✓1 cup whole milk buttermilk, room temperature
- ✓1/2 cup vegetable oil or canola oil
- ✓2 teaspoons pure vanilla extract
- ✓1 cup boiling hot coffee (or boiling water)
Instructions
- Preheat your oven to 350°F (175°C). Grease two 9-inch round cake pans with butter or cooking spray and line the bottoms with parchment paper for easy release.
- In a large mixing bowl, sift together the flour, sugar, cocoa powder, baking powder, baking soda, and salt. Whisk briefly to ensure the dry ingredients are evenly combined.
- Create a well in the center of the dry ingredients. Add the eggs, buttermilk, vegetable oil, and vanilla extract.
- Beat the mixture on medium speed with a hand mixer or whisk vigorously by hand for about 2 minutes. The batter should look smooth and creamy.
- Carefully pour in the boiling hot coffee. Stir gently by hand until combined. The batter will be very thin and liquid; this is completely normal and essential for the moisture of the cake.
- Divide the batter evenly between the two prepared cake pans.
- Bake in the center of the preheated oven for 30 to 35 minutes. To test for doneness, insert a wooden toothpick into the center of the cake; it should come out clean or with just a few moist crumbs attached.
- Remove the pans from the oven and let them cool on a wire rack for about 10 minutes. Then, run a knife around the edges to loosen the cake and invert them onto the rack to cool completely before frosting.
Expert Cooking Tips
- ✓Ensure your ingredients, especially the eggs and buttermilk, are at room temperature to allow for better emulsification.
- ✓Do not skip the parchment paper; this moist cake can stick to the bottom of pans easily.
- ✓Use high-quality cocoa powder (Dutch-processed or regular depending on preference, though regular works best with baking soda) for the deepest flavor.
- ✓Don’t overbake. Check the cake 5 minutes before the stated time. Overbaking is the number one cause of dry cakes.
- ✓If you don’t drink coffee, you can use boiling water, but the coffee enhances the chocolate flavor without making the cake taste like coffee.
Substitutions and Variations
This recipe is quite forgiving with substitutions. If you do not have buttermilk on hand, you can make a quick DIY version by adding one tablespoon of white vinegar or lemon juice to a cup of whole milk and letting it sit for 5 minutes until curdled. For the oil, melted coconut oil or light olive oil can be used, though vegetable or canola oil provides the most neutral flavor. Gluten-free all-purpose flour blends (specifically those with xanthan gum) can replace the regular flour at a 1:1 ratio with excellent results. For a lower sugar option, monk fruit sweetener can be used, though the texture may be slightly less dense. While we recommend fresh brewed coffee, instant coffee dissolved in boiling water works perfectly fine as well.
Common Mistakes to Avoid
The most common mistake is over-mixing the batter after adding the flour. While the liquid addition step requires mixing, once the flour is wet, excessive beating develops gluten which leads to a tough, rubbery cake rather than a tender one. Another frequent error is opening the oven door too early. This causes a sudden temperature drop that can make the cake collapse in the center. Always wait until at least 25 minutes have passed before checking. Finally, using cold ingredients can cause the batter to seize or not emulsify properly, leading to an uneven bake. Take the time to let your dairy and eggs sit on the counter for 30 minutes before starting.
Serving Suggestions
This rich cake is a blank canvas for decadent toppings. It pairs beautifully with a classic Chocolate Buttercream or a silky Swiss Meringue Buttercream. For a sophisticated twist, try a dark chocolate ganache and a sprinkling of sea salt flakes. If you prefer something lighter, serve slices with a dollop of freshly whipped cream and fresh raspberries or strawberries to cut through the richness. It is also fantastic served warm with a scoop of vanilla bean ice cream and a drizzle of caramel sauce.
Storage and Reheating Tips
Because this cake is oil-based, it stays moist at room temperature longer than butter cakes. Store unfrosted layers wrapped tightly in plastic wrap at room temperature for up to 2 days. Once frosted, store the cake in an airtight container; it can stay at room temperature for 3 days or in the refrigerator for up to 5 days. If refrigerating, allow the cake to come to room temperature before serving for the best flavor and texture. Both the frosted cake and unfrosted layers freeze exceptionally well. Wrap tightly in plastic wrap and foil, and freeze for up to 3 months.
Nutrition Facts (Estimated)
| Serving Size | 1 slice |
| Calories | 450 |
| Fat | 22g |
| Saturated Fat | 4g |
| Unsaturated Fat | 18g |
| Trans Fat | 0g |
| Cholesterol | 45mg |
| Sodium | 320mg |
| Carbohydrates | 58g |
| Fiber | 4g |
| Sugar | 30g |
| Protein | 6g |
Frequently Asked Questions
Can I use butter instead of oil?
Technically yes, but we don’t recommend it for this specific recipe. The oil is what keeps the cake incredibly moist and soft even when cold. Butter can make the texture drier and firmer.
Will the cake taste like coffee?
No, the coffee simply enhances the richness of the chocolate. You won’t detect a distinct coffee flavor in the final product.
Why is my batter so runny?
The batter for this cake is intentionally very thin and liquid. Do not be alarmed and do not add extra flour; it will bake up perfectly into a moist, tender sponge.
Can I make this into cupcakes?
Absolutely. This recipe makes about 24-30 standard cupcakes. Bake them at 350°F for 18-22 minutes.
Can I use Dutch-process cocoa?
This recipe relies on baking soda, which needs acid to react. Natural cocoa powder is acidic, while Dutch-process is neutral. However, because there is plenty of acid in the buttermilk, you can use Dutch-process cocoa for a darker color and smoother flavor without ruining the rise.
How do I know when the cake is done?
Insert a toothpick into the center. It should come out clean or with a few moist crumbs. If there is wet batter on the toothpick, it needs more time.
Why did my cake sink in the middle?
This usually happens if the oven door was opened too early, the oven wasn’t hot enough, or there was too much leavening agent. Ensure your baking soda/powder measurements are precise.
Can I bake this in a 9×13 pan?
Yes, this recipe fits a standard 9×13 inch rectangular pan. You will likely need to increase the baking time to 35-45 minutes.
Conclusion
In the world of baking, few things are as satisfying as pulling a perfect chocolate cake out of the oven. This Moist Dark Chocolate Cake with Buttermilk recipe is a testament to how simple ingredients, when combined correctly, can create something truly magical. It is reliable, forgiving, and utterly delicious—a recipe that deserves a permanent spot in your recipe box. Whether you are a novice baker or a seasoned pro, the result will make you look like a pastry chef. So, brew that pot of coffee, measure out your cocoa, and get ready to enjoy the best chocolate cake you have ever tasted.

