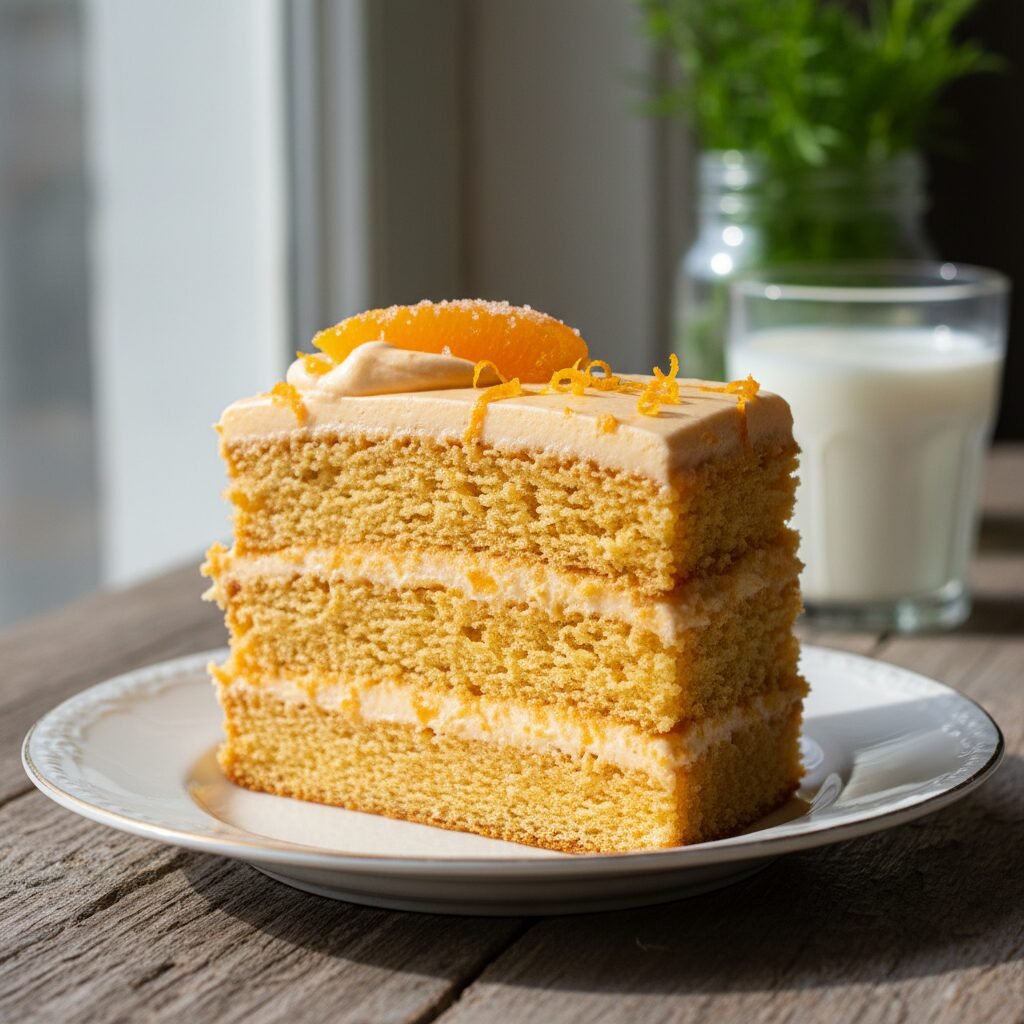
Moist Orange Layer Cake Recipe
Bursting with the sunshine-bright flavor of fresh oranges, this Ultimate Moist Orange Layer Cake features a tender, melt-in-your-mouth crumb and a velvety citrus buttercream. It is the perfect balance of sweet and tangy, making it a stunning centerpiece for spring gatherings or a cozy treat for afternoon tea.
45 minutes
30 minutes
2 hours
12-14 servings
Dessert
Baking
American
Vegetarian
There is something profoundly uplifting about the aroma of fresh citrus filling the kitchen. While lemon often takes the spotlight in the world of fruit desserts, the humble orange offers a sweeter, more floral complexity that creates a truly sophisticated layer cake. This Moist Orange Layer Cake is a celebration of that flavor—it is not just a vanilla cake with a hint of extract; it is a vibrant, zesty masterpiece that relies on fresh juice and zest to deliver a punch of authentic orange goodness.
The texture of this cake is what sets it apart from dry, dense sponges of the past. We aim for a crumb that is incredibly soft, almost plush, yet sturdy enough to hold up to three glorious layers of frosting. Achieving this requires a careful balance of ingredients: the richness of butter for flavor, the addition of oil for lasting moisture, and the acidity of buttermilk to tenderize the gluten. The result is a cake that stays soft for days, rather than drying out the moment it cools.
Covered in a silky, pale-orange buttercream that is speckled with fresh zest, this cake is as beautiful as it is delicious. It evokes memories of classic creamsicle treats but with an elevated, bakery-style finish. Whether you are baking for a birthday, a holiday brunch, or simply because you need a slice of sunshine on a cloudy day, this recipe promises to deliver joy in every forkful. It’s a labor of love that yields a show-stopping dessert, proving that homemade cake is always worth the effort.
History & Origins
The tradition of incorporating citrus into cakes dates back centuries, with roots deeply planted in Mediterranean cuisine where oranges and lemons grow in abundance. Early iterations were often dense, syrup-soaked semolina cakes or olive oil-based sponges that utilized the entire fruit, including the peel, to maximize flavor and preservation. However, the fluffy, high-rising layer cake is a distinctly American evolution in the world of baking.
In the United States, the popularity of orange cakes surged in the early to mid-20th century. This era saw the rise of the ‘chiffon’ cake, invented in the late 1920s, which used oil to create a uniquely airy texture. Simultaneously, the expansion of the railway systems allowed fresh citrus from Florida and California to be transported nationwide, making oranges a staple fruit in American households year-round. Recipes for ‘Sunshine Cakes’ and ‘Orange Kiss Me Cake’ (a winner of the 1950 Pillsbury Bake-Off) became household favorites, symbolizing freshness and modernity.
Southern baking culture also played a pivotal role in the history of this dessert. The South is famous for its elaborate layer cakes—coconut, caramel, and indeed, orange. These cakes were often signs of hospitality and culinary prowess, served at church potlucks and Sunday dinners. Over decades, the recipe has evolved from the denser pound cake styles to the lighter, fine-crumbed cakes we adore today, but the core appeal remains the same: the cheerful, bright flavor that only fresh oranges can provide.
Why This Recipe Works
This recipe succeeds where many others fail because it addresses the two biggest challenges in fruit-flavored cakes: lack of flavor and dry texture. First, to ensure a robust orange flavor without relying on artificial extracts, we utilize the ‘reverse creaming’ technique’s cousin—rubbing the orange zest directly into the granulated sugar before mixing. The friction releases the essential oils in the zest, infusing the sugar itself with intense citrus aroma that permeates the entire batter more effectively than just stirring zest in at the end.
Secondly, the texture is perfected through a specific fat strategy. We use a combination of unsalted butter and vegetable oil. Butter provides the classic, creamy flavor and structure that makes a cake feel luxurious, while vegetable oil remains liquid at room temperature, coating the flour proteins and preventing the cake from drying out. This ensures the cake remains moist days after baking.
Furthermore, we use fresh orange juice in the batter, but we balance its acidity with buttermilk. The buttermilk breaks down the gluten strands in the flour, resulting in a tender crumb, and reacts with the baking soda to create a fantastic lift. Finally, using cake flour instead of all-purpose flour lowers the protein content, ensuring the cake is soft and velvety rather than chewy or bread-like.
Why You’ll Love This Recipe
- ✓Infused with real orange zest and juice for authentic flavor.
- ✓Uses a butter-oil blend for the ultimate moist texture.
- ✓Stays soft and fresh for up to 4 days.
- ✓Layers are sturdy enough to stack but melt in your mouth.
- ✓Frosting is creamy, stable, and not overly sweet.
Equipment You’ll Need
- ✓Three 8-inch round cake pans
- ✓Stand mixer with paddle attachment
- ✓Microplane or fine zester
- ✓Mixing bowls
- ✓Whisk
- ✓Rubber spatula
- ✓Wire cooling rack
- ✓Offset spatula
- ✓Cake turntable (optional)
Ingredients
- ✓3 cups (345g) Cake flour, sifted
- ✓2 1/2 tsp Baking powder
- ✓1/2 tsp Baking soda
- ✓1 tsp Salt
- ✓1 cup (226g) Unsalted butter, room temperature
- ✓1 3/4 cups (350g) Granulated sugar
- ✓3 tbsp Fresh orange zest (approx. 3 oranges)
- ✓3 large Eggs, room temperature
- ✓2 large Egg whites, room temperature
- ✓1/3 cup (80ml) Vegetable oil
- ✓1 tbsp Pure vanilla extract
- ✓1/2 cup (120ml) Fresh orange juice
- ✓3/4 cup (180ml) Buttermilk, room temperature
- ✓FOR THE FROSTING:
- ✓1 1/2 cups (340g) Unsalted butter, slightly softened
- ✓8 oz (226g) Cream cheese, brick style, cool room temperature
- ✓6-7 cups (750g-875g) Powdered sugar, sifted
- ✓2 tbsp Fresh orange juice
- ✓1 tbsp Fresh orange zest
- ✓Pinch of salt
Instructions
- Preheat your oven to 350°F (175°C). Grease three 8-inch round cake pans, line the bottoms with parchment paper, and grease the parchment. Dust with flour and tap out the excess.
- In a medium bowl, whisk together the sifted cake flour, baking powder, baking soda, and salt. Set aside.
- In the bowl of a stand mixer, combine the granulated sugar and 3 tablespoons of orange zest. Use your fingertips to rub the zest into the sugar until it resembles wet sand and is very fragrant. This releases the essential oils.
- Add the room temperature butter to the sugar mixture. Beat on medium-high speed for about 3-4 minutes until the mixture is pale, fluffy, and aerated.
- Reduce speed to medium. Add the vegetable oil and vanilla extract, beating until combined.
- Add the eggs and egg whites one at a time, beating well after each addition and scraping down the sides of the bowl to ensure everything is incorporated.
- In a measuring cup, whisk together the fresh orange juice and buttermilk.
- Reduce the mixer speed to low. Add the dry ingredients in three parts, alternating with the wet ingredients in two parts, beginning and ending with the flour mixture (Flour -> Wet -> Flour -> Wet -> Flour). Mix only until just combined; do not overmix.
- Divide the batter evenly among the three prepared cake pans (use a kitchen scale for accuracy if desired). Smooth the tops with a spatula.
- Bake for 28-32 minutes, or until a toothpick inserted into the center comes out clean or with just a few moist crumbs. Avoid overbaking to preserve moisture.
- Remove cakes from the oven and let them cool in the pans for 10-15 minutes. Then, carefully turn them out onto a wire rack to cool completely before frosting.
- To make the frosting: In a clean mixer bowl, beat the butter and cream cheese on medium-high speed until creamy and smooth (about 3 minutes).
- Lower the speed and gradually add the powdered sugar, one cup at a time. Once all sugar is added, increase speed to high and whip for 2-3 minutes until fluffy.
- Add the orange juice, orange zest, and a pinch of salt. Beat for another minute until incorporated and smooth.
- Assemble the cake: Place one cake layer on your serving plate. Spread a layer of frosting over the top. Repeat with the second layer. Top with the final layer and frost the top and sides of the cake. Garnish with dried orange slices or fresh zest.
Expert Cooking Tips
- ✓Room temperature ingredients are non-negotiable. Cold eggs or butter will cause the batter to curdle and result in a dense cake.
- ✓Don’t skip the ‘rubbing the zest’ step. It creates a depth of flavor that extract alone cannot achieve.
- ✓Use fresh squeezed orange juice, not bottled. Bottled juice often contains preservatives or added sugar that can alter the taste.
- ✓Weigh your flour. If you scoop with a cup, you might pack too much flour in, leading to a dry cake. 345g is the magic number.
- ✓Chill the cake layers before frosting. A slightly cold cake is much easier to stack and frost without crumbs getting into the icing.
- ✓If the frosting is too soft, refrigerate it for 10-15 minutes to firm up before piping.
Substitutions and Variations
If you do not have cake flour, you can make a DIY version by measuring 1 cup of all-purpose flour, removing 2 tablespoons, and replacing them with 2 tablespoons of cornstarch. Sift this mixture twice before using. For the buttermilk, you can make a ‘sour milk’ substitute by adding 1 tablespoon of white vinegar or lemon juice to a cup of whole milk and letting it sit for 5 minutes, though store-bought buttermilk yields the best texture. If you prefer a dairy-free cake, you can substitute the butter with a high-quality vegan butter block and the buttermilk with almond milk mixed with vinegar, though the texture may be slightly less rich. For the oil, any neutral oil like canola, vegetable, or grapeseed works perfectly. In the frosting, if you don’t like cream cheese, you can replace it with an equal amount of additional butter for a standard American buttercream.
Common Mistakes to Avoid
The most common mistake with this cake is overmixing the batter after adding the flour. Once the flour hits the liquid, gluten begins to form. If you beat it too vigorously, the cake will become tough and rubbery instead of tender. Stop mixing as soon as the white streaks of flour disappear. Another mistake is opening the oven door too early. This releases heat and can cause the delicate structure of the cake to collapse in the center. Wait until at least 25 minutes have passed before checking. Finally, frosting a warm cake is a recipe for disaster; the butter in the frosting will melt, causing the layers to slide apart. Ensure the cakes are completely cool to the touch.
Serving Suggestions
This cake is a stunner on its own, but it pairs beautifully with a variety of accompaniments. Serve slices with a dollop of lightly sweetened whipped cream and a few segments of fresh orange or blood orange for a pop of color. A scoop of vanilla bean ice cream is excellent if serving the cake slightly warm (though it is best at room temperature). Beverage-wise, this cake complements a hot cup of Earl Grey tea, which has bergamot citrus notes, or a glass of cold prosecco for a celebratory brunch. For decoration, candied orange slices or edible flowers like nasturtiums or pansies make for a professional-looking finish.
Storage and Reheating Tips
Because the frosting contains cream cheese, this cake is best stored in the refrigerator if you are keeping it for more than 24 hours. However, cold cake can taste dry and the butter solidifies. Therefore, always remove the cake (or the slice you intend to eat) from the fridge 30 to 60 minutes before serving to let it come back to room temperature. This restores the soft texture and creamy frosting consistency. The cake can be stored in an airtight cake carrier in the fridge for up to 5 days. For freezing, wrap individual slices tightly in plastic wrap followed by aluminum foil. They can be frozen for up to 3 months. Thaw in the fridge overnight before bringing to room temperature.
Nutrition Facts (Estimated)
| Serving Size | 1 slice |
| Calories | 580 |
| Fat | 28g |
| Saturated Fat | 16g |
| Unsaturated Fat | 10g |
| Trans Fat | 0g |
| Cholesterol | 85mg |
| Sodium | 310mg |
| Carbohydrates | 76g |
| Fiber | 1g |
| Sugar | 42g |
| Protein | 5g |
Frequently Asked Questions
Can I bake this in a 9×13 pan instead?
Yes, you can bake this in a 9×13 inch rectangular pan. The baking time will likely need to be adjusted to 35-40 minutes. Check with a toothpick starting at 35 minutes.
Why did my cake sink in the middle?
Sinking usually happens if the oven door was opened too early, the oven temperature was too low, or the leavening agents (baking powder/soda) were expired. It can also happen if the batter was overmixed.
Can I use blood oranges instead of regular oranges?
Absolutely! Blood oranges will give the cake a slightly more berry-like flavor and a beautiful pinkish hue to the frosting. The acidity levels are similar enough that it won’t affect the chemistry of the batter.
Do I have to use the egg whites?
The additional egg whites add structure and lightness without the heaviness of the yolk. Omitting them might make the cake denser. If you hate wasting yolks, you can use 4 whole eggs instead of 3 eggs + 2 whites, but the texture will change slightly.
Can I make this recipe as cupcakes?
Yes, this batter makes excellent cupcakes. Line a muffin tin with paper liners and fill 2/3 full. Bake at 350°F for 18-22 minutes. This recipe yields approximately 24-28 cupcakes.
Is the cream cheese necessary in the frosting?
It is not strictly necessary, but it cuts the sweetness of the powdered sugar and adds a lovely tang that pairs well with the orange. If you prefer a standard buttercream, simply swap the cream cheese for more butter.
How do I get my cake layers flat?
You can use ‘cake strips’ wrapped around the outside of the pan to insulate the edges, preventing them from cooking faster than the center. Alternatively, once the cakes are cooled, simply use a serrated knife to trim off the domed tops before stacking.
Can I use gluten-free flour?
Yes, you can use a high-quality ‘cup-for-cup’ gluten-free flour blend that contains xanthan gum. The texture may be slightly different, but it generally works well with this moist batter.
Conclusion
This Moist Orange Layer Cake is more than just a recipe; it is a slice of happiness on a plate. The combination of the bright, zesty sponge with the rich, creamy frosting creates a dessert experience that is both nostalgic and refreshingly modern. Whether you are an experienced baker looking to perfect your layer cake technique or a novice wanting to impress your friends, this guide provides everything you need for success. So, grab your oranges, preheat that oven, and get ready to fill your home with the irresistible scent of citrus baking. Enjoy every bite!