Moist Red Velvet Layer Cake For Birthday Recipe
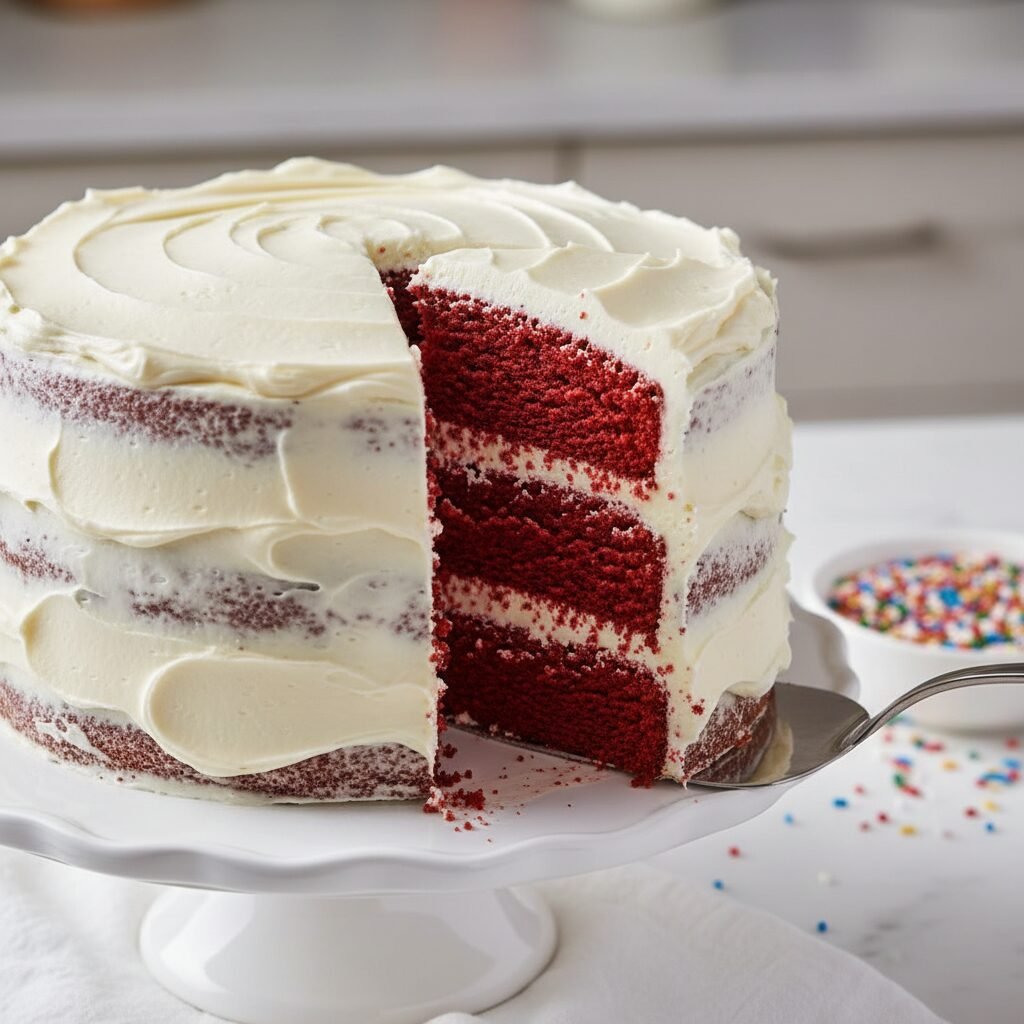
There is something truly magical about cutting into a stark white cake to reveal those vibrant red layers. This recipe delivers the perfect balance of vanilla and chocolate flavors with a texture so soft it practically melts in your mouth.
45 minutes
35 minutes
2 hours 30 minutes
12-16 Slices
Dessert
Baking
American
Vegetarian
Let’s be honest, Mamas: birthdays are a big deal. Whether you are planning a party for your little one, your significant other, or even treating yourself (because you absolutely deserve it!), the cake is the centerpiece of the entire event. I have spent years testing red velvet recipes. Some were too dry, some lacked flavor, and some just turned out brown instead of that gorgeous crimson red. But finally, I have cracked the code.
This Red Velvet Layer Cake is everything a birthday cake should be. It is incredibly moist—thanks to a secret combination of oil and buttermilk—and has that signature subtle chocolate flavor that keeps everyone guessing. And let’s talk about the frosting. We are using a classic, tangy Cream Cheese Frosting that cuts through the sweetness of the cake perfectly. It is swoon-worthy, lick-the-bowl-clean good!
I love this recipe because it feels fancy and sophisticated, but it is surprisingly forgiving to bake. You do not need to be a professional pastry chef to pull this off. So, grab your apron and your stand mixer, and let’s bake a memory-making masterpiece that will have all the other moms asking for your secret recipe!
History & Origins
Red Velvet Cake has a fascinating history that is as rich as its flavor. While many people think the red color comes solely from food dye, the original ‘velvet’ cakes from the Victorian era were simply named for their soft texture. The reddish hue actually happened naturally!
Back in the day, cocoa powder wasn’t processed the way it is now (Dutch-processed). Raw cocoa contains anthocyanins, which turn red when mixed with acidic ingredients like buttermilk and vinegar. During the Great Depression and WWII, when food rationing was in effect, bakers used beet juice to keep cakes moist and enhance the color. Later, the Adams Extract company popularized the modern version we know today by selling red food coloring with tear-off recipe cards in grocery stores. Today, it is a staple of American baking and a symbol of celebration, especially in the South.
Why This Recipe Works
So, what makes this specific recipe foolproof? It is all about the chemistry of the acids and fats. First, we use buttermilk and vinegar. These acids react with the baking soda to create carbon dioxide bubbles, which gives the cake a fluffy, airy lift. But more importantly, they tenderize the gluten in the flour, ensuring that ‘velvet’ texture.
Secondly, I use a mix of butter and oil. Butter provides that rich, nostalgic flavor we all love, while vegetable oil ensures the cake stays moist for days. Butter is about taste; oil is about texture. By using both, we get the best of both worlds. Finally, the addition of a little hot coffee (don’t worry, it won’t taste like java!) blooms the cocoa powder, intensifying the chocolate notes without making it a full-blown chocolate cake.
Why You’ll Love This Recipe
- ✓Ultra-moist texture that stays fresh for days
- ✓Perfect balance of tangy and sweet flavors
- ✓Sturdy enough for layering and decorating
- ✓Vibrant, show-stopping red color
- ✓Frosting is stable and easy to pipe
Equipment You’ll Need
- ✓Stand mixer or electric hand mixer
- ✓Two or three 9-inch round cake pans
- ✓Parchment paper
- ✓Wire cooling rack
- ✓Offset spatula for frosting
- ✓Large mixing bowls
- ✓Sifter or fine-mesh sieve
Ingredients
- ✓2 1/2 cups Cake Flour (spooned and leveled)
- ✓2 tablespoons Unsweetened Cocoa Powder
- ✓1 teaspoon Baking Soda
- ✓1/2 teaspoon Salt
- ✓1/2 cup Unsalted Butter, softened to room temperature
- ✓1 1/2 cups Granulated Sugar
- ✓1 cup Vegetable Oil (or Canola Oil)
- ✓2 large Eggs, room temperature
- ✓2 teaspoons Pure Vanilla Extract
- ✓1 teaspoon Distilled White Vinegar
- ✓1 tablespoon Red Gel Food Coloring
- ✓1 cup Buttermilk, room temperature
- ✓For the Frosting:
- ✓16 oz Full-Fat Cream Cheese, brick style, softened
- ✓1/2 cup Unsalted Butter, softened
- ✓4 cups Powdered Sugar
- ✓1 teaspoon Vanilla Extract
- ✓Pinch of salt
Instructions
- Preheat and Prep: Preheat your oven to 350°F (175°C). Grease your 9-inch cake pans with butter or cooking spray and line the bottoms with parchment paper rounds. This ensures your beautiful layers won’t stick!
- Whisk Dry Ingredients: In a medium bowl, sift together the cake flour, cocoa powder, baking soda, and salt. Sifting is crucial here to avoid lumps of cocoa in your batter. Set aside.
- Cream Butter and Sugar: In the bowl of a stand mixer fitted with the paddle attachment, beat the softened butter and sugar on medium-high speed for about 5 minutes. It should look pale and fluffy. Scrape down the sides of the bowl.
- Add Wet Ingredients: With the mixer on medium, pour in the vegetable oil. Then, add the eggs one at a time, mixing fully after each addition. Stir in the vanilla extract and vinegar.
- Color it Red: Add your red food coloring. I recommend gel coloring for a vibrant hue without adding too much liquid. Mix until the color is uniform.
- Combine: Turn the mixer to low speed. Add the dry ingredients in three parts, alternating with the buttermilk in two parts (Dry, Wet, Dry, Wet, Dry). Mix only until just combined. Do not overmix or the cake will be tough!
- Bake: Divide the batter evenly between the prepared pans. Bake for 30-35 minutes, or until a toothpick inserted into the center comes out clean or with just a few moist crumbs.
- Cool: Let the cakes cool in the pans for 10 minutes, then carefully turn them out onto a wire rack to cool completely before frosting. They must be room temperature or the frosting will melt.
- Make the Frosting: Beat the cream cheese and butter together until smooth and creamy (no lumps!). Gradually add the powdered sugar, one cup at a time, on low speed. Add vanilla and salt, then whip on high for 2 minutes until fluffy.
- Assemble: Place one cake layer on your serving stand. Spread a generous layer of frosting on top. Place the second layer on top. Frost the top and sides. Decorate with sprinkles or cake crumbs!
Expert Cooking Tips
- ✓Room Temperature is Key: Ensure your butter, eggs, buttermilk, and cream cheese are all at room temperature. This creates an emulsion that traps air, resulting in a lighter cake.
- ✓Weigh Your Flour: If you can, use a kitchen scale. If not, spoon the flour into the measuring cup and level it off. Scooping directly packs the flour and leads to a dry cake.
- ✓Don’t Skimp on Beating: When creaming the butter and sugar, really let it go for 5 minutes. You are mechanically adding air into the batter.
- ✓Gel vs. Liquid Dye: Use gel food coloring (like Americolor or Wilton). It is more concentrated, so you use less liquid, which keeps the batter consistency perfect.
- ✓The Crumb Coat: Apply a thin layer of frosting first and chill the cake for 20 minutes. This seals in the red crumbs so your final layer of white frosting stays pristine.
Substitutions and Variations
No buttermilk? No problem! You can make a DIY version by adding 1 tablespoon of lemon juice or white vinegar to a cup of whole milk and letting it sit for 5 minutes. If you do not have cake flour, you can use all-purpose flour, but remove 2 tablespoons of flour per cup and replace it with cornstarch. Sift well! For a dye-free version, you can use beet powder, though the color will be more of a rusty pink than a bright red.
Common Mistakes to Avoid
The biggest mistake I see is over-baking. Red velvet dries out faster than chocolate cake because it has less fat from cocoa butter. Check it at the 30-minute mark! Another common error is frosting the cake while it is still slightly warm. This will cause your beautiful cream cheese frosting to slide right off. Patience is a virtue here, Mama!
Serving Suggestions
This cake is a showstopper on its own, but for a birthday, I love to garnish it with fresh raspberries or strawberries to pop against the white frosting. A sprinkle of red sanding sugar or even crumbling up a cupcake to sprinkle red crumbs around the base adds a professional bakery touch. Serve with a cold glass of milk or a hot cup of coffee to cut the sweetness.
Storage and Reheating Tips
Because of the cream cheese frosting, this cake should be stored in the refrigerator. It will keep for up to 5 days in an airtight container or cake keeper. However, cold cake can taste dry, so slice it and let it sit on the counter for 20 minutes before eating to bring the butter back to room temperature. You can also freeze the unfrosted cake layers for up to 3 months—just wrap them tightly in plastic wrap and foil.
Nutrition Facts (Estimated)
| Serving Size | 1 Slice |
| Calories | 650 |
| Fat | 34g |
| Saturated Fat | 18g |
| Unsaturated Fat | 14g |
| Trans Fat | 0.5g |
| Cholesterol | 95mg |
| Sodium | 380mg |
| Carbohydrates | 82g |
| Fiber | 2g |
| Sugar | 48g |
| Protein | 6g |
Frequently Asked Questions
Can I make this cake ahead of time?
Absolutely! In fact, I find the flavor improves after the layers sit for a day. You can bake the layers, wrap them tightly, and store them in the fridge overnight before assembling.
Why did my cake turn brown instead of red?
This usually happens if you use too much baking soda or a very dark cocoa powder without enough food coloring. The pH balance affects the color. Stick to regular unsweetened cocoa powder, not Dutch-processed, for the best red color.
Can I turn this recipe into cupcakes?
Yes! This recipe makes about 24-30 standard cupcakes. Bake them at 350°F for 18-22 minutes.
Does red velvet cake taste like chocolate?
It has a mild chocolate flavor, but it is not as intense as a devil’s food cake. It is more of a vanilla cake with a hint of chocolate and a tangy buttermilk finish.
My frosting is too runny, how do I fix it?
Cream cheese frosting can get runny if the ingredients were too warm or over-mixed. Try chilling it in the fridge for 20 minutes. If it’s still too soft, add another half cup of powdered sugar.
Do I really need vinegar?
Yes! The vinegar activates the baking soda for the rise and helps preserve the red color. You won’t taste it in the final product.
Can I use butter instead of oil?
You can, but I highly recommend the blend. All-butter cakes taste great but can be drier when refrigerated. The oil keeps the crumb soft and moist even when cold.
How do I get flat layers?
You can use ‘cake strips’ soaked in water wrapped around your pans, or simply trim the domes off with a serrated knife after baking (and eat the scraps as a treat!).
Conclusion
There you have it, the only Red Velvet Cake recipe you will ever need in your recipe box! It is lush, vibrant, and packed with love. I hope this cake brings as much joy to your family celebrations as it does to mine. If you make it, please snap a photo and tag me on Pinterest or Instagram—I absolutely love seeing your creations! Happy baking, friends!

