Moist Red Velvet Layer Cake With Oreo Crumbs Recipe
Get ready to meet your new favorite dessert. This Red Velvet Layer Cake is impossibly soft, vibrant, and packed with a surprise crunch of Oreo crumbs between the layers. It is the ultimate marriage of classic elegance and cookies-and-cream fun!
30 Minutes
30 Minutes
2 Hours (includes cooling)
12-16 Slices
Dessert
Baking
American
Vegetarian
Hey there, sweet friends! If you have been searching for that one cake recipe that stops everyone in their tracks—the kind that makes people close their eyes and hum with happiness after the first bite—you have just found it. Today, we are diving deep into the world of Red Velvet, but with a decadent twist that takes it from delicious to absolutely unforgettable.
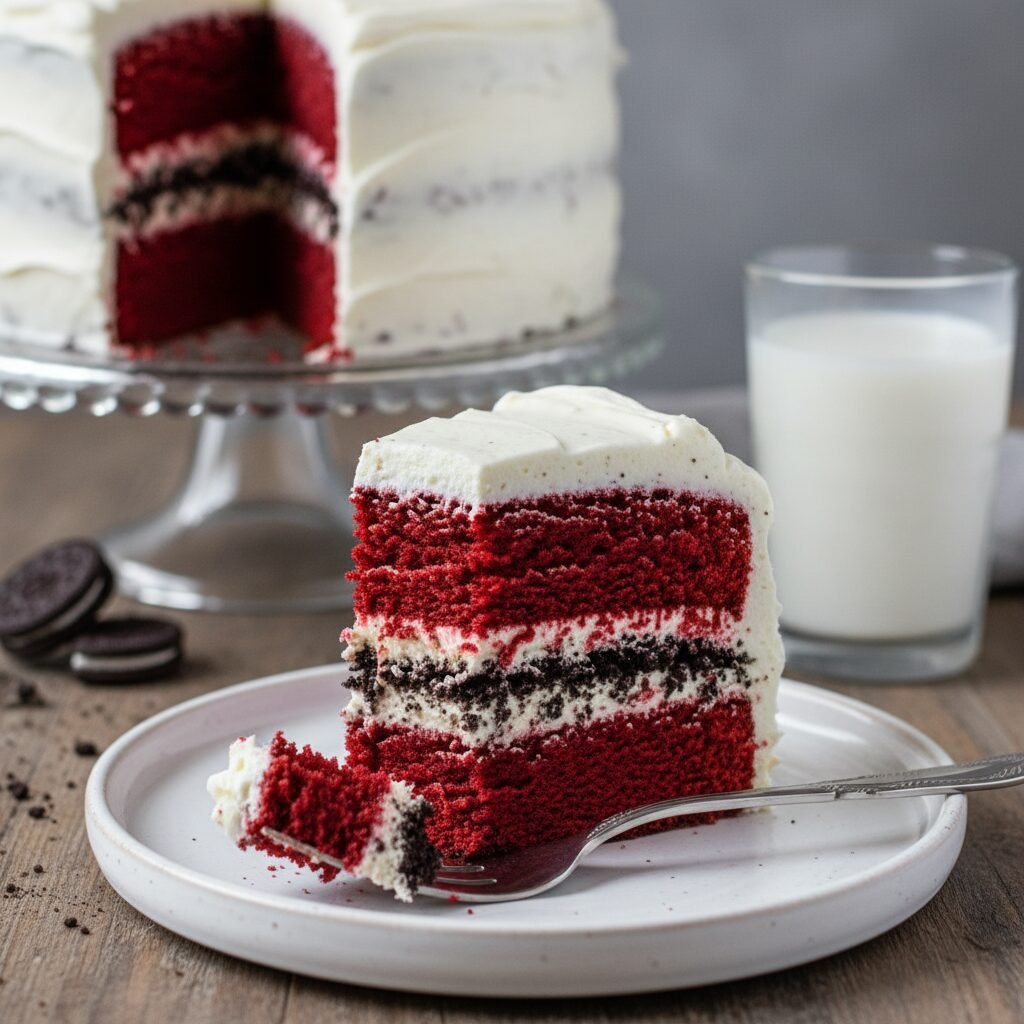
We all know and love the classic Red Velvet. It is iconic for a reason with its subtle chocolate flavor and tangy buttermilk crumb. But, being a mom who loves to experiment in the kitchen, I felt like it needed a little something extra. A texture surprise. Enter: Oreo Crumbs. By adding a layer of crushed chocolate sandwich cookies between the soft, velvety cake layers and the rich cream cheese frosting, we are creating a symphony of textures. You get the fluffy cake, the creamy frosting, and that satisfying crunch in every single forkful.
I first made this for my daughter’s birthday, and let me tell you, it vanished. Gone. Not a crumb left on the platter! It is visually stunning with that bright red pop against the white frosting and black cookie crumbs, making it totally Pinterest-worthy and perfect for holidays like Christmas or Valentine’s Day. So, grab your apron and let’s bake the most moist, flavorful, and fun cake you will ever taste!
History & Origins
Red Velvet cake has a fascinating and somewhat debated history that adds to its mystique. Originally, in the Victorian era, “velvet” cakes were a thing—they were fancy cakes with a soft, velvety crumb, usually served at elite gatherings. The reddish hue actually wasn’t originally from food dye! Back then, raw cocoa powder reacted with the acidic ingredients (like buttermilk and vinegar) to create a reddish-brown tint. It was chemistry magic!
Fast forward to the Great Depression and World War II, when food rationing was in full swing. Bakers began using beet juice to keep their cakes moist and visually appealing, which enhanced that red color. The bright, neon red we know today really took off when the Adams Extract company in Texas wanted to sell more food coloring and printed a Red Velvet recipe on their cards. It became a Southern staple and eventually a global icon.
The addition of Oreo crumbs is a much more modern twist, born from the “Cookies and Cream” craze of the late 20th century. Combining the Southern classic with America’s favorite cookie bridges the gap between traditional elegance and modern indulgence. It is a nod to the past with a fun, crunchy foot firmly planted in the present!
Why This Recipe Works
You might be wondering, “What makes this specific recipe so moist?” The science here is actually pretty cool! First, we use oil instead of butter for the cake batter. While butter adds flavor, it contains water and solids that can make a cake dry out faster, especially when refrigerated. Oil is 100% fat and stays liquid at room temperature (and in the fridge), ensuring your cake stays soft and tender for days.
Secondly, the combination of buttermilk and vinegar is non-negotiable. The acid in these ingredients breaks down the gluten strands in the flour, resulting in a crumb that is incredibly tender rather than chewy. That acid also reacts with the baking soda to give the cake a brilliant lift and fluffiness.
Finally, let’s talk about the Oreo layer. Texture is just as important as flavor. If a dessert is all soft (soft cake, soft frosting), your palate can get bored. Adding the crushed Oreos introduces a contrasting crunch that wakes up your taste buds and cuts through the richness of the cream cheese frosting, balancing the entire bite perfectly.
Why You’ll Love This Recipe
- ✓Incredibly moist texture thanks to vegetable oil and buttermilk.
- ✓A surprise crunch from a generous layer of crushed Oreos.
- ✓Silky, tangy homemade cream cheese frosting.
- ✓Vibrant red color that makes a stunning centerpiece.
- ✓Keeps fresh and soft for days in the refrigerator.
- ✓Perfect balance of sweet, tangy, and chocolatey flavors.
Equipment You’ll Need
- ✓Three 8-inch or Two 9-inch Round Cake Pans
- ✓Stand Mixer with Paddle Attachment (or Electric Hand Mixer)
- ✓Large Mixing Bowls
- ✓Whisk
- ✓Rubber Spatula
- ✓Offset Spatula for frosting
- ✓Parchment Paper
- ✓Wire Cooling Rack
Ingredients
- ✓For the Cake:
- ✓2 1/2 cups Cake Flour (sifted)
- ✓1 1/2 cups Granulated Sugar
- ✓1 teaspoon Baking Soda
- ✓1 teaspoon Salt
- ✓1/4 cup Unsweetened Cocoa Powder
- ✓1 1/2 cups Vegetable Oil (or Canola Oil)
- ✓1 cup Buttermilk (room temperature)
- ✓2 Large Eggs (room temperature)
- ✓1 teaspoon White Distilled Vinegar
- ✓1 teaspoon Vanilla Extract
- ✓1-2 tablespoons Red Gel Food Coloring (depending on desired intensity)
- ✓For the Filling:
- ✓15-20 Oreo Cookies (crushed into coarse crumbs)
- ✓For the Cream Cheese Frosting:
- ✓16 oz Full-Fat Cream Cheese (brick style, softened)
- ✓1 cup Unsalted Butter (softened)
- ✓1 tablespoon Vanilla Extract
- ✓4-5 cups Powdered Sugar (sifted)
- ✓Pinch of salt
Instructions
- Prep the Oven and Pans: Preheat your oven to 350°F (175°C). Grease your cake pans with butter or cooking spray and line the bottoms with parchment paper. This ensures your beautiful layers won’t stick!
- Mix Dry Ingredients: In a medium bowl, sift together the cake flour, cocoa powder, baking soda, and salt. Whisk them well to ensure the cocoa is evenly distributed. Set aside.
- Mix Wet Ingredients: In the bowl of your stand mixer (or a large bowl), combine the sugar and vegetable oil. Mix on medium speed until combined. Add the eggs one at a time, beating well after each addition.
- Add Color and Flavor: Stir in the red food coloring, vanilla extract, and vinegar. Prepare for a visual pop—the batter will turn a gorgeous bright red!
- Combine: Alternate adding the dry ingredients and the buttermilk to the oil mixture. Start with dry, then buttermilk, then dry. Mix on low speed just until combined. Do not overmix or the cake will be tough!
- Bake: Divide the batter evenly between your prepared pans. Bake for 28-32 minutes, or until a toothpick inserted into the center comes out clean or with just a few moist crumbs. The tops should spring back when gently touched.
- Cool: Let the cakes cool in the pans for about 10 minutes, then turn them out onto a wire rack to cool completely. This is crucial—if you frost warm cake, it will melt!
- Make the Frosting: While the cake cools, beat the softened cream cheese and butter together until smooth and creamy (about 3 minutes). Add the vanilla and salt. Gradually add the powdered sugar, one cup at a time, beating on low until incorporated, then whip on high for 2 minutes until fluffy.
- Assemble: Place one cake layer on your serving stand. Spread a generous layer of cream cheese frosting on top. Sprinkle a heavy layer of crushed Oreo crumbs over the frosting. Top with the second cake layer.
- Frost and Decorate: Cover the top and sides of the cake with the remaining frosting. Use an offset spatula to make it smooth or create swirls. Decorate the base or the top with any remaining Oreo crumbs or whole Oreos.
- Chill: Refrigerate the cake for at least 30 minutes before slicing to let the layers set. Serve and enjoy!
Expert Cooking Tips
- ✓Room Temperature is Key: Make sure your eggs, buttermilk, butter, and cream cheese are all at room temperature. This ensures they emulsify properly for a smooth batter and frosting.
- ✓Gel vs. Liquid Color: I highly recommend using gel food coloring (like Americolor Super Red). It is much more concentrated, so you use less liquid, and it gives a more vibrant color than the watery grocery store drops.
- ✓Don’t Skip the Vinegar: It might seem odd to put vinegar in a cake, but you cannot taste it! It is there strictly for the chemical reaction with the baking soda to make the cake fluffy.
- ✓Crushing Oreos: Place your Oreos in a zip-top bag and bash them with a rolling pin. You want a mix of fine dust and bigger chunks for the best texture.
- ✓Weigh Your Flour: If you can, use a kitchen scale. If not, spoon the flour into the measuring cup and level it off. Scooping directly packs the flour and leads to a dry cake.
Substitutions and Variations
If you are missing a few ingredients, don’t panic! Here are some mom-approved swaps:
- Buttermilk: No buttermilk? No problem. Add 1 tablespoon of lemon juice or white vinegar to a measuring cup, then fill it to the 1-cup line with regular milk. Let it sit for 5 minutes until it curdles.
- Cake Flour: If you only have All-Purpose flour, remove 2 tablespoons of flour per cup and replace it with cornstarch. Sift well.
- Vegetable Oil: You can use melted coconut oil or canola oil. I don’t recommend olive oil as the flavor is too strong.
- Cream Cheese: Ensure you use the brick style, not the tub spread. Mascarpone can also be used for a less tangy, creamier frosting.
Common Mistakes to Avoid
The biggest mistake people make with Red Velvet is overbaking. Because of the dark color, it is hard to see when it is browning. Trust your timer and the toothpick test. If you bake it too long, it loses that signature moisture.
Another common error is frosting too soon. I know, the smell is intoxicating and you want to eat it NOW, but if the cake is even slightly warm, your butter-based frosting will slide right off, and your layers will slip. Patience is a virtue here!
Serving Suggestions
This cake is rich, so cut the slices thin! It pairs beautifully with a tall glass of ice-cold milk to balance the sweetness. For the adults, a hot cup of dark roast coffee cuts through the sugar and complements the cocoa notes perfectly. If you want to get fancy for a party, serve it with a side of fresh raspberries or strawberries—the tart fruit works wonders with the cream cheese.
Storage and Reheating Tips
Because of the cream cheese frosting, this cake must be refrigerated. It can sit out for a few hours during a party, but store leftovers in the fridge in an airtight container (or with plastic wrap pressed against the cut side) for up to 5 days. Actually, I think it tastes even better cold!
Freezing: You can freeze the baked cake layers (unfrosted) for up to 2 months. Wrap them tightly in plastic wrap and then foil. Thaw in the fridge overnight before frosting.
Nutrition Facts (Estimated)
| Serving Size | 1 Slice |
| Calories | 680 kcal |
| Fat | 38g |
| Saturated Fat | 14g |
| Unsaturated Fat | 22g |
| Trans Fat | 0g |
| Cholesterol | 95mg |
| Sodium | 340mg |
| Carbohydrates | 82g |
| Fiber | 2g |
| Sugar | 55g |
| Protein | 7g |
Frequently Asked Questions
Why is my Red Velvet cake not red?
This usually happens if you don’t use enough food coloring or if you use a natural coloring that browns when baked. Cocoa powder is dark, so you need a strong dye to overcome it. Use high-quality gel paste for the best results.
Can I use butter instead of oil in the cake?
You can, but I don’t recommend it for this specific recipe. Oil coats the flour proteins better than butter, preventing gluten formation and keeping the cake moist longer. If you must use butter, the cake will be denser and dry out faster.
Do I remove the cream from the Oreos before crushing?
Nope! Leave the cream filling in. It adds extra sweetness and helps the crumbs clump together slightly, which is delicious inside the cake.
Can I make this into cupcakes?
Absolutely! This recipe will make about 24-30 standard cupcakes. Bake them at 350°F for about 18-22 minutes. Check them early.
Why did my cake sink in the middle?
This is usually due to underbaking (the center wasn’t set) or opening the oven door too early, which causes a temperature drop. It can also happen if your baking soda is old and inactive.
Is Red Velvet just chocolate cake with dye?
Sort of, but not quite! It has much less cocoa powder than a standard chocolate cake, and the addition of vinegar and buttermilk gives it a distinct tangy flavor and a finer, tighter crumb texture that is unique to Red Velvet.
Can I make the cake layers ahead of time?
Yes! In fact, chilled cake is easier to frost. You can bake the layers the day before, wrap them in plastic wrap once cooled, and store them in the fridge until you are ready to assemble.
My frosting is too runny, how do I fix it?
This happens if the butter or cream cheese was too warm (melted) or if it’s humid. Try adding more sifted powdered sugar, a quarter cup at a time. You can also pop the bowl in the fridge for 20 minutes to firm up the fats.
Conclusion
And there you have it, my lovelies! The Moist Red Velvet Layer Cake with Oreo Crumbs that is going to change your dessert game forever. It is lush, festive, and honestly, a little addictive. Whether you are baking for a birthday, a potluck, or just because it is Tuesday and you deserve a treat, this cake delivers.
I hope you have as much fun making this (and eating the batter… shh, I won’t tell!) as I do. If you try this recipe, please snap a photo and tag me on Pinterest or Instagram! I love seeing your beautiful creations. Happy baking!

