Moist Red Velvet Sheet Cake Recipe
This isn’t just a cake; it’s a warm hug in a baking pan. With its velvety crumb, subtle chocolate notes, and a thick layer of tangy cream cheese frosting, this Red Velvet Sheet Cake is the easiest way to win hearts at your next gathering.
20 minutes
30 minutes
50 minutes
24 squares
Dessert
Baking
American
Vegetarian
Hey there, lovely mamas and baking enthusiasts! If there is one dessert that screams "special occasion" without actually requiring a culinary degree to pull off, it is this Moist Red Velvet Sheet Cake. I have been obsessed with red velvet since I was a little girl—there is just something magical about that vibrant red color and the way it pairs so perfectly with tangy, sweet cream cheese frosting. But let’s be real for a second: layer cakes can be a huge hassle. The leveling, the crumb coating, the stacking… sometimes, as a busy mom, I just do not have the time (or the patience!) for all that architecture.
That is why I am completely in love with this sheet cake version. It gives you all the drama and flavor of a traditional tiered cake but with zero stress. You literally bake it in a 9×13 pan, slather the frosting right on top, and serve. It is the ultimate "low effort, high reward" dessert. Whether you are prepping for a Valentine’s Day party, a Christmas potluck, or just a Tuesday night where you need a little pick-me-up, this recipe is your new best friend. Trust me, the texture is so incredibly moist that it stays fresh for days—if it lasts that long in your house!
I have tweaked this recipe over the years to ensure it is foolproof. We are using oil instead of butter for the base to guarantee that moist factor, and just the right amount of cocoa powder so it tastes authentic without being just a chocolate cake in disguise. Grab your apron, because we are about to bake some happiness!
History & Origins
Red Velvet Cake has a surprisingly controversial and mysterious history that makes it even more fun to eat! While many people believe it originated in the South, its roots might actually be in the luxurious Waldorf-Astoria Hotel in New York City during the 1920s. Legend has it that the cake was a signature dessert there. However, the "red" color originally wasn’t from food dye at all.
Back in the day, cocoa powder was not processed the way it is now (Dutch-processed). When raw cocoa powder reacted with acidic ingredients like buttermilk and vinegar, it naturally turned a reddish-brown hue. During the Great Depression and World War II, when foods were rationed, bakers began using beet juice to keep their cakes moist and enhance that color. It wasn’t until the Adams Extract company in Texas popularized the use of red food coloring in the 1940s—pairing it with tear-off recipe cards in grocery stores—that the bright, neon-red cake we know and love today became an American staple. So, when you bake this, you are partaking in a nearly century-old tradition of culinary chemistry and marketing genius!
Why This Recipe Works
You might be wondering, "What makes this specific recipe better than a box mix?" It all comes down to the science of moisture and lift. First, we use vegetable oil instead of butter. While butter adds flavor, it contains water that evaporates during baking, which can sometimes lead to a drier crumb. Oil is 100% fat and remains liquid at room temperature, ensuring the cake stays incredibly soft and moist for days.
Secondly, the combination of buttermilk, vinegar, and baking soda creates a powerful chemical reaction. This trio does two things: it tenderizes the gluten in the flour (making the cake "velvety" rather than chewy) and it creates carbon dioxide bubbles that give the cake a fluffy, airy rise. Finally, the small amount of cocoa powder provides that elusive red velvet flavor—it is not quite vanilla, not quite chocolate, but a delicious hybrid that is perfectly balanced by the tanginess of the cream cheese frosting.
Why You’ll Love This Recipe
- ✓Requires only one bowl for the wet ingredients and one for dry—super easy cleanup!
- ✓Uses oil instead of butter for a texture that stays moist for days.
- ✓The sheet cake format means no stressful stacking or crumb coating.
- ✓Perfect balance of mild chocolate flavor and tangy buttermilk.
- ✓Feeds a crowd easily, making it ideal for potlucks and school parties.
- ✓The frosting is whipped to perfection and holds its shape beautifully.
Equipment You’ll Need
- ✓9×13 inch baking pan (metal or glass)
- ✓Large mixing bowl
- ✓Medium mixing bowl
- ✓Whisk
- ✓Electric hand mixer or stand mixer
- ✓Rubber spatula
- ✓Measuring cups and spoons
Ingredients
- ✓For the Cake:
- ✓2 1/2 cups all-purpose flour (sifted)
- ✓1 1/2 cups granulated sugar
- ✓1 teaspoon baking soda
- ✓1 teaspoon salt
- ✓1 teaspoon cocoa powder (unsweetened)
- ✓1 1/2 cups vegetable oil (or canola oil)
- ✓1 cup buttermilk (room temperature)
- ✓2 large eggs (room temperature)
- ✓2 tablespoons red food coloring (liquid)
- ✓1 teaspoon white distilled vinegar
- ✓1 teaspoon vanilla extract
- ✓For the Cream Cheese Frosting:
- ✓16 oz cream cheese (2 blocks, softened)
- ✓1/2 cup unsalted butter (1 stick, softened)
- ✓4 cups powdered sugar (confectioners’ sugar)
- ✓2 teaspoons vanilla extract
- ✓1-2 tablespoons heavy cream (optional, for texture)
Instructions
- Preheat and Prep: Preheat your oven to 350°F (175°C). Grease a 9×13 inch baking pan generously with non-stick spray or butter, and lightly dust it with flour. Shake out the excess flour.
- Mix Dry Ingredients: In a medium bowl, whisk together the flour, granulated sugar, baking soda, salt, and cocoa powder. Make sure to break up any clumps of cocoa powder so you don’t get bitter bites later!
- Mix Wet Ingredients: In a large bowl (or your stand mixer bowl), combine the vegetable oil, buttermilk, eggs, red food coloring, vinegar, and vanilla extract. Whisk vigorously until everything is fully combined and the mixture is a bright, uniform red.
- Combine: Slowly add the dry ingredients into the wet ingredients in two or three batches. Mix on low speed or use a spatula to fold just until the flour disappears. Do not overmix! Overmixing makes the cake dense instead of fluffy.
- Bake: Pour the batter into your prepared pan and smooth it out into an even layer. Bake for 28-32 minutes. To test for doneness, insert a toothpick into the center; it should come out clean or with just a few moist crumbs attached.
- Cool Completely: This step is crucial! Place the pan on a wire rack and let the cake cool completely to room temperature. If you try to frost it while it’s warm, your frosting will melt into a sad puddle.
- Make the Frosting: While the cake cools, beat the softened cream cheese and butter together in a large bowl until smooth and creamy (about 3 minutes). Add the vanilla extract.
- Add Sugar: Gradually add the powdered sugar, one cup at a time, mixing on low speed until incorporated. Once all sugar is added, increase speed to high and whip for 2 minutes until fluffy. If it’s too stiff, add a splash of heavy cream.
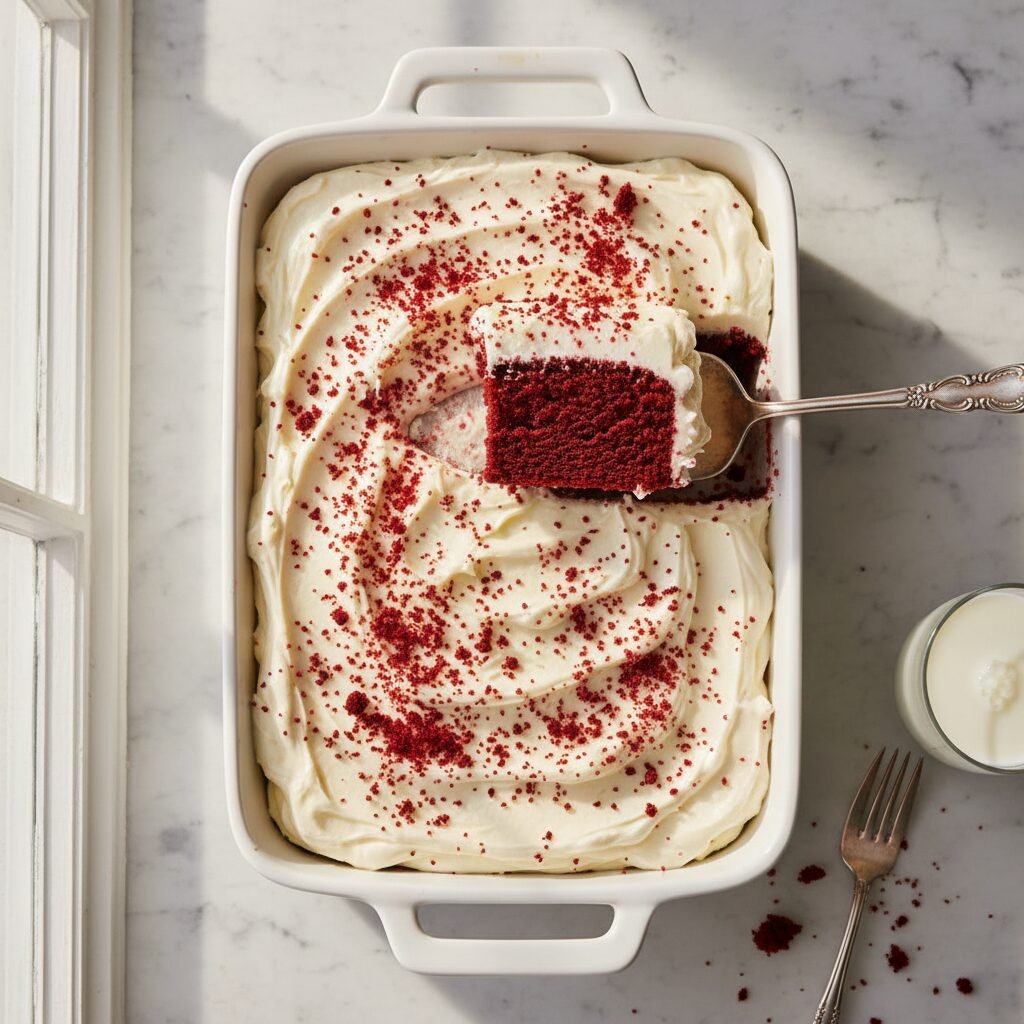
- Decorate: Spread the frosting generously over the cooled cake. You can use an offset spatula to make swirls. Top with sprinkles, crushed pecans, or cake crumbs if desired. Slice and enjoy!
Expert Cooking Tips
- ✓Room Temperature Ingredients: Ensure your eggs, buttermilk, cream cheese, and butter are all at room temperature. This ensures they emulsify properly, creating a smoother batter and frosting.
- ✓Don’t Skip the Vinegar: It might seem odd to put vinegar in a cake, but it reacts with the baking soda to give the cake its signature rise and velvety texture. You won’t taste it!
- ✓Cocoa Quantity: Stick to the small amount of cocoa listed. Red velvet isn’t meant to be a chocolate cake; the cocoa is there for a subtle depth of flavor and color enhancement.
- ✓Food Coloring: I use liquid food coloring for this recipe as it’s traditional and mixes easily. If using gel paste, you will need much less—start with a teaspoon.
- ✓Sifting: Sifting the powdered sugar before making the frosting prevents grainy lumps. It takes an extra minute but makes a huge difference.
Substitutions and Variations
No buttermilk? No problem! You can make a DIY version by adding 1 tablespoon of lemon juice or white vinegar to a measuring cup, then filling it to the 1-cup line with regular milk. Let it sit for 5 minutes until it curdles. If you want to avoid red dye, you can use beet powder or reduced beet juice, though the color will be more of a rusty brown than vibrant red. You can also swap the all-purpose flour for cake flour if you want an even lighter, airier crumb, but AP flour works perfectly for a sturdy sheet cake.
Common Mistakes to Avoid
The biggest mistake people make is overbaking. Red velvet can dry out quickly if left in the oven too long. Start checking it at the 28-minute mark. Another common pitfall is frosting the cake while it is still warm. I know it’s tempting because it smells so good, but the butter and cream cheese in the frosting will melt instantly, sliding right off the cake. Patience is key! Lastly, do not use "tub" cream cheese spread for the frosting; use the blocks of full-fat cream cheese for the right stability.
Serving Suggestions
This cake is rich, so I love serving it with a cold glass of milk or a hot cup of coffee to cut through the sweetness. For a festive look, sprinkle the top with red sanding sugar, heart-shaped sprinkles, or even chopped pecans if you like a little crunch. If you are feeling fancy, crumble one corner of the cake (or trim the edges) and sprinkle the red crumbs over the white frosting for that classic bakery look.
Storage and Reheating Tips
Because of the cream cheese frosting, this cake needs to be stored in the refrigerator. Cover the pan tightly with plastic wrap or foil, and it will stay fresh for up to 5 days. Actually, I think it tastes even better on day two when the flavors have melded! If you want to freeze it, you can freeze the unfrosted cake right in the pan for up to 3 months. Or, freeze individual frosted slices by placing them on a baking sheet to harden, then wrapping them in plastic wrap and foil.
Nutrition Facts (Estimated)
| Serving Size | 1 square |
| Calories | 420 |
| Fat | 22g |
| Saturated Fat | 8g |
| Unsaturated Fat | 12g |
| Trans Fat | 0g |
| Cholesterol | 45mg |
| Sodium | 280mg |
| Carbohydrates | 52g |
| Fiber | 1g |
| Sugar | 38g |
| Protein | 4g |
Frequently Asked Questions
Why is my red velvet cake dry?
Dryness usually comes from overbaking or measuring flour incorrectly. Make sure to spoon and level your flour rather than scooping the cup directly into the bag, which packs it down. Also, using oil instead of butter helps retain moisture.
Can I make this in round pans instead?
Absolutely! This recipe yields enough batter for two 9-inch round pans. You will just need to adjust the baking time down slightly, checking around 25 minutes.
Does red velvet cake taste like chocolate?
It has a very mild chocolate flavor, but it is distinct from chocolate cake. It is more tangy and buttery with vanilla notes, with just a hint of cocoa.
Why do I need vinegar?
Vinegar is the acid required to activate the baking soda (since we aren’t using much natural cocoa powder acid). It creates the bubbles that make the cake fluffy and tender.
Can I leave this cake out on the counter?
It is safe on the counter for a few hours during a party, but for storage, it must go in the fridge because of the dairy in the cream cheese frosting.
Can I use natural food coloring?
Yes, but the color will likely be duller and more brownish-red. Artificial liquid dye gives that classic bright red pop.
How do I get smooth frosting?
Make sure your butter and cream cheese are very soft before mixing. Also, sift your powdered sugar to remove lumps.
Can I make cupcakes with this batter?
Yes! This recipe makes about 24-30 standard cupcakes. Bake them for 18-22 minutes at 350°F.
Conclusion
And there you have it, friends! The easiest, most delicious Moist Red Velvet Sheet Cake you will ever make. I hope this recipe becomes a staple in your home just like it is in mine. It is the perfect way to show someone you love them (even if that someone is just yourself after a long week!). If you try this recipe, please leave a comment below or tag me on Pinterest—I love seeing your beautiful creations. Happy baking!

