Moist Red Velvet Sheet Cake With Chocolate Ganache Recipe
If you are looking for a dessert that screams ‘I love you’ without requiring a culinary degree, this is it. This Red Velvet Sheet Cake is impossibly moist, vibrant, and draped in a rich chocolate ganache that will make your knees weak.
20 minutes
30 minutes
50 minutes (plus cooling)
24 servings
Dessert
Baking
American
Vegetarian
Hey there, beautiful mamas! Let’s have a little heart-to-heart about cake. We all love a stunning, sky-high layer cake that looks like it walked right out of a bakery window, right? But let’s be real—between school drop-offs, laundry mountains, and trying to keep the tiny humans alive, who actually has time to level, stack, and crumb-coat a masterpiece on a Tuesday? Not me!
That is exactly why this Moist Red Velvet Sheet Cake with Chocolate Ganache has become my absolute ride-or-die dessert recipe. It gives you all that classic, sophisticated red velvet flavor—that subtle cocoa whisper with a tangy buttermilk kick—but in the easiest format possible: the humble sheet pan. No stress, no sliding layers, just pure, unadulterated baking bliss.
And can we talk about the topping? Traditionally, red velvet is paired with cream cheese frosting, and don’t get me wrong, I love that combo. But when you pour this warm, silky, glossy chocolate ganache over the tender red crumbs… oh my goodness. It transforms a standard cake into a decadent truffle-like experience. It’s rich, it’s romantic, and it’s guaranteed to get you the title of ‘Best Baker Mom’ at the next potluck. Grab your apron, pour a glass of wine, and let’s bake something magical!
History & Origins
Red Velvet cake has such a fascinating and somewhat mysterious past that makes it even more fun to bake. It actually originated during the Victorian era! Back then, the term ‘velvet’ was used to describe cakes with a soft, fine crumb, usually achieved by using almond flour or cornstarch. The red color wasn’t originally from a bottle of dye; it was a chemical reaction between natural cocoa powder (which contains anthocyanin) and acidic ingredients like buttermilk and vinegar. This reaction revealed a reddish-brown hue in the chocolate.
Fast forward to the Great Depression and World War II, when food rationing meant bakers had to be creative. Some used beet juice to add moisture and color. The bright red version we know and love today really took off in the mid-20th century with the introduction of red food coloring extracts. Pairing it with chocolate ganache is a more modern, gourmet twist that leans into the cake’s cocoa profile, making it a double-chocolate delight that feels both vintage and contemporary.
Why This Recipe Works
There is some serious science happening in this bowl, and it’s what makes the texture so incredible. The holy trinity of this recipe is buttermilk, vinegar, and baking soda. When these acidic ingredients meet the alkaline baking soda, they create bubbles of carbon dioxide that expand the batter, making it incredibly fluffy and light—literally ‘velvety.’
Furthermore, we are using oil instead of butter for the cake base. While butter adds flavor, oil is superior for texture in cakes that you want to stay moist for days. Oil remains liquid at room temperature, ensuring your cake doesn’t dry out or become dense. As for the ganache, it works because of the ratio of heavy cream to chocolate. It creates an emulsion that is stable enough to set but soft enough to melt in your mouth, providing a creamy contrast to the fluffy sponge.
Why You’ll Love This Recipe
- ✓No stacking or leveling required – perfect for beginners!
- ✓Stays moist for days thanks to the buttermilk and oil method.
- ✓The chocolate ganache adds a sophisticated, rich finish.
- ✓Feeds a crowd easily, making it perfect for parties.
- ✓Ready in under an hour from mixing bowl to oven.
- ✓A stunning visual contrast between the deep red cake and dark chocolate.
Equipment You’ll Need
- ✓9×13 inch baking pan (metal or glass)
- ✓Large mixing bowl
- ✓Medium mixing bowl
- ✓Whisk
- ✓Rubber spatula
- ✓Measuring cups and spoons
- ✓Small saucepan (for ganache)
- ✓Heat-proof bowl
Ingredients
- ✓2 1/2 cups all-purpose flour
- ✓1 1/2 cups granulated sugar
- ✓1 teaspoon baking soda
- ✓1 teaspoon salt
- ✓2 tablespoons unsweetened cocoa powder
- ✓1 1/2 cups vegetable oil (or canola oil)
- ✓1 cup buttermilk, room temperature
- ✓2 large eggs, room temperature
- ✓2 tablespoons red food coloring (liquid works best here)
- ✓1 teaspoon white distilled vinegar
- ✓1 teaspoon pure vanilla extract
- ✓10 oz semi-sweet chocolate chips or chopped chocolate bar (for ganache)
- ✓1 cup heavy whipping cream (for ganache)
Instructions
- Preheat your oven to 350°F (175°C). Generously grease a 9×13 inch baking pan with non-stick spray or butter, and lightly dust with flour (or cocoa powder if you want to avoid white streaks).
- In a large bowl, sift together the flour, sugar, baking soda, salt, and cocoa powder. Whisk them well to ensure the cocoa is evenly distributed and there are no lumps.
- In a separate medium bowl, whisk together the oil, buttermilk, eggs, red food coloring, vinegar, and vanilla extract. It will look bright red and glossy—don’t panic, it’s supposed to be vibrant!
- Pour the wet ingredients into the dry ingredients. Using a whisk or rubber spatula, mix gently until just combined. Do not overmix; stop as soon as the flour streaks disappear to keep the cake tender.
- Pour the batter into your prepared baking pan and spread it out evenly into the corners.
- Bake for 28-32 minutes, or until a toothpick inserted into the center comes out clean or with just a few moist crumbs attached. Be careful not to overbake.
- Remove the cake from the oven and place the pan on a wire rack to cool completely. The cake needs to be cool before you pour the ganache, or the chocolate will slide right off!
- While the cake cools, prepare the ganache. Place the chocolate chips in a heat-proof bowl. Heat the heavy cream in a small saucepan over medium heat until it just begins to simmer (do not let it come to a rolling boil).
- Pour the hot cream over the chocolate chips. Let it sit untouched for 5 minutes to melt the chocolate.
- Gently whisk the chocolate and cream together starting from the center and working your way out until the mixture is smooth, glossy, and uniform.
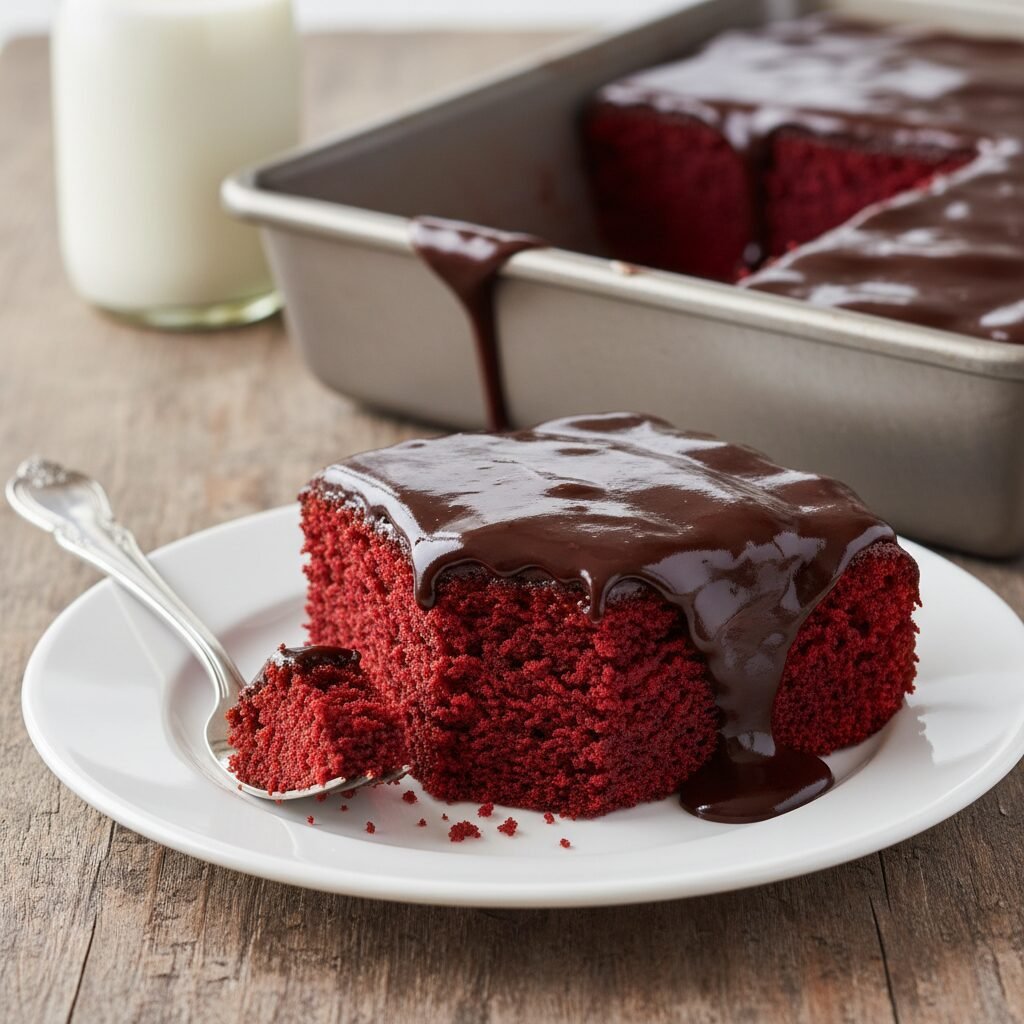
- Pour the warm ganache over the cooled cake. Use an offset spatula or the back of a spoon to spread it to the edges.
- Let the ganache set for about 20-30 minutes before slicing. Serve and enjoy the compliments!
Expert Cooking Tips
- ✓Room Temperature Ingredients: Make sure your eggs and buttermilk are at room temperature. This helps them emulsify better with the oil, creating a more uniform crumb.
- ✓Cocoa Powder Choice: Use regular unsweetened cocoa powder, not Dutch-processed. The natural acidity in regular cocoa helps with the rising reaction.
- ✓Don’t Skimp on the Red: If you want that iconic bright red color, don’t be shy with the food coloring. If you prefer a natural route, beet powder can work, but the color will be more brownish-red.
- ✓Ganache Consistency: If your ganache looks grainy or separated (oily), add a teaspoon of boiling water and whisk vigorously to bring it back together.
- ✓Checking Doneness: Sheet cakes bake faster than deep round cakes. Check it at the 28-minute mark to ensure you don’t dry it out.
Substitutions and Variations
If you are out of buttermilk, you can easily make a DIY version! Just add 1 tablespoon of lemon juice or white vinegar to a measuring cup, then fill it to the 1-cup line with regular milk. Let it sit for 5 minutes until it curdles slightly. For a gluten-free version, swap the all-purpose flour for a high-quality 1:1 gluten-free flour blend (measure by weight for best results). If you want to reduce the sugar, you can cut the sugar in the cake by 1/4 cup, but it may slightly alter the moisture level.
Common Mistakes to Avoid
The biggest mistake people make with red velvet is overbaking. Because the cake is dark, it’s hard to see it browning. Trust your timer and the toothpick test. Another common error is overmixing the batter once the wet and dry ingredients are combined. This develops the gluten too much and results in a tough, rubbery cake rather than a tender, velvety one. Finally, pouring ganache on a hot cake is a recipe for disaster—it will melt into the sponge and make it soggy rather than sitting beautifully on top.
Serving Suggestions
This cake is rich, so I love serving it with a side of fresh raspberries or strawberries to cut through the chocolate with some tart freshness. A dollop of lightly sweetened whipped cream is also a lovely addition. For beverages, a cold glass of milk is a classic choice for the kids, but for the adults? A nice glass of Pinot Noir or a hot cup of dark roast coffee pairs beautifully with the chocolate ganache.
Storage and Reheating Tips
Because of the ganache (which contains cream), this cake is best stored in the refrigerator, especially if your kitchen is warm. Cover the pan tightly with plastic wrap or foil. It will keep fresh for up to 5 days. You can serve it cold (it tastes like a dense fudge cake!) or let it sit on the counter for 20 minutes to come to room temperature before eating. You can also freeze individual slices wrapped in plastic wrap for up to 3 months.
Nutrition Facts (Estimated)
| Serving Size | 1 slice |
| Calories | 340 |
| Fat | 18g |
| Saturated Fat | 6g |
| Unsaturated Fat | 11g |
| Trans Fat | 0g |
| Cholesterol | 45mg |
| Sodium | 180mg |
| Carbohydrates | 42g |
| Fiber | 2g |
| Sugar | 28g |
| Protein | 4g |
Frequently Asked Questions
Can I make this cake ahead of time?
Absolutely! In fact, sheet cakes often taste even better the next day as the flavors meld. You can bake the cake one day, cover it, and add the ganache the next day, or make the whole thing a day in advance.
Why do I need vinegar in a cake recipe?
Vinegar provides the necessary acid to react with the baking soda, which helps the cake rise. It also helps preserve the red color of the anthocyanin in the cocoa powder.
Can I use butter instead of oil?
You can, but I don’t recommend it for this specific recipe. Oil coats the flour proteins better than butter, preventing gluten formation and keeping the cake incredibly moist and tender for longer.
Can I use gel food coloring instead of liquid?
Yes! Gel is much more concentrated, so you will need significantly less. Start with 1 teaspoon of gel paste and add more if needed to reach your desired shade.
What if I don’t have a 9×13 pan?
You can use two 8-inch or 9-inch round pans, but the baking time will change. Start checking them around 25 minutes. You could also make cupcakes (bake for 18-20 mins).
My ganache is too runny, what happened?
You may have used too much cream or didn’t let it cool long enough. Let it sit at room temperature; it will thicken as it cools. If it’s still soup, you can melt a bit more chocolate and whisk it in.
Is this cake safe for kids?
Yes, absolutely! There is no alcohol, and the caffeine content from the small amount of chocolate is negligible. The red food dye is the only thing to watch if your child has sensitivities.
How do I cut clean slices with ganache?
Run a sharp knife under hot water, wipe it dry, and then make your cut. Wipe the knife clean and reheat between each cut for bakery-perfect squares.
Conclusion
There you have it, friends! The most Moist Red Velvet Sheet Cake with Chocolate Ganache that is going to change your dessert game forever. It is lush, it is simple, and it is pure comfort food on a plate. Whether you are making this for a Valentine’s treat, a birthday bash, or just because you survived a chaotic week of motherhood, this cake is the hug you deserve.
Don’t forget to pin this recipe for later and tag me on social media if you make it—I absolutely love seeing your creations in the wild! Happy baking!

