Moist Red Velvet Sheet Cake With Cream Cheese Frosting Recipe
This isn’t just a cake; it’s a warm hug in a pan! With its vibrant red hue, velvety crumb, and luscious cream cheese frosting, this sheet cake is the easiest way to feed a crowd without the stress of stacking layers.
20 minutes
30 minutes
50 minutes (plus cooling)
24 squares
Dessert
Baking
American
Vegetarian
Hey there, lovely bakers! Welcome back to my kitchen. Today, we are diving fork-first into a classic that holds a very special place in my heart: Red Velvet Sheet Cake. Now, I know what you’re thinking. ‘Another red velvet recipe?’ But hear me out! This isn’t just any cake. This is the ‘I need to bring a dessert to the PTA meeting in two hours’ and ‘I want to impress the in-laws without having a mental breakdown over layer cakes’ kind of recipe.
There is something undeniably magical about red velvet. Is it chocolate? Is it vanilla? It’s a mysterious, delicious hybrid that feels fancy but is actually incredibly simple to pull off. I used to be intimidated by red velvet, thinking it required some sort of wizardry to get that texture just right. But after testing (and tasting!) more batches than I care to admit, I’ve found the holy grail. We are talking about a crumb so moist it practically melts on your tongue, paired with a tangy, sweet cream cheese frosting that you’ll want to eat by the spoonful.
The best part? It’s a sheet cake! No leveling, no stacking, no crumb coating, and definitely no stress. Just bake, cool, slather on that frosting, and sprinkle with some cute decorations. It’s perfect for potlucks, Valentine’s Day, Christmas, or just a Tuesday night when you need a little pick-me-up. So, grab your apron and let’s get baking!
History & Origins
Let’s take a little trip down memory lane, shall we? The history of red velvet cake is actually quite fascinating and a little bit debated! Some food historians believe it originated at the famous Waldorf-Astoria Hotel in New York City, while others claim it started in the South or even Canada. But the real science behind the original red velvet is super cool.
Back in the day, before Dutch-processed cocoa powder was the norm, cocoa was more acidic. When this acidic cocoa powder mixed with buttermilk and baking soda, a chemical reaction occurred that revealed the natural reddish anthocyanin in the cocoa. It wasn’t the bright fire-engine red we see today, but more of a mahogany or reddish-brown hue. The term ‘velvet’ was used in the Victorian era to describe cakes with a soft, smooth texture, distinguishing them from the coarser sponge cakes of the time.
During World War II, when foods were rationed, bakers used boiled beet juices to enhance the color of their cakes and keep them moist. It wasn’t until later, with the rise of food dyes and extract companies like Adams Extract in Texas, that the vibrant red cake became a household staple. Today, we get the best of both worlds: that nostalgic, tender texture and the fun, festive color that makes everyone smile!
Why This Recipe Works
Okay, science nerds (and I mean that in the most loving way possible), let’s talk about why this specific recipe works so well. The secret to that signature ‘velvet’ texture lies in the interaction between the acidic ingredients and the baking soda. We are using both buttermilk and white vinegar in this batter. When these acids meet the baking soda, they create carbon dioxide bubbles that expand the batter, giving it a fluffy, airy lift that is distinct from a dense chocolate cake.
Furthermore, we are using oil instead of butter for the cake base. While I love the flavor of butter, oil is actually superior for cakes that you want to stay moist for days. Oil remains liquid at room temperature (and even when chilled), meaning your cake won’t dry out or harden up in the fridge. To bring back that buttery richness, we rely heavily on the cream cheese frosting, which uses a generous amount of butter. It’s the perfect balance!
Lastly, the cocoa powder amount is key. We use just enough to give it that subtle chocolate undertone without overpowering the vanilla and buttermilk flavors. It’s a delicate dance of flavors that results in pure perfection.
Why You’ll Love This Recipe
- ✓Super easy one-pan recipe (no layering required!)
- ✓Incredibly moist texture thanks to buttermilk and oil
- ✓Tangy, luscious cream cheese frosting made from scratch
- ✓Feeds a crowd – perfect for parties and potlucks
- ✓Freezes beautifully for make-ahead meal prep
- ✓Vibrant color makes it a festive showstopper
Equipment You’ll Need
- ✓9×13 inch baking pan (metal or glass)
- ✓Stand mixer or electric hand mixer
- ✓Large mixing bowl
- ✓Medium mixing bowl
- ✓Sifter or fine-mesh sieve
- ✓Rubber spatula
- ✓Measuring cups and spoons
- ✓Offset spatula (for frosting)
Ingredients
- ✓2 1/2 cups cake flour (spooned and leveled)
- ✓1 1/2 cups granulated sugar
- ✓1 teaspoon baking soda
- ✓1 teaspoon salt
- ✓2 tablespoons unsweetened cocoa powder
- ✓1 1/2 cups vegetable oil (or canola oil)
- ✓1 cup buttermilk, room temperature
- ✓2 large eggs, room temperature
- ✓2 tablespoons red food coloring (liquid or gel)
- ✓1 teaspoon white distilled vinegar
- ✓1 teaspoon pure vanilla extract
- ✓For the Frosting:
- ✓16 oz cream cheese (2 blocks), softened to room temperature
- ✓1/2 cup unsalted butter (1 stick), softened
- ✓4 cups powdered sugar, sifted
- ✓1 teaspoon pure vanilla extract
- ✓1 pinch salt
Instructions
- Preheat your oven to 350°F (175°C). Grease a 9×13 inch baking pan with non-stick spray or butter, and lightly dust with flour (or cocoa powder if you want to avoid white streaks). Set aside.
- In a medium bowl, sift together the cake flour, sugar, baking soda, salt, and cocoa powder. Whisk gently to ensure everything is evenly distributed. Sifting is crucial here for that velvety texture!
- In a large bowl (or the bowl of your stand mixer), combine the vegetable oil, buttermilk, eggs, food coloring, vinegar, and vanilla extract. Mix on medium speed until the mixture is smooth and bright red.
- Slowly add the dry ingredients to the wet ingredients in two or three batches. Mix on low speed just until combined. Do not overmix! Stop as soon as you see the flour disappear. Use a rubber spatula to scrape the bottom and sides of the bowl to catch any hidden pockets of flour.
- Pour the batter into your prepared baking pan. Smooth the top with a spatula. Tap the pan gently on the counter once or twice to release any large air bubbles.
- Bake for 28-32 minutes. The cake is done when a toothpick inserted into the center comes out clean or with just a few moist crumbs attached. Be careful not to overbake, or it will lose that signature moisture.
- Remove the cake from the oven and place the pan on a wire rack. Let it cool completely in the pan. If you try to frost a warm cake, your frosting will melt into a sad puddle!
- While the cake cools, make the frosting. In a large bowl, beat the softened cream cheese and butter together on medium-high speed until smooth and creamy (about 2-3 minutes). There should be no lumps.
- Reduce the mixer speed to low and gradually add the powdered sugar, one cup at a time. Once incorporated, add the vanilla and salt. Increase speed to high and whip for another 2 minutes until the frosting is fluffy and white.
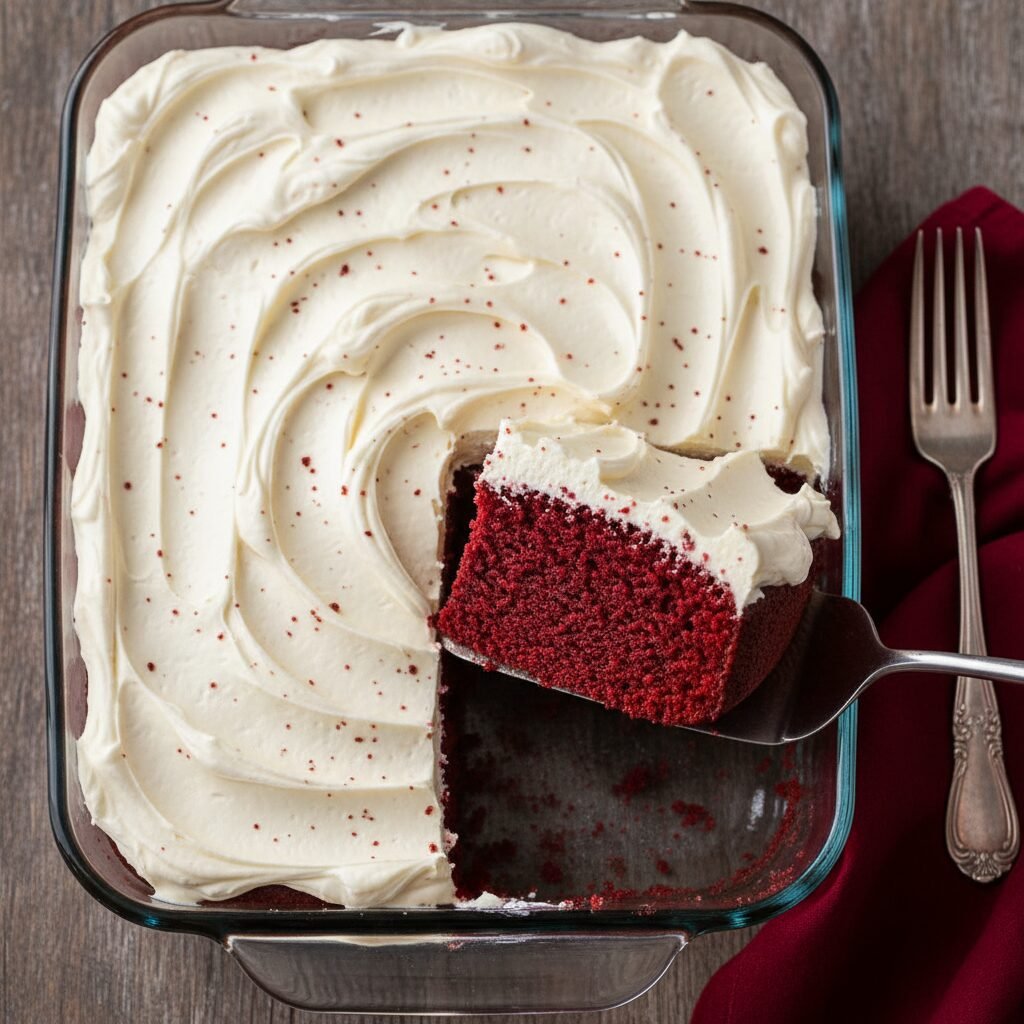
- Spread the frosting generously over the cooled cake using an offset spatula. Create swoops and swirls for that homemade look. Top with sprinkles or cake crumbs if desired. Slice into squares and serve!
Expert Cooking Tips
- ✓Room Temperature is Key: Ensure your buttermilk, eggs, cream cheese, and butter are all at room temperature. This ensures a smooth batter and a lump-free frosting.
- ✓Don’t Skimp on the Dye: If you want that vibrant red color, you really need the full amount of food coloring. Gel colors are more concentrated, so start with less if using gel.
- ✓Cake Flour vs. All-Purpose: I highly recommend cake flour for a lighter crumb. If you only have all-purpose, remove 2 tablespoons of flour per cup and replace it with cornstarch, then sift.
- ✓Cool Completely: I know it’s tempting, but frosting a warm cake is a disaster waiting to happen. Pop the cake in the fridge for 20 minutes after it cools on the counter to speed up the process.
- ✓Make Ahead: This cake actually tastes even better the next day as the flavors meld together!
Substitutions and Variations
If you find yourself missing an ingredient, don’t panic! Here are some easy swaps. No buttermilk? Make your own by adding 1 tablespoon of lemon juice or vinegar to a cup of regular milk and letting it sit for 5 minutes. If you don’t have cake flour, use all-purpose flour but be careful not to overmix, as it has more gluten. For the oil, melted coconut oil works great, though it might add a slight coconut flavor. If you want a natural coloring option, you can use beet powder, though be aware the color will be more of a deep magenta than bright red.
Common Mistakes to Avoid
The biggest mistake I see is overmixing the batter. Once the wet and dry ingredients touch, gluten starts to form. Too much mixing leads to a tough, rubbery cake instead of a tender one. Another common pitfall is using cold cream cheese for the frosting. This guarantees lumps that you just can’t whip out. Lastly, don’t skip the vinegar! You might think it’s weird, but it’s essential for the chemical reaction that gives the cake its rise and texture.
Serving Suggestions
This sheet cake is a stunner on its own, but you can dress it up! I love serving it with a side of fresh raspberries or strawberries to cut through the sweetness. For Valentine’s Day, use a heart-shaped cookie cutter to cut out individual cakes. If it’s for a birthday, go wild with rainbow sprinkles or shaved white chocolate curls on top. A cold glass of milk is, of course, mandatory.
Storage and Reheating Tips
Because of the cream cheese frosting, this cake needs to be stored in the refrigerator. Cover the pan tightly with plastic wrap or transfer slices to an airtight container. It will stay fresh for up to 5 days. You can also freeze the frosted cake! Cut it into squares, place them on a baking sheet to freeze the frosting solid (about an hour), then wrap each square individually in plastic wrap and foil. Thaw in the fridge overnight before eating.
Nutrition Facts (Estimated)
| Serving Size | 1 square |
| Calories | 345 kcal |
| Fat | 18g |
| Saturated Fat | 7g |
| Unsaturated Fat | 10g |
| Trans Fat | 0g |
| Cholesterol | 45mg |
| Sodium | 180mg |
| Carbohydrates | 42g |
| Fiber | 1g |
| Sugar | 28g |
| Protein | 4g |
Frequently Asked Questions
Why is my red velvet cake dry?
Dry cake is usually caused by overbaking or measuring flour incorrectly. Make sure to spoon and level your flour rather than scooping directly from the bag, which packs it down. Also, check your oven temperature with an oven thermometer.
Can I make this cake ahead of time?
Absolutely! In fact, red velvet cake often tastes better on day two. You can bake the cake one day, cover it, and frost it the next day, or frost it and store it in the fridge for up to 2 days before serving.
Do I really need the vinegar?
Yes, please don’t skip it! The vinegar reacts with the baking soda to provide lift and helps preserve the red color. You won’t taste it in the final product, I promise.
Can I use butter instead of oil in the cake?
You can, but I don’t recommend it for this specific recipe. Oil coats the flour proteins better than butter, inhibiting gluten formation and resulting in a much moister, more tender cake that stays soft even when cold.
Can I make this into cupcakes?
Yes! This recipe makes about 24-30 standard cupcakes. Bake them at 350°F for about 18-22 minutes. Watch them closely so they don’t dry out.
Why is my frosting runny?
Runny frosting usually happens if the butter or cream cheese got too warm (melting) or if the cake wasn’t fully cooled. If it’s too soft, pop the bowl in the fridge for 20 minutes and then whip it again.
Can I use liquid food coloring instead of gel?
Yes, this recipe works with liquid dye. You’ll need about 1 to 2 ounces (basically a whole small bottle) to get a deep red. Gel is more concentrated, so you use less liquid.
Is this cake gluten-free friendly?
You can substitute the cake flour with a high-quality 1:1 Gluten-Free baking flour blend. The texture might be slightly different, but it still tastes delicious!
Conclusion
And there you have it, friends! The ultimate Moist Red Velvet Sheet Cake that is sure to become a family favorite. It’s simple, sweet, and oh-so-satisfying. Whether you are baking for a crowd or just need a little sweetness in your life, this recipe delivers every single time. I really hope you give this a try and love it as much as my family does. If you make it, snap a photo and tag me on Pinterest or Instagram—I absolutely love seeing your creations! Happy baking, y’all!

