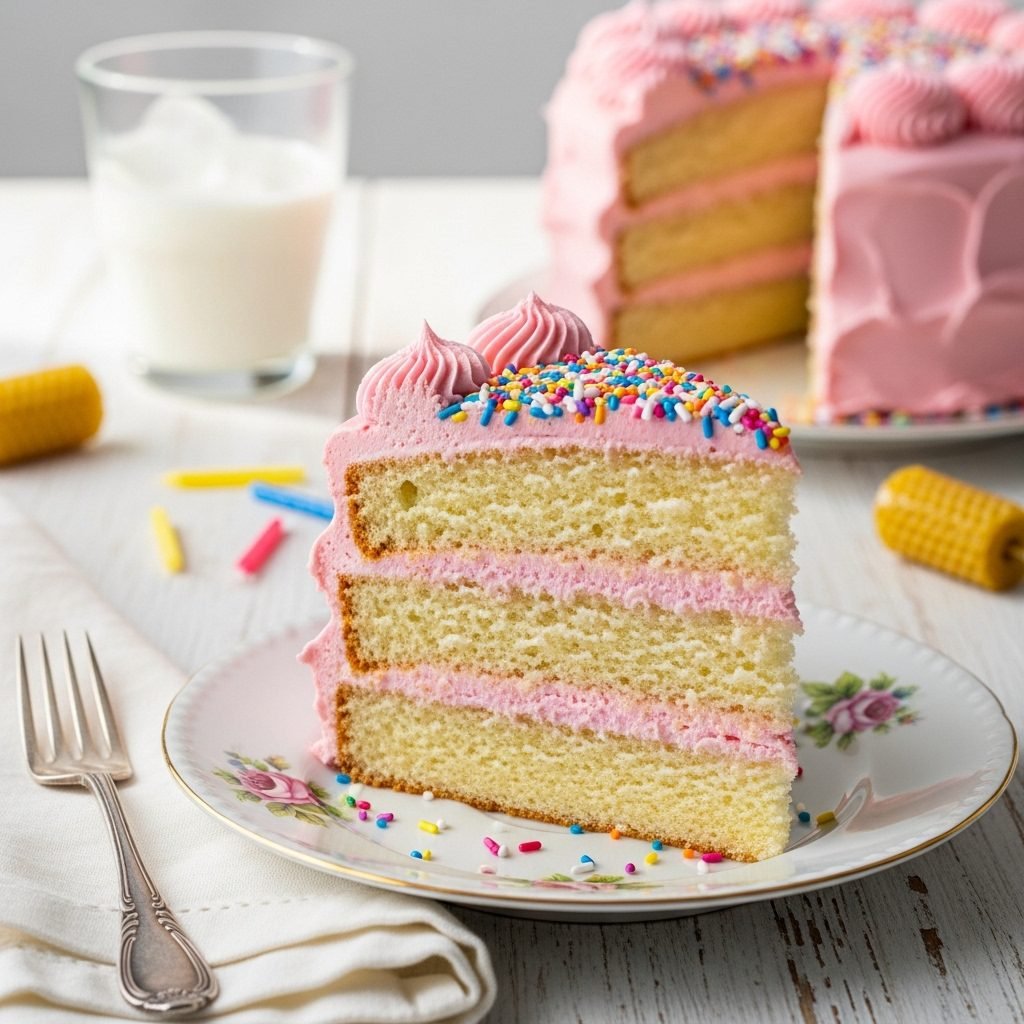
Moist Vanilla Birthday Cake Recipe
Discover the secret to the perfect birthday centerpiece: a vanilla cake that pairs the buttery richness of a classic sponge with the undeniable moisture of a bakery-style treat. This fail-proof recipe delivers a tender, plush crumb and a pure vanilla flavor that nostalgic dreams are made of.
30 minutes
35 minutes
1 hour 5 minutes
12-16 servings (makes two 8-inch rounds or three 6-inch rounds)
Dessert
Baking
American
Vegetarian
For years, I was on a quest to find the ‘Holy Grail’ of vanilla cakes. You know the one—the cake that doesn’t need to be drowned in simple syrup to stay moist, the one that holds up to a thick layer of buttercream without crumbling into dry dust. After countless trials, failed batters, and sunken centers, I finally cracked the code. This Moist Vanilla Birthday Cake is everything a celebration dessert should be. It possesses a tight, velvety crumb that melts on the tongue, yet it has enough structure to stand tall in a layer cake.
The flavor is unapologetically vanilla, a pure and aromatic canvas that brings back memories of childhood parties, but with a sophisticated texture that adults will appreciate. Unlike box mixes that can taste artificial or overly sweet, this scratch-made delight balances the richness of butter with the tenderizing power of buttermilk. We use a specific blend of fats—butter for that unmistakable flavor and oil to ensure the cake stays soft for days. Whether you are frosting it with a classic American buttercream, a silky Swiss meringue, or a rich chocolate ganache, this cake base is the reliable, delicious anchor your celebration needs. It is not just a recipe; it is the foundation for building memories, one slice at a time.
History & Origins
The tradition of the birthday cake is a fascinating journey through history, evolving from ancient rituals to the sugary spectacles we know today. The concept can be traced back to the Ancient Greeks, who baked round honey cakes to honor Artemis, the goddess of the moon. They would light candles on these cakes to mimic the glow of the moon, believing the smoke carried their prayers to the gods. However, the modern birthday cake as a celebration of a person’s life has its roots in medieval Germany.
In the 15th century, Germans celebrated ‘Kinderfest,’ a festival specifically for children. On the morning of a child’s birthday, a cake would be topped with lit candles—one for each year of life plus one for ‘good luck’ or the upcoming year. These candles were left burning all day, replaced as needed, until the cake was eaten after dinner. This ritual symbolized the ‘light of life.’
By the 17th century, elaborate cakes with icing became available, but only to the wealthy due to the high cost of sugar and ingredients. It wasn’t until the Industrial Revolution in the 19th century that baking powder was invented and mass-produced baking equipment became available, making ingredients cheaper and baking easier. This democratization of baking allowed the birthday cake to become a widespread tradition across Western culture. Today, the vanilla birthday cake remains a timeless icon, a sweet symbol of growth, celebration, and the simple joy of gathering together.
Why This Recipe Works
The science behind this recipe focuses on one primary goal: balancing moisture with structure. Many vanilla cakes rely solely on butter, which provides excellent flavor but can lead to a dry texture if overbaked or refrigerated, as butter solidifies when cold. This recipe utilizes a ‘hybrid fat’ method. We use unsalted butter for that premium dairy richness and mouthfeel, but we supplement it with neutral vegetable oil. The oil remains liquid at room temperature (and even when chilled), coating the flour proteins and preventing the cake from drying out.
Furthermore, the inclusion of buttermilk is non-negotiable. The acidity in buttermilk reacts with the baking soda and baking powder, not only helping the cake rise but also breaking down long gluten strands, resulting in a significantly more tender crumb. We also opt for cake flour instead of all-purpose flour. Cake flour has a lower protein content (usually around 7-9%), which means less gluten formation during mixing. This ensures the cake is fluffy and soft rather than chewy or bread-like. Finally, the ‘reverse creaming’ technique—or a modified version where we ensure fats are fully emulsified with the sugars before adding eggs—traps air efficiently, creating a fine, even texture that looks professionally baked.
Why You’ll Love This Recipe
- ✓Hybrid butter-oil method ensures maximum moisture retention.
- ✓Uses cake flour for an incredibly tender, bakery-style crumb.
- ✓Sturdy enough for stacking but soft enough to melt in your mouth.
- ✓Perfectly balanced sweetness that doesn’t overpower the vanilla.
- ✓Stays fresh and moist for up to 4 days at room temperature.
Equipment You’ll Need
- ✓Two 8-inch round cake pans
- ✓Stand mixer with paddle attachment or electric hand mixer
- ✓Large mixing bowls
- ✓Kitchen scale
- ✓Sifter or fine-mesh sieve
- ✓Parchment paper
- ✓Wire cooling rack
- ✓Measuring cups and spoons
Ingredients
- ✓2 1/2 cups (300g) cake flour, sifted
- ✓2 cups (400g) granulated sugar
- ✓1 tbsp baking powder
- ✓1/2 tsp baking soda
- ✓1 tsp fine sea salt
- ✓1 cup (226g) unsalted butter, room temperature, cut into cubes
- ✓1/4 cup (60ml) vegetable oil (or canola oil)
- ✓4 large eggs, room temperature
- ✓1 cup (240ml) buttermilk, room temperature
- ✓1 tbsp pure vanilla extract or vanilla bean paste
Instructions
- Preheat your oven to 350°F (175°C). Grease two 8-inch round cake pans with butter or baking spray, line the bottoms with parchment paper, and grease the parchment.
- In a medium bowl, whisk together the sifted cake flour, baking powder, baking soda, and salt. Set aside.
- In the bowl of a stand mixer fitted with the paddle attachment, beat the room temperature butter and sugar on medium-high speed for about 3-4 minutes until pale and fluffy. This aeration is crucial for the cake’s lift.
- Reduce the mixer speed to medium. Slowly drizzle in the vegetable oil and beat for another minute until fully incorporated.
- Add the eggs one at a time, beating well after each addition. Scrape down the sides and bottom of the bowl to ensure everything is evenly mixed. Stir in the vanilla extract.
- Reduce the mixer speed to low. Add one-third of the flour mixture, followed by half of the buttermilk. Mix just until combined.
- Add another third of the flour mixture, followed by the remaining buttermilk. Finish with the final third of the flour mixture. Mix only until the flour streaks disappear. Do not overmix.
- Divide the batter evenly between the prepared pans (use a kitchen scale for precision). Smooth the tops with a spatula.
- Bake for 30-35 minutes, or until a toothpick inserted into the center comes out clean or with just a few moist crumbs attached. The cakes should spring back lightly when touched.
- Remove from the oven and let the cakes cool in the pans for 10 minutes. Then, carefully invert them onto a wire rack to cool completely before frosting.
Expert Cooking Tips
- ✓Room temperature ingredients are mandatory. Cold eggs or buttermilk can cause the batter to curdle, leading to an uneven bake.
- ✓Weigh your flour. Scooping with a cup often packs the flour down, leading to a dry, dense cake. 300g is the magic number.
- ✓Do not open the oven door before the 25-minute mark. The rush of cold air can cause the rising cake to collapse.
- ✓Use vanilla bean paste if available; the specks of vanilla add a gourmet look and a more intense flavor.
- ✓Tap the pans on the counter before baking to release any large air bubbles trapped in the batter.
Substitutions and Variations
If you cannot find cake flour, you can make a substitute: for every cup of all-purpose flour, remove 2 tablespoons of flour and replace them with 2 tablespoons of cornstarch. Sift together twice. If you don’t have buttermilk, make a ‘sour milk’ substitute by adding 1 tablespoon of white vinegar or lemon juice to a measuring cup, then filling it to the 1-cup line with whole milk; let it sit for 5 minutes before using. For a dairy-free version, substitute the butter with a high-quality vegan butter block and use unsweetened almond milk mixed with vinegar instead of buttermilk. Gluten-free 1:1 baking flour blends generally work well in this recipe, though the texture may be slightly denser.
Common Mistakes to Avoid
The most common mistake is overmixing the batter after adding the flour. This develops gluten and results in a tough, rubbery cake rather than a tender one. Stop mixing as soon as you see the last streak of flour disappear. Another error is baking at the wrong temperature; ensure your oven is calibrated or use an oven thermometer. Using salted butter instead of unsalted makes it hard to control the sodium level; stick to unsalted and add the salt separately. Lastly, frosting the cake before it is completely cool will cause the buttercream to melt and slide right off the cake.
Serving Suggestions
Serve this cake at room temperature for the best texture and flavor release. It pairs beautifully with a classic Vanilla Buttercream, a rich Chocolate Fudge Frosting, or a light Whipped Cream and Berry topping. For a birthday celebration, cover the exterior in sprinkles (funfetti style) or use gel food coloring to tint the frosting. A scoop of strawberry ice cream or a glass of cold milk is the traditional and perfect accompaniment.
Storage and Reheating Tips
Unfrosted cake layers can be wrapped tightly in plastic wrap and stored at room temperature for up to 2 days. For longer storage, wrap the layers in plastic wrap and then aluminum foil, and freeze for up to 3 months. Thaw frozen layers in the refrigerator overnight before frosting. Once frosted, the cake can be stored at room temperature under a cake dome for 3-4 days. If the kitchen is hot or the filling is perishable (like custard or cream cheese), store the cake in the refrigerator, but bring it to room temperature 1-2 hours before serving to soften the butter in the cake and frosting.
Nutrition Facts (Estimated)
| Serving Size | 1 slice (1/14th of cake) |
| Calories | 420 |
| Fat | 22g |
| Saturated Fat | 10g |
| Unsaturated Fat | 11g |
| Trans Fat | 0g |
| Cholesterol | 65mg |
| Sodium | 210mg |
| Carbohydrates | 54g |
| Fiber | 0.5g |
| Sugar | 28g |
| Protein | 4g |
Frequently Asked Questions
Can I make this recipe into cupcakes?
Yes! This batter makes excellent cupcakes. Line a muffin tin with liners and fill them 2/3 full. Bake at 350°F for 18-22 minutes. The yield will be approximately 24 cupcakes.
Why did my cake sink in the middle?
Sinking usually happens if the cake was underbaked (the structure didn’t set) or if the oven door was opened too early. It can also result from too much leavening (baking powder/soda).
Can I use all-purpose flour instead of cake flour?
You can, but the cake will be slightly denser and more bread-like. If using AP flour, reduce the amount slightly (use roughly 2 1/3 cups) and be extremely careful not to overmix.
How do I get flat cake layers?
You can use ‘cake strips’—damp fabric strips wrapped around the outside of the pan—to insulate the edges and promote even rising. Alternatively, simply trim the domed tops with a serrated knife after cooling.
Can I reduce the sugar in this recipe?
Sugar is not just for sweetness; it provides moisture and tenderness. Reducing it significantly will affect the texture, making the cake drier and more bread-like. I recommend sticking to the recipe for the best structural results.
Is this cake sturdy enough for fondant?
Yes, the addition of butter and the specific flour ratio makes this cake sturdy enough to support the weight of fondant, provided it is properly chilled and crumb-coated first.
Can I add sprinkles to the batter?
Absolutely! To make this a ‘Funfetti’ cake, fold in 1/2 cup of rainbow sprinkles (jimmies, not nonpareils) at the very end of the mixing process.
Why are my ingredients required to be at room temperature?
Room temperature ingredients emulsify much better. Cold ingredients do not bond easily, leading to a clumpy batter and an uneven, dense bake.
Conclusion
This Moist Vanilla Birthday Cake recipe is more than just a set of instructions; it is a reliable companion for your most cherished celebrations. By combining the best properties of butter and oil, and utilizing the tenderizing magic of buttermilk and cake flour, you achieve a result that rivals any high-end bakery. Whether you are a novice baker or a seasoned pro, this recipe offers a foolproof path to a stunning, delicious creation. So preheat that oven, gather your ingredients, and get ready to bake a cake that will have your guests asking for seconds—and the recipe!

