Moist Vanilla Layer Cake With Cream Cheese Frosting Recipe
Discover the secret to the most tender, melt-in-your-mouth vanilla cake you will ever taste. Paired with a silky, tangy cream cheese frosting, this recipe strikes the perfect balance between sweetness and depth, making it the ultimate crowd-pleaser for birthdays, weddings, or just a Tuesday treat.
45 minutes
30 minutes
1 hour 15 minutes
12-14 servings
Dessert
Baking
American
Vegetarian
There is something profoundly nostalgic and universally comforting about a classic vanilla cake, yet finding the ‘perfect’ recipe can feel like an endless quest. We have all been there: dry crumbs that require gallons of milk to wash down, flavor profiles that lean too heavily on artificial extracts, or textures that are dense and heavy rather than light and airy. This Moist Vanilla Layer Cake with Cream Cheese Frosting is the answer to those baking woes. It is not just another vanilla cake; it is a celebration of texture and flavor harmony.
The crumb is exceptionally tender, boasting a plush velvetiness that stays moist for days, thanks to a carefully calculated ratio of fat and liquid. We utilize a combination of butter for that unmistakable rich flavor and oil to ensure the cake remains soft even after refrigeration. But the real magic lies in the frosting. While a standard American buttercream can sometimes be cloyingly sweet, our signature cream cheese frosting adds a sophisticated tang that cuts through the sugar, elevating the vanilla notes rather than overpowering them.
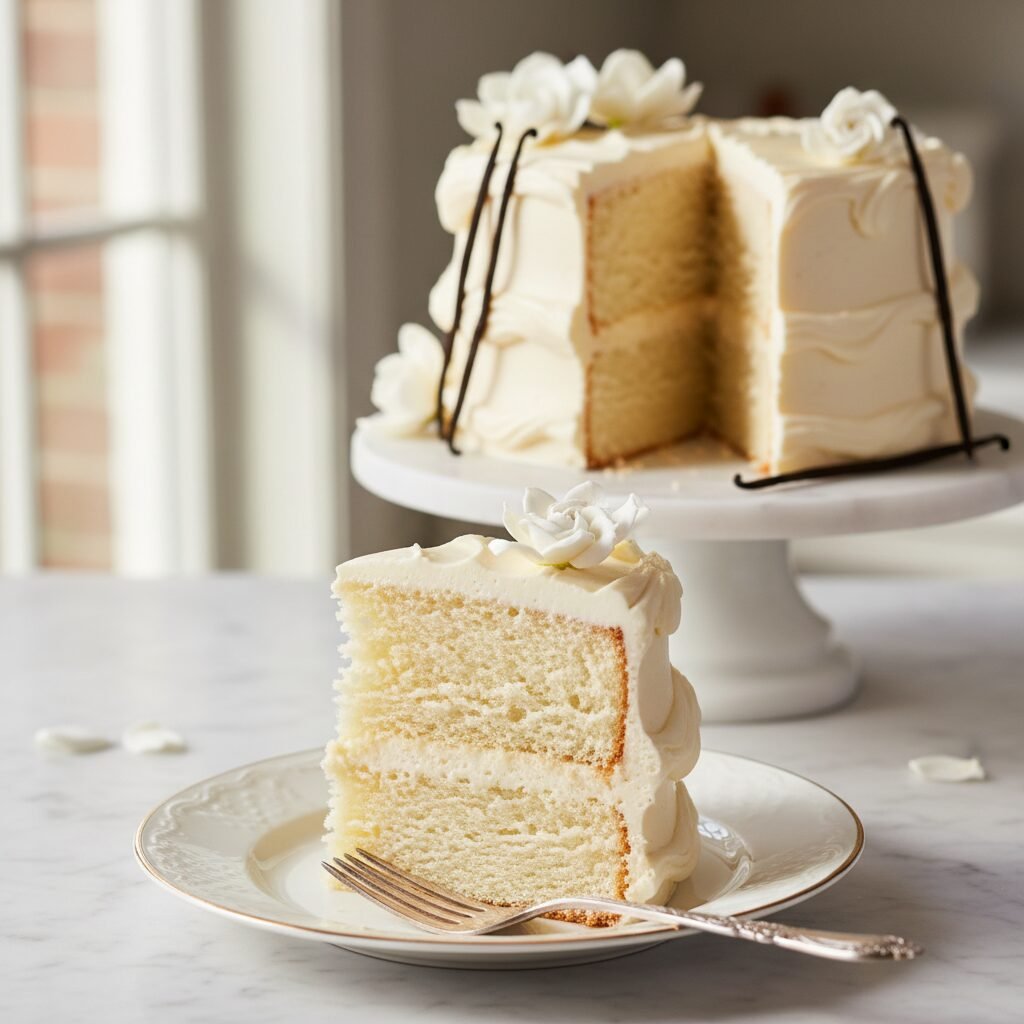
Imagine slicing into a tall, impressive tiered cake to reveal snowy white layers that are sturdy enough to stack but delicate enough to dissolve on the tongue. The aroma filling your kitchen—warm butter, sweet vanilla bean, and a hint of caramelized sugar—is enough to gather the whole family before the timer even dings. Whether you are a seasoned baker looking for a reliable go-to recipe or a novice attempting your first layer cake, this guide breaks down the science and steps to ensure perfection. Get ready to bake a masterpiece that looks as stunning as it tastes.
History & Origins
The history of the vanilla cake is a journey through the evolution of baking technology and global trade. While cakes have existed since ancient times—often as modified breads sweetened with honey—the light, fluffy cakes we recognize today are a relatively modern invention. The story begins with the discovery of vanilla by the Totonac people of Mexico, later cultivated by the Aztecs and eventually brought to Europe by Spanish conquistadors. For centuries, vanilla was an exotic luxury, reserved only for the aristocracy.
By the mid-19th century, the development of chemical leavening agents like baking soda and baking powder revolutionized home baking. Before this, cakes relied on yeast or the arduous task of manually beating eggs to incorporate air. The Victorian era saw the rise of the ‘pound cake’ and sponge cakes, but it wasn’t until the mass production of vanilla extract in the late 1800s that vanilla cake became a household staple in America.
The pairing with cream cheese frosting is a distinctly American innovation. Cream cheese itself was invented in New York in 1872 by a dairyman named William Lawrence. However, cream cheese frosting didn’t gain massive popularity until the mid-20th century, often associated with Carrot Cake or Red Velvet Cake. Bringing it together with a classic vanilla sponge is a testament to the modern palate’s desire for contrast—the rich, savory undertones of the cheese balancing the sweet, aromatic sponge. Today, the vanilla layer cake stands as a culinary icon, representing celebration, comfort, and the simple joy of baking.
Why This Recipe Works
This recipe succeeds where many others fail due to a few key scientific principles regarding gluten formation and moisture retention. First, we use cake flour instead of all-purpose flour. Cake flour has a lower protein content (usually around 7-8%), which inhibits the formation of tough gluten strands, resulting in a crumb that is tender and fine rather than chewy or bread-like.
Secondly, the ‘fat strategy’ here is crucial. Many recipes use solely butter or solely oil. Butter provides flavor and structure (contributing to the rise as water evaporates and creates steam), while oil, being liquid at room temperature, coats the flour proteins more effectively and ensures the cake stays moist longer. By using a blend of both, we get the best of both worlds: the rich, buttery taste and the enduring moisture of oil.
Finally, the inclusion of sour cream (or buttermilk) is a game-changer. The acidity in these dairy products reacts with the baking soda to create carbon dioxide, giving the cake a superior lift. Furthermore, the acid breaks down gluten strands, tenderizing the crumb even further. This chemical reaction, combined with the reverse creaming method—where fats are beaten into the dry ingredients before liquids are added—ensures a flat, even rise and a velvety texture that supports the weight of the frosting without becoming dense.
Why You’ll Love This Recipe
- ✓Incredibly moist texture that stays fresh for days.
- ✓Perfect balance of sweet vanilla and tangy cream cheese.
- ✓Uses a blend of butter and oil for flavor and softness.
- ✓Sturdy enough for stacking, yet tender to eat.
- ✓Versatile base recipe that allows for various fillings.
- ✓Detailed instructions suitable for beginners and pros.
Equipment You’ll Need
- ✓Three 8-inch round cake pans
- ✓Stand mixer with paddle attachment or electric hand mixer
- ✓Large mixing bowls
- ✓Kitchen scale
- ✓Sifter or fine-mesh sieve
- ✓Wire cooling racks
- ✓Offset spatula
- ✓Bench scraper (for smoothing frosting)
- ✓Parchment paper
Ingredients
- ✓3 cups (345g) cake flour, sifted
- ✓2 1/2 tsp baking powder
- ✓1/2 tsp baking soda
- ✓1 tsp fine sea salt
- ✓1 cup (226g) unsalted butter, room temperature
- ✓1 3/4 cups (350g) granulated sugar
- ✓1/3 cup (80ml) vegetable oil or canola oil
- ✓1 tbsp pure vanilla extract or vanilla bean paste
- ✓4 large eggs, room temperature
- ✓1 1/4 cups (300ml) buttermilk, room temperature
- ✓16 oz (450g) full-fat cream cheese, slightly softened (for frosting)
- ✓1 cup (226g) unsalted butter, room temperature (for frosting)
- ✓5-6 cups (600-720g) powdered sugar, sifted (for frosting)
- ✓2 tsp pure vanilla extract (for frosting)
- ✓Pinch of salt (for frosting)
Instructions
- Preheat your oven to 350°F (175°C). Grease three 8-inch round cake pans with butter or cooking spray, line the bottoms with parchment paper, and grease the parchment. Dust with a little flour and tap out the excess.
- In a medium bowl, sift together the cake flour, baking powder, baking soda, and salt. Set aside.
- In the bowl of a stand mixer fitted with the paddle attachment, beat the 1 cup of room temperature butter and granulated sugar on medium-high speed for about 3-4 minutes until pale and fluffy. This aeration step is crucial for a light cake.
- Add the vegetable oil and vanilla extract to the butter mixture. Beat for another minute until fully incorporated.
- Add the eggs one at a time, beating well after each addition. Scrape down the sides and bottom of the bowl with a rubber spatula to ensure everything is mixed evenly.
- Reduce the mixer speed to low. Add the dry ingredients in three additions, alternating with the buttermilk in two additions (Dry – Buttermilk – Dry – Buttermilk – Dry). Mix only until just combined and no streaks of flour remain. Do not overmix.
- Divide the batter evenly among the three prepared cake pans. Use a kitchen scale for precision if available (approx. 450-500g per pan).
- Bake for 25-30 minutes, or until a toothpick inserted into the center comes out clean or with just a few moist crumbs. The cakes should spring back lightly when touched.
- Remove from the oven and let the cakes cool in the pans for 10-15 minutes. Then, carefully invert them onto a wire rack to cool completely before frosting.
- While cakes cool, make the frosting. In a clean mixer bowl, beat the cream cheese and butter together on medium-high speed until smooth and creamy (about 3 minutes).
- Reduce speed to low and gradually add the powdered sugar, one cup at a time. Once incorporated, add the vanilla and a pinch of salt. Increase speed to high and whip for 2-3 minutes until fluffy and white.
- To assemble, place one cake layer on a serving plate or turntable. Spread a generous layer of frosting on top. Repeat with the second layer. Top with the third layer, bottom side up for a flat top.
- Apply a thin ‘crumb coat’ of frosting over the entire cake to trap any loose crumbs. Refrigerate for 20 minutes.
- Apply the remaining frosting generously over the top and sides, smoothing with an offset spatula or bench scraper for a professional finish.
Expert Cooking Tips
- ✓Room temperature ingredients are non-negotiable; cold eggs or dairy will cause the batter to curdle.
- ✓Weigh your flour using a kitchen scale for the most accurate results; too much flour leads to a dry cake.
- ✓Do not overmix the batter once the flour is added, or you will develop gluten and create a tough texture.
- ✓Use ‘full-fat’ block cream cheese for the frosting; tub varieties or low-fat versions are too watery.
- ✓Tap the cake pans on the counter before baking to release large air bubbles.
- ✓If the cake tops are domed, use a serrated knife to level them before stacking.
- ✓Chill the cake for 30 minutes before slicing to get clean, sharp cuts.
Substitutions and Variations
If you cannot find cake flour, you can make a substitute by removing 2 tablespoons of all-purpose flour from every cup and replacing it with 2 tablespoons of cornstarch; sift well to combine. If buttermilk is unavailable, make ‘sour milk’ by adding 1 tablespoon of lemon juice or white vinegar to a measuring cup and filling it to the 1 1/4 cup line with whole milk; let it sit for 5 minutes. You can replace vegetable oil with melted coconut oil or grapeseed oil, though coconut oil may impart a slight flavor. For a dairy-free version, use high-quality plant-based butter and a thick dairy-free yogurt instead of buttermilk, though the texture may vary slightly. In the frosting, mascarpone cheese can be used as a milder alternative to cream cheese, but it is softer, so you may need more powdered sugar to stabilize it.
Common Mistakes to Avoid
The most common mistake is scooping flour directly with the measuring cup, which packs it down and leads to a dry, dense cake; always spoon and level or weigh your flour. Another pitfall is using cold butter or cream cheese for the frosting, resulting in a lumpy texture that is impossible to smooth out. Opening the oven door too early to check on the cake can cause the center to collapse due to a sudden drop in temperature. Finally, frosting the cakes before they are completely cool is a disaster waiting to happen—the frosting will melt and the layers will slide apart. Patience is key.
Serving Suggestions
Serve this cake at room temperature to ensure the frosting is silky and the crumb is soft. It pairs beautifully with fresh berries (strawberries, raspberries, or blueberries) which add a tart contrast to the sweet frosting. A drizzle of salted caramel or a dollop of lemon curd on the side can elevate the dessert for a dinner party. For beverages, a glass of cold milk is classic, but it also goes wonderfully with a hot cup of Earl Grey tea or a flute of dry champagne for celebrations.
Storage and Reheating Tips
Store the frosted cake in the refrigerator due to the cream cheese in the frosting. It will keep well for up to 5 days in an airtight cake carrier or covered with plastic wrap. However, cake is best eaten at room temperature, so remove slices from the fridge 30-60 minutes before serving. Unfrosted cake layers can be wrapped tightly in plastic wrap and frozen for up to 3 months. Thaw frozen layers in the refrigerator overnight before assembling.
Nutrition Facts (Estimated)
| Serving Size | 1 slice |
| Calories | 580 |
| Fat | 32g |
| Saturated Fat | 16g |
| Unsaturated Fat | 14g |
| Trans Fat | 0g |
| Cholesterol | 95mg |
| Sodium | 310mg |
| Carbohydrates | 68g |
| Fiber | 0.5g |
| Sugar | 42g |
| Protein | 6g |
Frequently Asked Questions
Can I make this cake ahead of time?
Yes! You can bake the layers 1-2 days in advance, wrap them tightly in plastic, and store them at room temperature or in the fridge. The flavor often develops even better the next day.
Why did my cake sink in the middle?
This usually happens if the oven door was opened too early, the oven wasn’t fully preheated, or there was too much leavening (baking powder/soda) used. Ensure your oven temperature is accurate with an oven thermometer.
Can I turn this into cupcakes?
Absolutely. This recipe yields approximately 24-30 standard cupcakes. Bake them at 350°F for 18-22 minutes.
My frosting is too runny, what do I do?
If the frosting is too soft, chill it in the fridge for 20 minutes. If it’s still runny, add more sifted powdered sugar, 1/4 cup at a time, until it reaches the desired consistency.
Can I use salted butter instead of unsalted?
You can, but you should reduce the added salt in the recipe to 1/2 tsp. Unsalted butter is preferred because it gives you total control over the sodium level.
How do I get flat layers without cutting?
You can use ‘cake strips’—damp fabric strips wrapped around the outside of the pan. They cool the edges of the pan, preventing the outside from setting too fast, which forces the center to dome.
Why is my cake dry?
Overbaking is the usual culprit. Start checking for doneness 5 minutes before the recipe states. Also, ensure you didn’t over-measure the flour.
Can I use a 9-inch pan instead?
Yes, you can use two 9-inch pans instead of three 8-inch pans. The bake time may need to be increased slightly, by about 5 minutes.
Conclusion
This Moist Vanilla Layer Cake with Cream Cheese Frosting is more than just a recipe; it is a reliable companion for life’s celebrations. The combination of the plush, buttery crumb and the tangy, velvety frosting creates a dessert experience that feels both luxurious and comfortably homemade. By following the tips and techniques outlined above, you are guaranteed a result that rivals any high-end bakery. Whether you are baking for a birthday, an anniversary, or simply to brighten a gloomy weekend, this cake promises to deliver joy in every bite. Happy baking!

