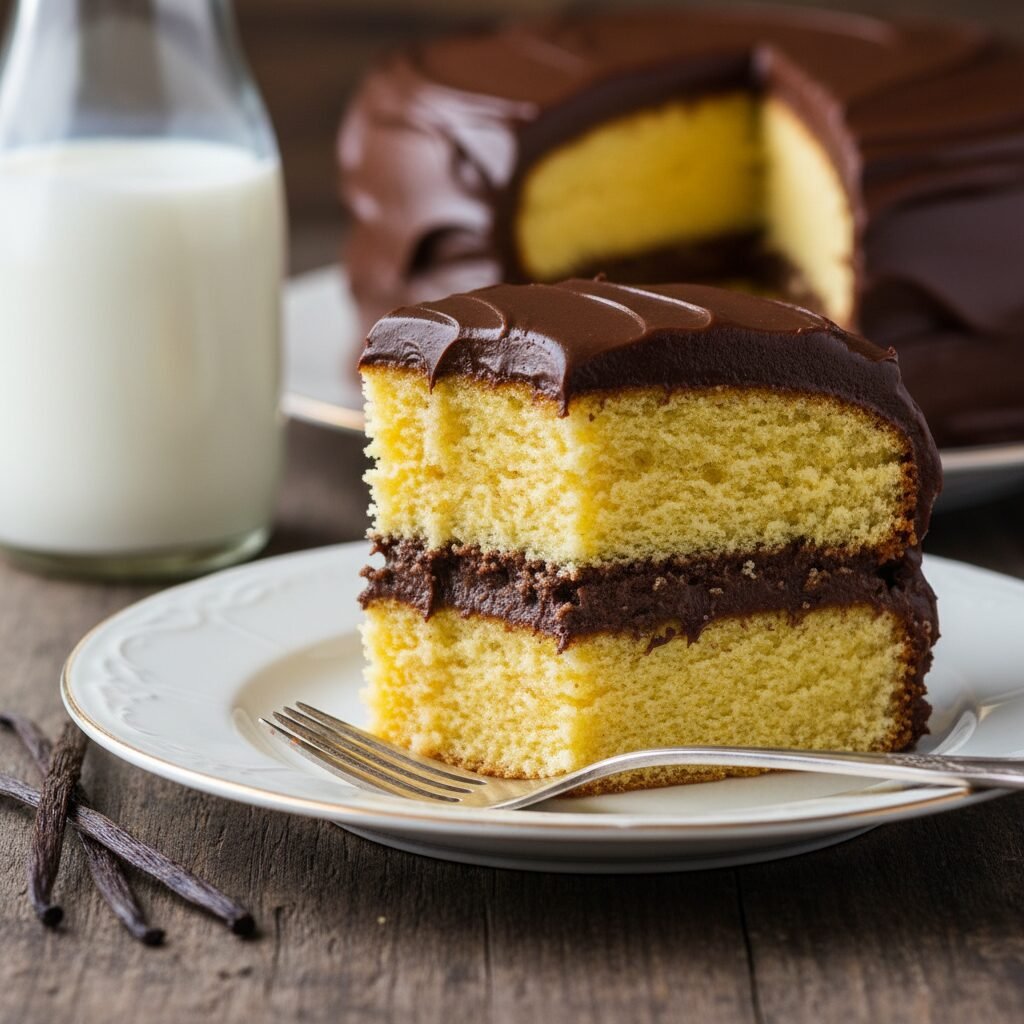
Moist Yellow Layer Cake Recipe
Ditch the box mix forever with this incredibly tender, buttery, and moist yellow layer cake recipe. Paired with a luscious, whipped chocolate fudge frosting, this classic dessert evokes the nostalgia of childhood birthdays while delivering a sophisticated, bakery-quality texture made entirely from scratch.
30 minutes
30 minutes
1 hour 30 minutes
12-16 servings (Two 8-inch or 9-inch rounds)
Dessert
Baking
American
Vegetarian
There is something undeniably comforting about a classic yellow cake. It is the quintessential American birthday cake, the centerpiece of potlucks, and the standard by which all other cakes are often measured. While chocolate cake has its devotees and white cake offers a pristine elegance, yellow cake strikes a perfect, golden balance. It offers a rich, custard-like vanilla flavor derived from whole eggs and egg yolks, distinct from the delicate almond or pure vanilla notes of a white cake. However, finding a scratch recipe that rivals the supernatural moistness of a box mix has historically been a challenge for home bakers—until now.
This recipe is the result of extensive testing to solve the ‘dry cake’ dilemma. Many homemade yellow cakes turn out dense, cornbread-like, or dry within a day. This version, however, utilizes a specific combination of fats and dairy to ensure a crumb that is soft, plush, and stays moist for days. We are looking for a texture that is sturdy enough to stack and frost without crumbling, yet tender enough to melt in your mouth. The flavor profile is deeply buttery with a heavy hit of high-quality vanilla extract, providing that nostalgic aroma that fills the kitchen as it bakes.
When paired with the accompanying homemade chocolate buttercream, this cake becomes a masterpiece of contrast. The sweet, golden sponge cuts through the richness of the cocoa, creating a bite that is balanced and deeply satisfying. Whether you are celebrating a milestone birthday or simply craving a slice of comfort on a Tuesday night, this moist yellow layer cake is guaranteed to become your new go-to standard, proving once and for all that homemade is always better than the box.
History & Origins
The history of the ‘yellow cake’ is deeply intertwined with the evolution of baking technology and American culinary culture. Before the mid-19th century, cakes were primarily leavened with yeast (like brioche) or by mechanically beating egg whites to create a foam (like sponge cakes). The invention of chemical leaveners—specifically baking powder in the 1840s and 1850s—revolutionized home baking. It allowed for the creation of ‘butter cakes,’ where butter and sugar were creamed together, and chemical agents provided the lift. This method was far more reliable and less labor-intensive than the foam method.
Yellow cake specifically differentiates itself from white cake based on the use of eggs. In the late 19th and early 20th centuries, recipes like the ‘1-2-3-4 Cake’ (1 cup butter, 2 cups sugar, 3 cups flour, 4 eggs) became staples in American households. White cakes utilized only egg whites to achieve a pale color, reserved for weddings and formal occasions, while yellow cakes utilized the whole egg, and often extra yolks, giving them their signature golden hue and richer flavor. This made them the standard ‘everyday’ or celebration cake for families.
The cultural archetype of the yellow cake was further cemented in the post-WWII era. In the late 1940s, companies like General Mills (Betty Crocker) and Pillsbury introduced cake mixes to a convenience-obsessed market. The ‘Yellow Cake Mix’ became the flavor profile most Americans grew up with—ultra-moist, distinctively vanilla-forward, and very tender. While these mixes offered consistency, they often lacked the depth of flavor found in scratch baking. Today, the modern craft baking movement seeks to reclaim that history, using high-quality butter and vanilla to recreate the nostalgic profile of the mid-century yellow cake without the artificial preservatives.
Why This Recipe Works
This recipe succeeds where others fail due to a carefully engineered balance of fats, flour type, and mixing method. First, we use a combination of unsalted butter and vegetable oil. Butter is non-negotiable for flavor; it provides that milky, rich taste that defines a yellow cake. However, butter is 80% fat and 20% water, and it solidifies at room temperature, which can lead to a drier texture. Vegetable oil remains liquid at room temperature, coating the flour proteins and ensuring the cake stays sensationally moist and soft days after baking. By using both, we get the best of both worlds: superior flavor and lasting moisture.
Secondly, the inclusion of buttermilk and sour cream is critical. The acidity in these dairy products reacts with the baking soda to create a powerful lift, but more importantly, the acid breaks down gluten strands, resulting in a significantly more tender crumb. We also use cake flour rather than all-purpose flour. Cake flour has a lower protein content (usually around 7-9%), which minimizes gluten formation, preventing the cake from becoming tough or bread-like.
Finally, the egg strategy is specific: we use whole eggs plus extra egg yolks. The whites provide structure, but the yolks provide fat, emulsifiers (lecithin), and that signature yellow color. The extra yolks add a richness that mimics a custard, contributing to a velvety mouthfeel that a standard whole-egg cake simply cannot achieve.
Why You’ll Love This Recipe
- ✓Uses both butter and oil for maximum flavor and moisture retention.
- ✓Extra egg yolks create a rich, custard-like consistency and golden color.
- ✓Sturdy enough for layer cakes but tender enough for cupcakes.
- ✓Stays soft and fresh for up to 4 days at room temperature.
- ✓Paired with a silky, whipped chocolate buttercream that isn’t overly gritty.
Equipment You’ll Need
- ✓Stand mixer with paddle attachment or electric hand mixer
- ✓Two 8-inch or 9-inch round cake pans
- ✓Parchment paper
- ✓Digital kitchen scale (highly recommended)
- ✓Wire cooling racks
- ✓Offset spatula
- ✓Sifter or fine-mesh sieve
- ✓Rubber spatula
Ingredients
- ✓2 ½ cups (300g) Cake flour, sifted
- ✓2 teaspoons Baking powder
- ✓½ teaspoon Baking soda
- ✓1 teaspoon Fine sea salt
- ✓¾ cup (170g) Unsalted butter, softened to room temperature
- ✓¼ cup (60ml) Vegetable oil or canola oil
- ✓1 ½ cups (300g) Granulated sugar
- ✓3 Large eggs, room temperature
- ✓2 Large egg yolks, room temperature
- ✓1 tablespoon Pure vanilla extract
- ✓¾ cup (180ml) Buttermilk, room temperature
- ✓½ cup (120g) Sour cream, room temperature
- ✓FOR THE FROSTING:
- ✓1 ½ cups (340g) Unsalted butter, softened
- ✓¾ cup (65g) Unsweetened cocoa powder (Dutch-process preferred)
- ✓4-5 cups (480g-600g) Powdered sugar, sifted
- ✓¼ cup (60ml) Heavy cream
- ✓2 teaspoons Pure vanilla extract
- ✓Pinch of salt
Instructions
- 1. PREHEAT & PREP: Preheat your oven to 350°F (175°C). Grease two 8-inch or 9-inch round cake pans generously with butter or baking spray. Line the bottoms with parchment paper rounds to guarantee easy removal. Dust the sides with a little flour, tapping out the excess.
- 2. WHISK DRY INGREDIENTS: In a medium bowl, sift together the cake flour, baking powder, baking soda, and salt. Whisk well to ensure the leavening agents are evenly distributed. Set aside.
- 3. CREAM BUTTER & SUGAR: In the bowl of a stand mixer fitted with the paddle attachment (or using a hand mixer), beat the softened butter, vegetable oil, and granulated sugar on medium-high speed. Beat for a full 4-5 minutes until the mixture is very pale, fluffy, and aerated. Scrape down the sides of the bowl.
- 4. ADD EGGS: Reduce the mixer speed to medium. Add the eggs and egg yolks one at a time, beating well after each addition. Wait until each egg is fully incorporated before adding the next. Stir in the vanilla extract.
- 5. COMBINE WET & DRY: In a small bowl or measuring cup, whisk together the buttermilk and sour cream. Reduce the mixer speed to the lowest setting. Add the flour mixture in three parts, alternating with the buttermilk mixture in two parts (Flour -> Buttermilk -> Flour -> Buttermilk -> Flour).
- 6. FINAL MIX: Mix only until the last streaks of flour disappear. Do not overmix! Stop the mixer and finish folding the batter by hand with a rubber spatula, scraping the bottom of the bowl to ensure no dry pockets remain.
- 7. BAKE: Divide the batter evenly between the prepared cake pans (use a kitchen scale for precision). Bake for 28-32 minutes, or until a toothpick inserted into the center comes out clean or with just a few moist crumbs attached. The tops should spring back when gently pressed.
- 8. COOL: Remove cakes from the oven and let them cool in the pans for 15 minutes. Run a knife around the edges, then invert them onto a wire rack to cool completely before frosting.
- 9. MAKE FROSTING: While cakes cool, make the buttercream. Beat the butter on medium-high speed until creamy (2 mins). Add the cocoa powder and mix on low until combined. Gradually add powdered sugar, one cup at a time, alternating with the heavy cream. Add vanilla and salt. Whip on high speed for 3 minutes until fluffy.
- 10. ASSEMBLE: Once cakes are completely cool, level the tops if necessary. Place one layer on a serving plate or cake stand. Spread a thick layer of frosting over the top. Place the second layer on top (bottom side up for a flat top). Frost the top and sides of the cake. Decorate as desired.
Expert Cooking Tips
- ✓Room Temperature Ingredients: This is the most critical tip. Cold eggs or dairy will cause the butter to seize and curdle, breaking the emulsion. Ensure everything is at room temp.
- ✓Weigh Your Flour: If you don’t have a scale, spoon the flour into the cup and level it off. Scooping directly packs the flour, leading to a dry cake.
- ✓Don’t Overmix: Once the flour touches the liquid, gluten begins to form. Mix gently on low speed and finish by hand to keep the cake tender.
- ✓Cool Completely: Never try to frost a warm cake; the butter in the frosting will melt, and the layers will slide.
- ✓Chill for Clean Cuts: After frosting, chill the cake for 20 minutes in the fridge to set the buttercream before slicing.
- ✓Use Dutch Process Cocoa: For the frosting, Dutch-process cocoa yields a darker color and a smoother, less acidic chocolate flavor.
Substitutions and Variations
If you do not have cake flour, you can make a substitute: for every 1 cup of all-purpose flour, remove 2 tablespoons of flour and replace them with 2 tablespoons of cornstarch. Sift this mixture 3-4 times to aerate. If you don’t have buttermilk, you can make a ‘sour milk’ by adding 1 tablespoon of white vinegar or lemon juice to a scant cup of whole milk and letting it sit for 5 minutes. You can substitute full-fat plain Greek yogurt for the sour cream if needed. For a dairy-free version, use high-quality plant-based butter sticks, unsweetened almond milk mixed with vinegar (for buttermilk), and a dairy-free sour cream alternative.
Common Mistakes to Avoid
The most common mistake is over-baking. Yellow cake dries out quickly if left in the oven too long; check it 2-3 minutes before the timer goes off. Another issue is using melted butter instead of softened butter; the creaming process relies on solid (but soft) fat to trap air bubbles, which gives the cake lift. Using cold ingredients is another major pitfall that results in a dense, greasy texture because the batter separates. Finally, opening the oven door too early can cause the cake to sink in the middle due to the sudden drop in temperature before the structure has set.
Serving Suggestions
This cake is a showstopper on its own, but it pairs beautifully with a scoop of vanilla bean ice cream or a glass of cold milk. For a festive birthday touch, add rainbow sprinkles to the batter (fold them in at the very end) for a ‘Funfetti’ style cake, or press sprinkles into the sides of the frosting. Fresh berries, particularly raspberries or strawberries, cut through the sweetness of the chocolate frosting and add a fresh element. Serve at room temperature for the best texture; cold butter cake can feel firm.
Storage and Reheating Tips
Store the frosted cake at room temperature in an airtight cake carrier or under a glass dome for up to 4 days. The sugar and fat content act as preservatives. If your kitchen is very hot (over 75°F), store the cake in the refrigerator, but bring it to room temperature for 1-2 hours before serving. To freeze, wrap individual slices tightly in plastic wrap and then foil. They can be frozen for up to 3 months. Thaw on the counter before eating. Unfrosted cake layers can be wrapped in plastic and frozen for up to 2 months.
Nutrition Facts (Estimated)
| Serving Size | 1 slice |
| Calories | 580 |
| Fat | 28g |
| Saturated Fat | 16g |
| Unsaturated Fat | 10g |
| Trans Fat | 0g |
| Cholesterol | 95mg |
| Sodium | 310mg |
| Carbohydrates | 76g |
| Fiber | 2g |
| Sugar | 42g |
| Protein | 6g |
Frequently Asked Questions
Can I bake this recipe as cupcakes?
Yes! This recipe makes approximately 24 standard cupcakes. Bake them at 350°F for 18-22 minutes.
Why did my cake sink in the middle?
This usually happens if the oven door was opened too early, the oven wasn’t hot enough, or there was too much leavening (baking powder/soda). Ensure your oven temperature is accurate using an oven thermometer.
Can I use all-purpose flour instead of cake flour?
You can, but the texture will be slightly denser and more bread-like. Cake flour is highly recommended for that bakery-style, tender crumb.
Can I make this cake ahead of time?
Absolutely. The cake layers actually develop better flavor and structure if wrapped in plastic wrap and stored in the fridge overnight before frosting.
My batter looks curdled after adding eggs. Is it ruined?
No, it’s likely fine! This happens if the eggs were too cold. Keep going; the batter will smooth out once you add the flour.
Can I use 9-inch pans instead of 8-inch?
Yes. The layers will be slightly thinner and may bake 2-4 minutes faster, so keep an eye on them.
What adds the yellow color?
The color comes naturally from the butter and the egg yolks. If you want a deeper yellow color like boxed mixes, you can add a tiny drop of yellow gel food coloring, but it is not necessary.
Can I use salted butter?
If you only have salted butter, reduce the added salt in the recipe to ¼ teaspoon. However, unsalted butter gives you more control over the flavor.
Is the coffee in the frosting necessary?
There is no coffee in this specific frosting recipe, but adding a teaspoon of espresso powder to the chocolate frosting enhances the chocolate flavor without making it taste like coffee.
How do I get flat cake layers?
You can use ‘cake strips’ wrapped around the pan to insulate the edges, or simply use a serrated knife to level the dome off the top of the cooled cakes before stacking.
Conclusion
There is truly no substitute for a homemade yellow cake. The effort of separating eggs and measuring flour is rewarded tenfold with that first bite of tender, vanilla-scented crumb and creamy chocolate frosting. It is a recipe that feels like a celebration, regardless of the occasion. Whether you are a novice baker looking to graduate from box mixes or a seasoned pro hunting for the perfect ‘gold standard’ recipe, this Moist Yellow Layer Cake delivers on every front. Happy baking!

