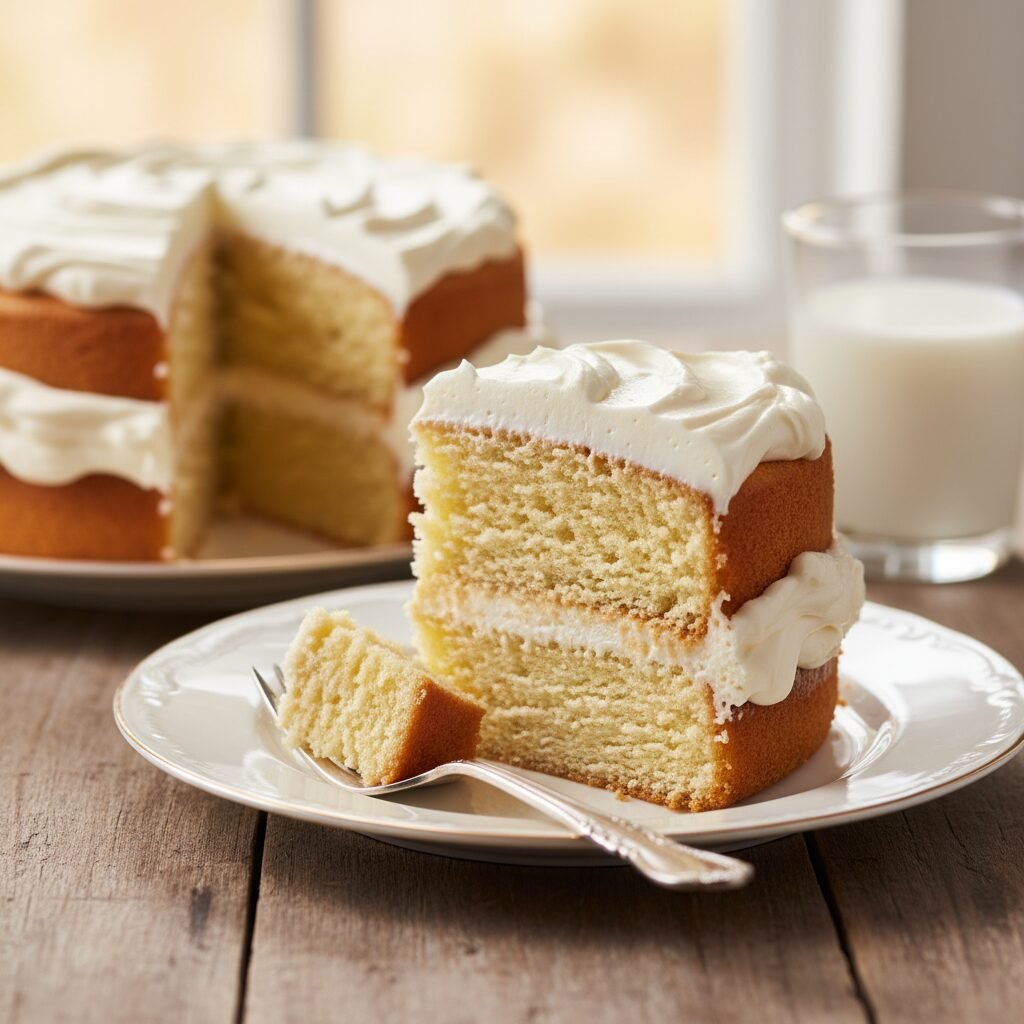
Moist Yellow Layer Cake With Cream Cheese Frosting Recipe
This is the definitive recipe for a classic yellow cake that is incredibly moist, tender, and buttery. Paired with a tangy, velvety cream cheese frosting, this scratch-made dessert rivals any bakery creation and brings a nostalgic, melt-in-your-mouth experience to your table.
45 minutes
30 minutes
1 hour 15 minutes
12-14 Servings
Dessert
Baking
American
Vegetarian
There is something profoundly comforting about a slice of classic yellow cake. It is the quintessential birthday cake, the centerpiece of Sunday dinners, and a symbol of celebration in American households for generations. However, finding a scratch recipe that lives up to the textural promise of a box mix while delivering the superior flavor of homemade baking can be a lifelong quest for many home bakers. Often, homemade yellow cakes can turn out dry, dense, or lacking that distinct buttery richness. This recipe changes everything. We have meticulously tested ratios of fat, flour, and liquid to create a crumb that is soft, plush, and undeniably moist. Unlike standard recipes that rely solely on butter, we utilize a combination of butter and oil to ensure the cake stays soft for days, while buttermilk provides a tenderizing tang that relaxes the gluten strands. But the cake is only half the story. While yellow cake is traditionally paired with chocolate buttercream, we have elevated the flavor profile by frosting it with a luscious, thick Cream Cheese Frosting. The slight tang of the cream cheese cuts through the sweetness of the vanilla cake layers, creating a sophisticated balance that keeps you coming back for ‘just one more sliver.’ Whether you are celebrating a milestone or simply craving a slice of nostalgia, this Moist Yellow Layer Cake with Cream Cheese Frosting is guaranteed to become your new gold standard. It is rich without being heavy, sweet without being cloying, and visually stunning in its golden simplicity.
History & Origins
The concept of ‘yellow cake’ is deeply rooted in the history of American baking, emerging distinctly in the 19th century. Before the advent of baking powder in the mid-1800s, cakes were primarily leavened using yeast or by laboriously beating egg whites to create sponge cakes. As chemical leaveners became commercially available, ‘butter cakes’ became easier to produce. The distinction between white, yellow, and spice cakes came down to the ingredients available and the desired appearance. White cakes utilized only egg whites for a pristine look, often reserved for weddings, while yellow cakes utilized the whole egg, specifically the rich yolks, which were prized for their fat content and the golden hue they imparted to the batter. The mid-20th century saw the rise of industrial cake mixes, which standardized the ‘yellow cake’ as a specific flavor profile—essentially a custard-like vanilla—that many Americans grew up eating. These mixes set a high bar for texture, often using emulsifiers not available to the home cook. This recipe pays homage to that culinary heritage by returning to the foundational ingredients of the 19th century—real butter, fresh eggs, and buttermilk—while employing modern understanding of food chemistry to rival the texture of the industrial mixes. The pairing with cream cheese frosting is a more modern evolution. Cream cheese frosting became iconic in the United States in the 1960s, largely popularized alongside carrot cake. Its migration to yellow cake is a brilliant culinary crossover, merging the southern tradition of rich butter cakes with the tangy, dense frosting that became a staple of American comfort desserts.
Why This Recipe Works
This recipe succeeds where many others fail because it addresses the two biggest complaints about homemade yellow cake: dryness and lack of flavor depth. First, we use a ‘blended fat’ method. Butter is essential for that classic flavor that oil simply cannot replicate. However, butter is about 18-20% water, which evaporates during baking, sometimes leading to a drier crumb. By substituting a portion of the butter with neutral vegetable oil, which is 100% fat and remains liquid at room temperature, we ensure the cake retains a sensation of moistness long after it has cooled. Secondly, the inclusion of buttermilk is non-negotiable. The acidity in buttermilk reacts with the baking soda (and baking powder) to create a robust rise, but more importantly, the acid breaks down long gluten strands, resulting in a tender, melt-in-your-mouth texture rather than a chewy, bread-like one. We also use a combination of whole eggs and extra egg yolks. The extra yolks act as natural emulsifiers, binding the fats and liquids into a smooth batter while adding richness and that signature golden color without needing artificial dyes. Finally, the reverse creaming method—or a modified version where dry ingredients are well-incorporated—ensures a sturdy structure that can hold up the heavy cream cheese frosting without becoming dense.
Why You’ll Love This Recipe
- ✓Incredibly moist texture thanks to a butter-oil blend
- ✓Rich, custard-like vanilla flavor using extra egg yolks
- ✓Tangy cream cheese frosting balances the sweetness
- ✓Sturdy crumb that slices perfectly without crumbling
- ✓Better than box mix flavor with zero preservatives
- ✓Perfect for birthdays, holidays, and celebrations
Equipment You’ll Need
- ✓Two 9-inch round cake pans
- ✓Stand mixer with paddle attachment or electric hand mixer
- ✓Large mixing bowls
- ✓Sifter or fine-mesh sieve
- ✓Wire cooling racks
- ✓Offset spatula
- ✓Parchment paper
- ✓Measuring cups and spoons (or kitchen scale)
Ingredients
- ✓2 1/2 cups Cake flour (sifted)
- ✓1 1/2 cups Granulated sugar
- ✓1 1/2 tsp Baking powder
- ✓1/2 tsp Baking soda
- ✓1/2 tsp Salt
- ✓1/2 cup Unsalted butter (room temperature)
- ✓1/4 cup Vegetable oil (or canola oil)
- ✓2 Large eggs (room temperature)
- ✓2 Large egg yolks (room temperature)
- ✓1 tbsp Pure vanilla extract
- ✓1 cup Buttermilk (room temperature)
- ✓16 oz Full-fat cream cheese (slightly softened)
- ✓1 cup Unsalted butter (for frosting, slightly softened)
- ✓4 cups Powdered sugar (sifted)
- ✓2 tsp Vanilla extract (for frosting)
- ✓Pinch of salt (for frosting)
Instructions
- Preheat your oven to 350°F (175°C). Grease two 9-inch round cake pans with butter or baking spray, line the bottoms with parchment paper rounds, and grease the parchment. Flour the sides of the pans and tap out excess.
- In a medium bowl, sift together the cake flour, baking powder, baking soda, and salt. Set this dry mixture aside.
- In the bowl of a stand mixer fitted with the paddle attachment, beat the 1/2 cup of softened butter, vegetable oil, and granulated sugar on medium-high speed for about 3-4 minutes until the mixture is pale and fluffy. Scrape down the sides of the bowl as needed.
- Reduce the mixer speed to low and add the eggs and egg yolks one at a time, beating well after each addition. Stir in the 1 tablespoon of vanilla extract.
- With the mixer on low speed, add the flour mixture in three parts, alternating with the buttermilk in two parts, starting and ending with the flour. Mix only until just combined; do not overmix or the cake will be tough.
- Divide the batter evenly between the two prepared cake pans. Smooth the tops with a spatula and tap the pans gently on the counter to release any large air bubbles.
- Bake for 28-32 minutes, or until a toothpick inserted into the center comes out clean or with just a few moist crumbs attached. The cakes should spring back lightly when pressed.
- Allow the cakes to cool in the pans for 10-15 minutes, then run a knife around the edges and invert them onto wire racks to cool completely before frosting. They must be cool to the touch.
- To make the frosting: In a clean mixer bowl, beat the 1 cup of butter and 16 oz cream cheese on medium-high speed until completely smooth and creamy (about 3 minutes).
- Reduce speed to low and gradually add the powdered sugar, one cup at a time, until incorporated. Add the vanilla and a pinch of salt.
- Increase speed to medium-high and whip the frosting for 2-3 minutes until it is fluffy and white.
- To assemble: Place one cake layer on your serving plate or cake stand. Spread a generous layer of frosting over the top. Place the second cake layer on top, flat side up. Frost the top and sides of the cake with the remaining frosting.
- Refrigerate the cake for 20 minutes before serving to set the frosting, if desired, or serve immediately.
Expert Cooking Tips
- ✓Room temperature ingredients are critical. Cold eggs or buttermilk can cause the batter to curdle and affect the rise.
- ✓Do not overmix the batter once the flour is added. Overmixing develops gluten, leading to a dense, bread-like cake.
- ✓If you don’t have cake flour, you can make a substitute: measure 1 cup of all-purpose flour, remove 2 tablespoons, and replace with 2 tablespoons of cornstarch. Sift well.
- ✓Weigh your flour if possible. A cup of flour should weigh roughly 120g. Scooping directly can pack the flour and dry out the cake.
- ✓Tap the pans on the counter before baking to remove large air pockets which can cause the cake to bake unevenly.
- ✓Cool the cakes completely before frosting. Even a slightly warm cake will melt the butter in the cream cheese frosting, causing it to slide off.
- ✓For flatter layers, you can use ‘cake strips’ wrapped around the outside of the pans to insulate the edges.
Substitutions and Variations
Baking is a science, so substitutions should be made carefully. If you do not have buttermilk, you can make a ‘sour milk’ substitute by adding 1 tablespoon of white vinegar or lemon juice to a measuring cup and filling it to the 1-cup line with regular whole milk; let it sit for 5 minutes before using. You can substitute the vegetable oil with melted coconut oil, though this may impart a slight coconut flavor. For the frosting, if you find cream cheese too tangy, you can replace half of the cream cheese with more butter for a standard buttercream, or use mascarpone cheese for a milder, creamier flavor. Gluten-free 1:1 baking flour blends generally work well in this recipe, though the texture may be slightly more dense. If you prefer a lighter cake, you can separate the eggs, whip the whites to soft peaks, and fold them in at the end, though this changes the ‘yellow cake’ density slightly.
Common Mistakes to Avoid
The most common mistake is over-baking. Yellow cake dries out quickly if left in the oven too long. Start checking at the 28-minute mark. Another error is using cold butter or cream cheese for the frosting; this results in lumpy frosting that won’t smooth out. Conversely, if the butter is too soft or melted, the frosting will be soupy. Ingredients should be cool room temperature (around 65°F-70°F). Opening the oven door too frequently during the first 20 minutes of baking can cause the cakes to sink in the middle due to the temperature drop. Finally, failing to grease and flour the pans properly can lead to the heartbreaking moment of the cake sticking to the pan when you try to invert it.
Serving Suggestions
This cake is rich and flavorful enough to stand on its own, but it pairs beautifully with fresh berries to cut through the richness. Fresh raspberries, strawberries, or blueberries placed on top or served on the side add a fresh element. A scoop of vanilla bean ice cream is a classic accompaniment. For a birthday celebration, rainbow sprinkles are a must—add them to the batter for a ‘funfetti’ effect or decorate the top. Beverage-wise, this cake goes exceptionally well with a dark roast coffee, a cold glass of milk, or a dry sparkling wine like Prosecco to balance the sweetness.
Storage and Reheating Tips
Because of the cream cheese in the frosting, this cake should be stored in the refrigerator. It can sit out for a few hours during a party, but for long-term storage, keep it chilled. Cover the cake with a cake dome or plastic wrap pressed against the cut sides to prevent drying. It will keep in the fridge for up to 5 days. For best flavor, remove the cake from the fridge 30-60 minutes before serving to allow the frosting and crumb to soften. You can also freeze the baked, unfrosted cake layers for up to 3 months. Wrap them tightly in plastic wrap and then foil. Thaw in the refrigerator overnight before frosting.
Nutrition Facts (Estimated)
| Serving Size | 1 slice |
| Calories | 650 |
| Fat | 34g |
| Saturated Fat | 18g |
| Unsaturated Fat | 14g |
| Trans Fat | 0.5g |
| Cholesterol | 110mg |
| Sodium | 320mg |
| Carbohydrates | 82g |
| Fiber | 1g |
| Sugar | 45g |
| Protein | 6g |
Frequently Asked Questions
Can I bake this in a 9×13 pan instead?
Yes, you can bake this in a 9×13 inch rectangular pan. You will likely need to increase the baking time to 35-40 minutes. Check for doneness with a toothpick.
Why did my cake sink in the middle?
Sinking usually happens if the oven door was opened too early, the oven wasn’t hot enough, or there was too much leavening (baking powder/soda). Ensure your oven temperature is accurate using an oven thermometer.
Can I make this recipe into cupcakes?
Absolutely. This recipe yields approximately 24 standard cupcakes. Bake them at 350°F for 18-22 minutes.
My frosting is too runny, how do I fix it?
If the frosting is too soft, your butter or cream cheese may have been too warm. Put the bowl in the fridge for 20 minutes, then whip again. You can also add a bit more powdered sugar to stiffen it.
Can I use salted butter instead of unsalted?
Yes, but reduce the added salt in the recipe to 1/4 teaspoon to avoid an overly salty cake. Unsalted butter gives you more control over the flavor.
How do I get my frosting super smooth?
Make sure your butter and cream cheese are fully softened. Beat them together for a long time before adding sugar. Sifting the powdered sugar is also crucial to avoid gritty lumps.
Why is my cake dense?
Density is often caused by overmixing the batter after adding the flour, which develops gluten. It can also happen if your baking powder is expired.
Can I freeze the frosted cake?
Yes, place the cake in the freezer uncovered for an hour to harden the frosting, then wrap tightly in plastic wrap and foil. Freeze for up to 2 months. Thaw in the fridge.
Conclusion
This Moist Yellow Layer Cake with Cream Cheese Frosting is more than just a dessert; it is a heartwarming slice of culinary tradition. The combination of the tender, golden crumb and the tangy, rich frosting creates a flavor profile that is both sophisticated and incredibly nostalgic. It is the kind of recipe that gets requested year after year for birthdays and special occasions. By following the tips and techniques outlined above, you can achieve bakery-quality results right in your own kitchen. We hope this cake brings as much joy to your table as it has to ours. Don’t forget to share your creations with us on social media!

